
The best chicken BROODER box & heater
by Jennifer Behm – Chicken farmer| Last Updated 28 February 2021
How do you use a chicken brooder? What is a chicken brooder?
Let's say you've hatched your first generation of chicks, or you've brought them home from the farm. You might be tempted to introduce them right away to your fancy backyard coop, but don't! Before living in a coop, young chicks need to live in a brooder.
Simply put, a chick brooder is essentially the container where your newborn chicks live until they get their adult feathers, at which point it'll be safe to move them outside. The perfect brooder is durable, warm, easy to clean, and keeps all your chicks in one place. It's possible to buy a premade brooder, but they tend to be cheaply-made or insanely expensive. That's why most people opt to build their own chick brooders.
Don't be intimidated. The key features of a brooder are food, water, and heat. With that in mind, it's pretty simple to build a brooder that meets all your chicks' needs. As an added bonus, you might have some of the materials on hand at this very moment. Even if you don't, they're affordable and easy to find.
What You'll Need
- Plastic storage bin
- Incandescent lightbulb
- Dome work lamp with clamp
- Chick feeder/waterer
- Substrate (such as wood shavings, shredded paper, or old towels)
- Thermometer
Read on:

How to Set up a Baby Chick Brooder?
Just how to Set Up a Brooder
Prior to you introduce your chicks to the brooder, a couple of things need to be done. Even if you got all the equipment brand new, wash it down with either some disinfectant or cozy, soapy water to see to it is tidy.
Second of all and most notably, test everything to make sure it functions and also have it functioning prior to you position the chicks in it.
Best brooder box – Kiddie Pool/Stock Tank
Instead of a plastic storage bin, some people may opt for a kiddie pool or stock tank for their chicken brooder box. Like a plastic bin, they're both waterproof and durable. However, they take up much more space and tend to be more expensive. If you're planning to raise less than a handful of chicks at one time, a plastic bin will work just fine.
Best electric chick brooder heater
A chick brooder heater, like this one, is essentially an electronic heater that radiates warmth without creating a hot surface. Most models feature some sort of metal plate covered in ceramic, which chicks can huddle under for warmth without burning themselves the way they could on a standard lightbulb. It's more expensive than using the lightbulb-and-dome-lamp approach, but worth it if you plan to hatch many more generations of chicks in the future.
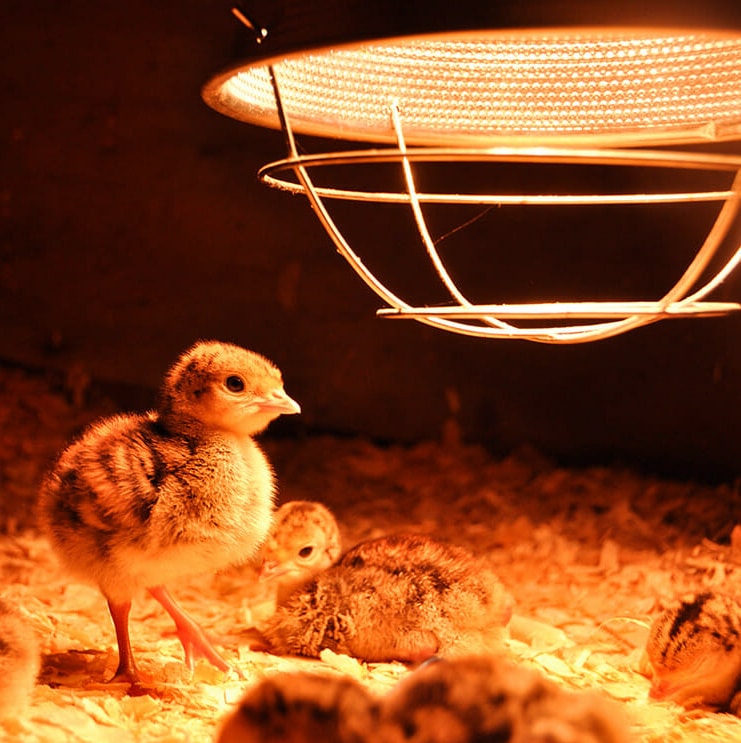
Infrared Heat Lamp for the brooder
You can find infrared heat lamps in pet stores and farm supply stores. Typically, they shine a red light instead of the standard white or yellowish light from incandescent bulbs. Some people prefer infrared bulbs to incandescent because the red light is easier on chicks' eyes, allowing them to sleep better. However, light from incandescent bulbs isn't harmful to chicks, especially if they have an area to escape to.
Best chicken brooder for sale
So what type of brooder should you purchase? The solution will depend upon what you plan to do after this batch of chicks and naturally, finances.
If you totally intend to hatch numerous batches of chicks then it truly does make good sense to purchase a package. See to it has all you require and is really long-lasting. If you don’t want all of the parts after that get what you do require. If on the other hand, you have actually an assigned area all set and some supplies ready– simply buy what you require.
| Image | Product | Top rated |
Premium chick Brooder box 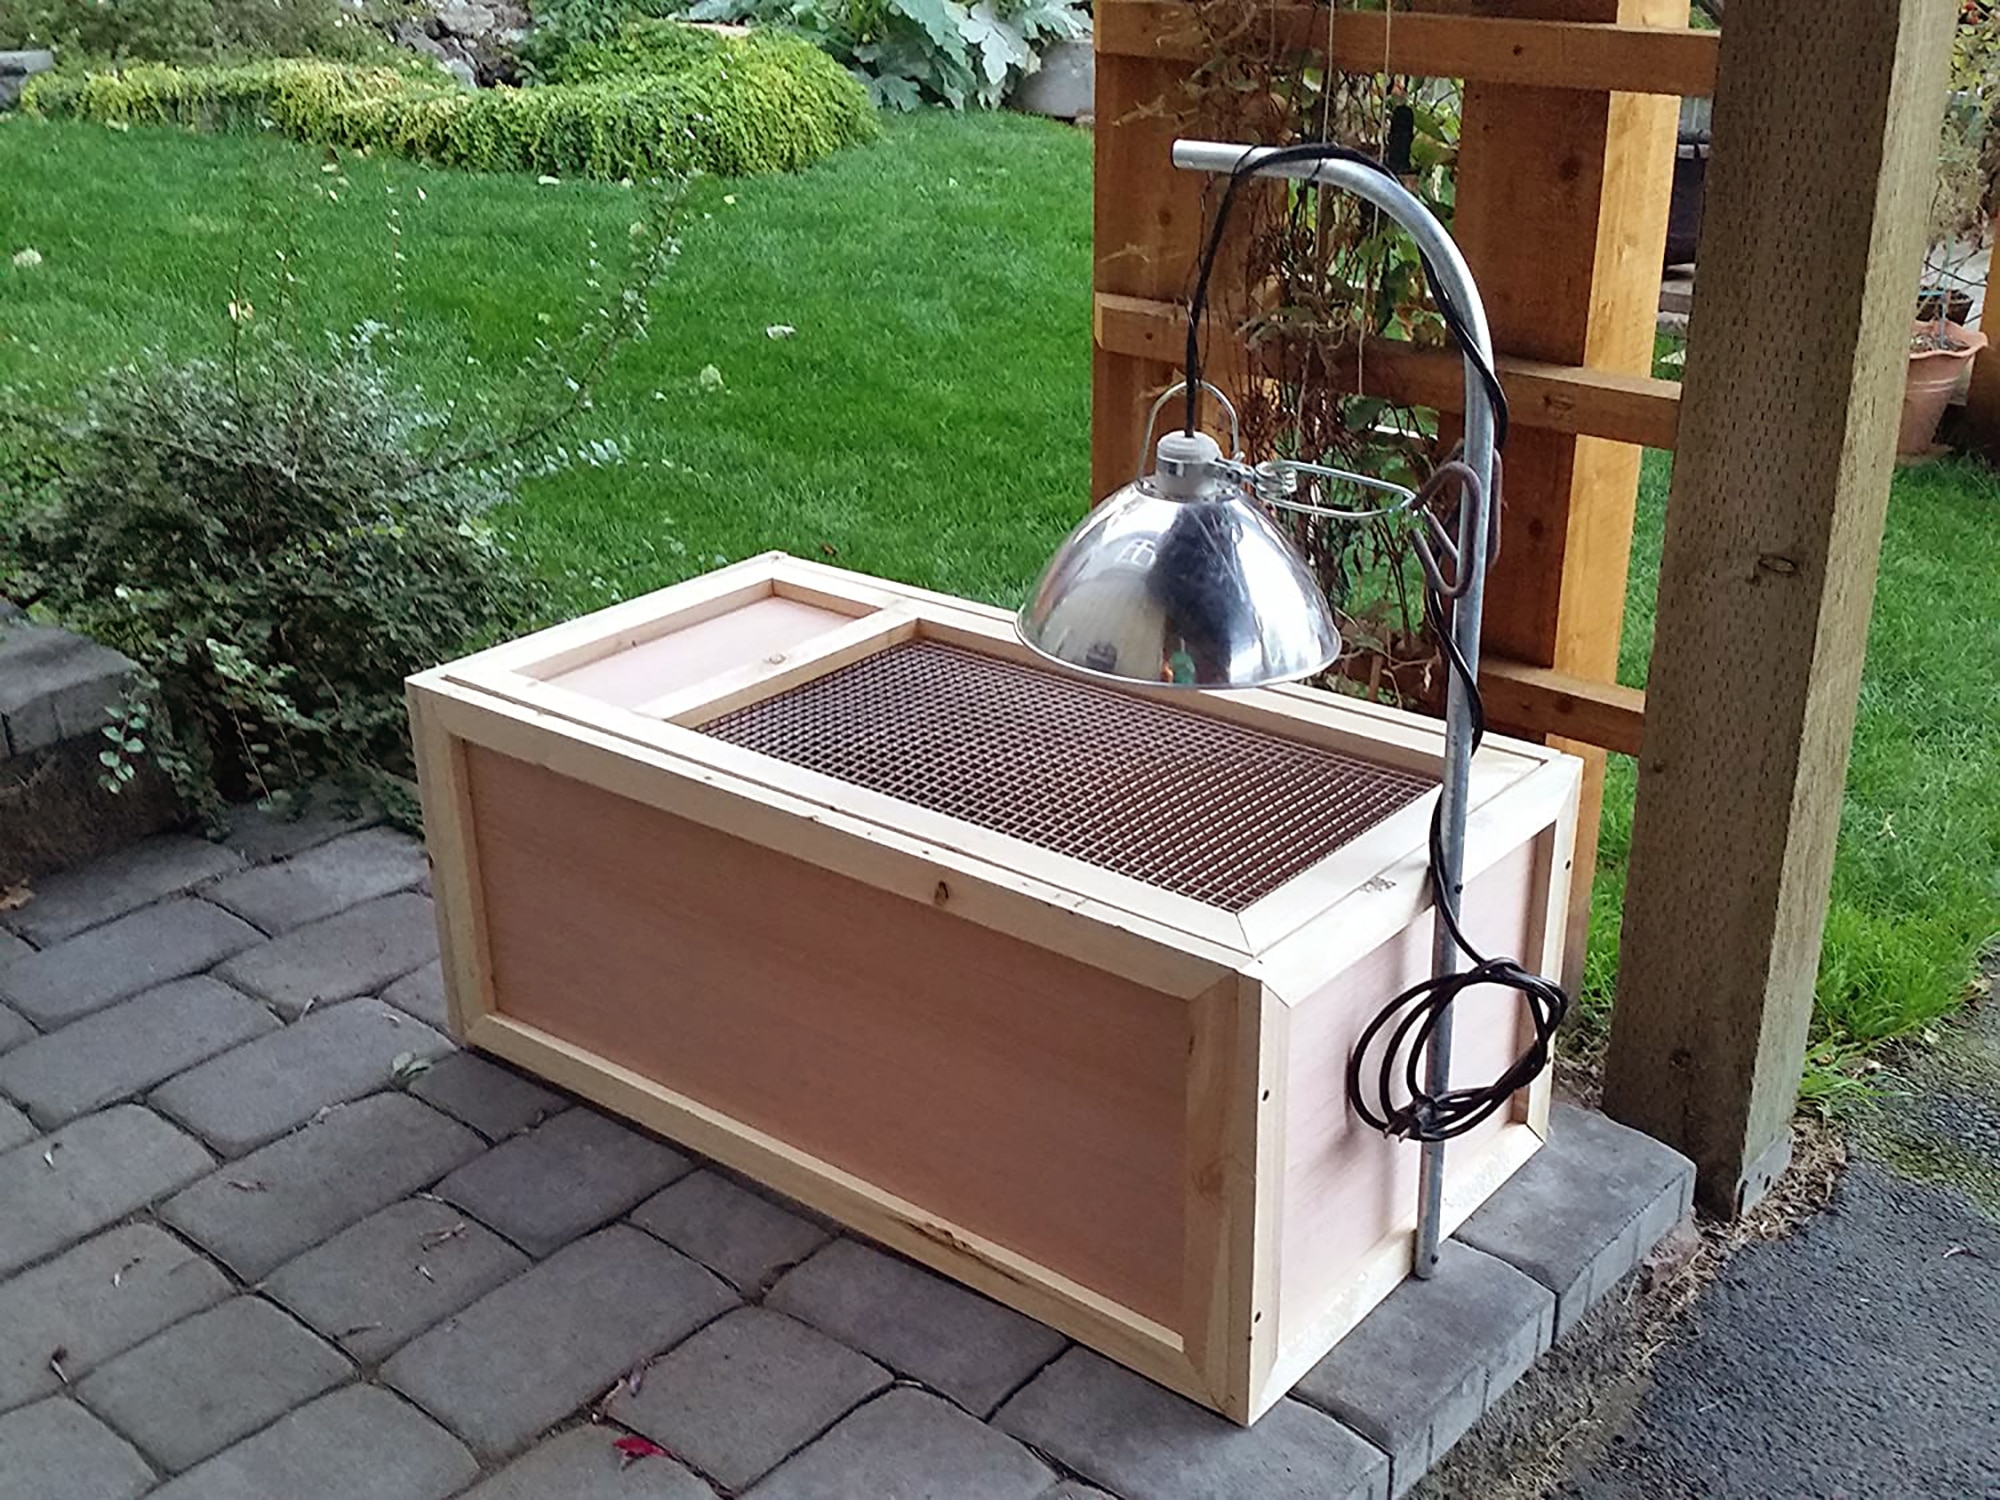 | Brooder Box
| Check Price |
Farm Innovators Model 3700 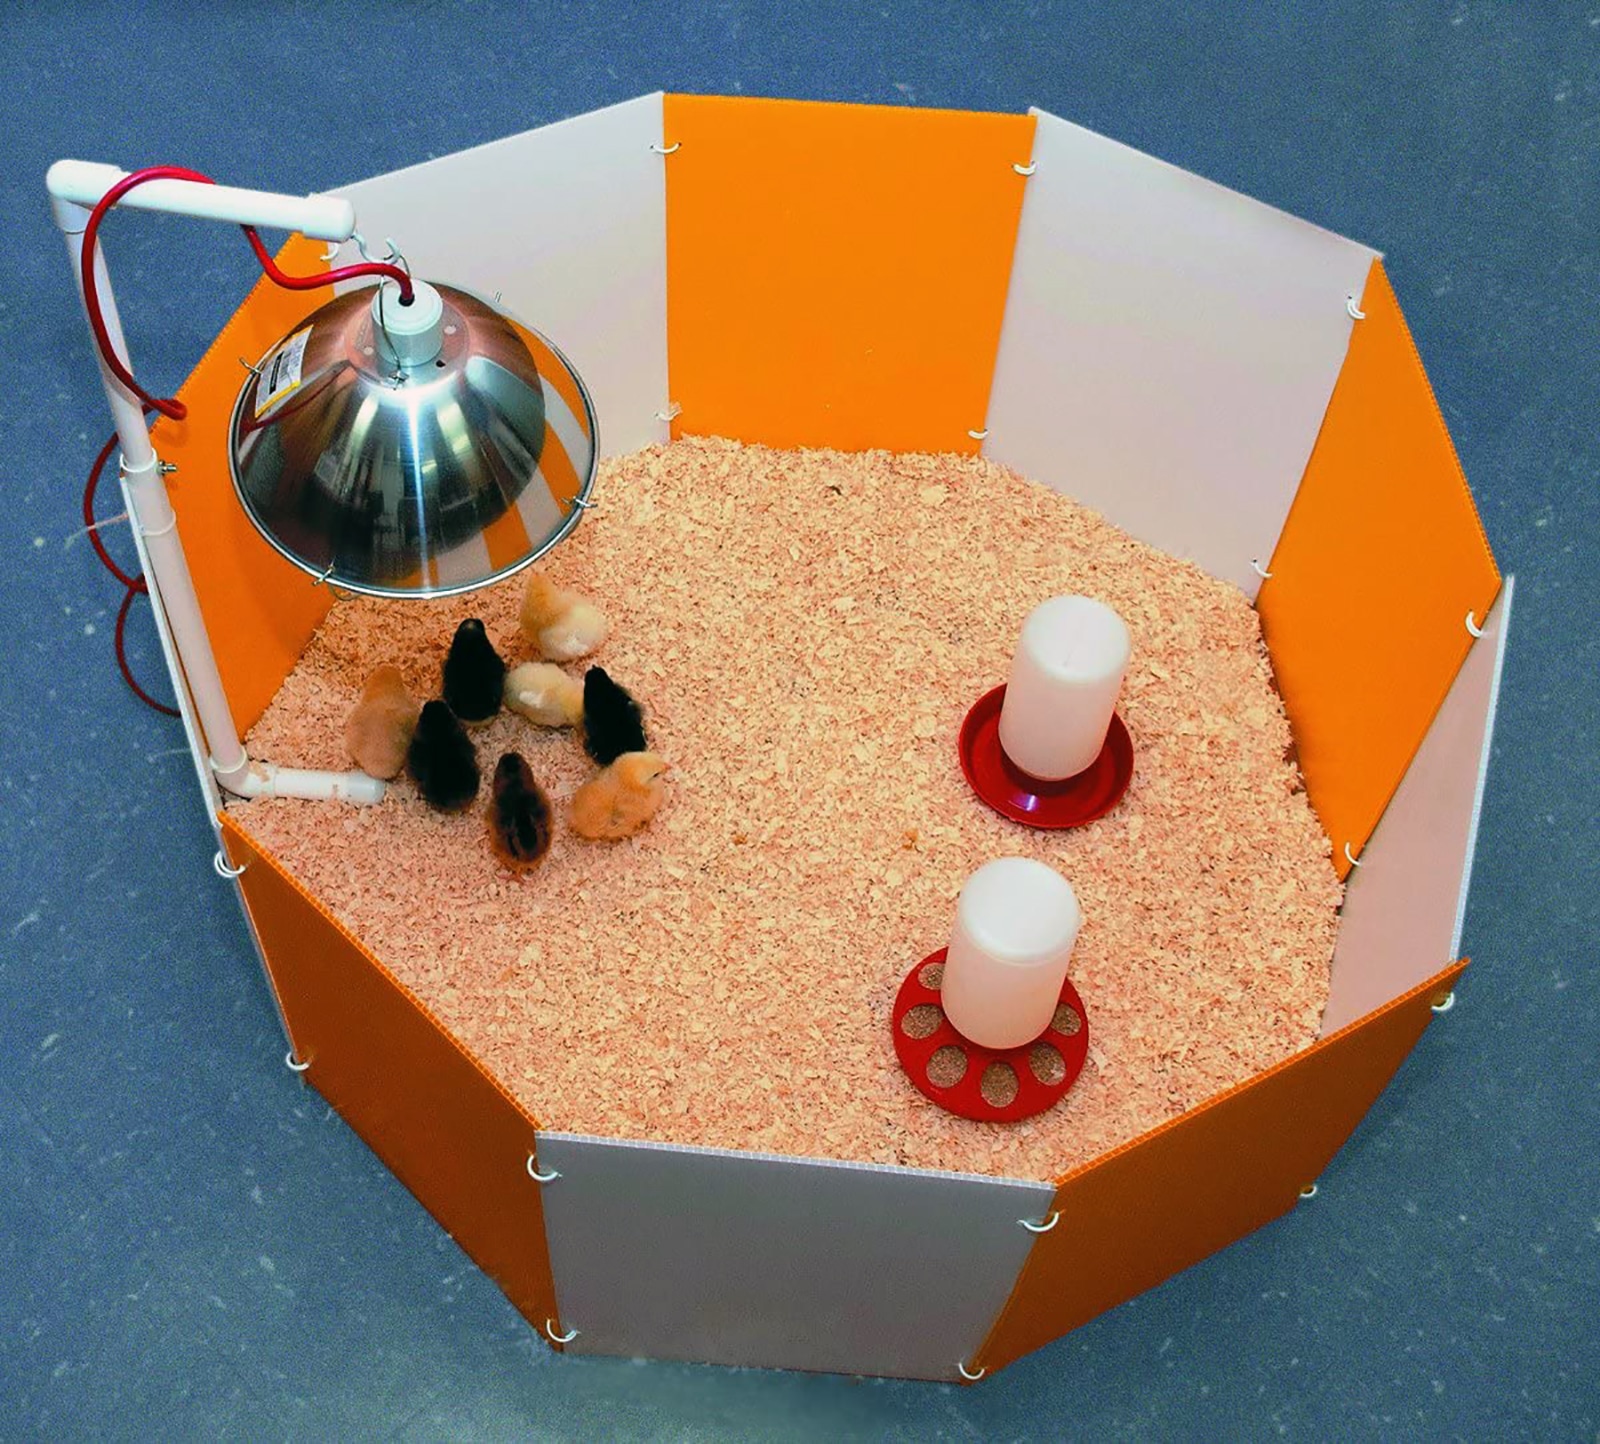 | Baby Chick Starter Home Kit
| Check Price |
Premier Carbon Fiber Heater (600 or 1200 Watt) 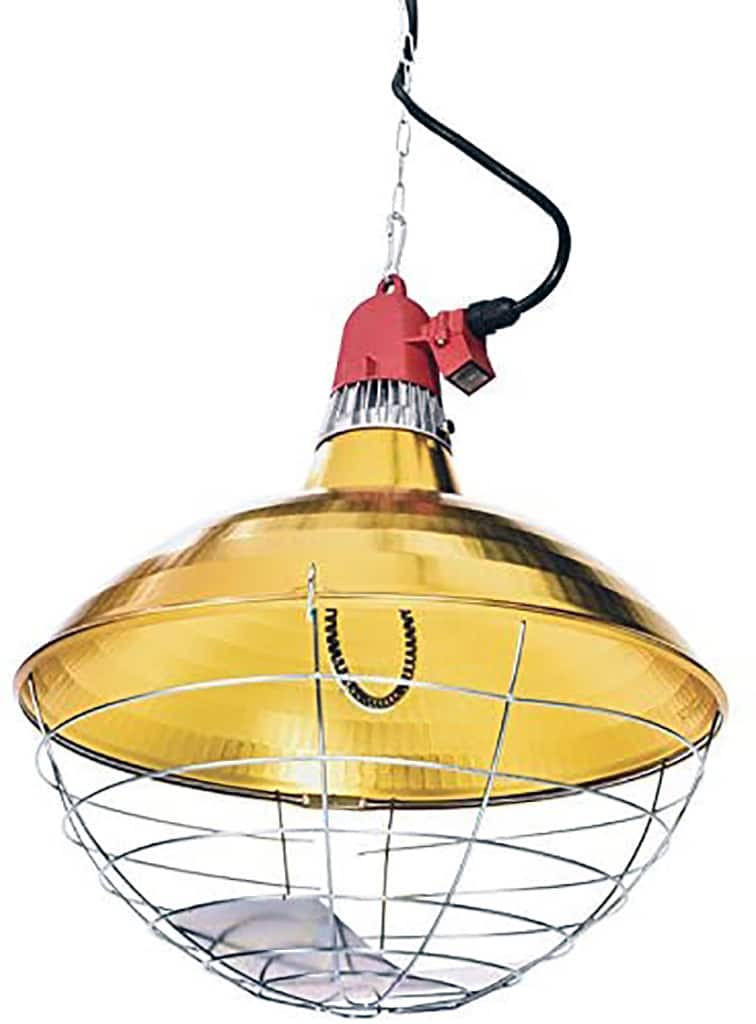 | Heater for Poultry and Livestock
| Check Price |
Brinsea Ecoglow 20 Safety 600 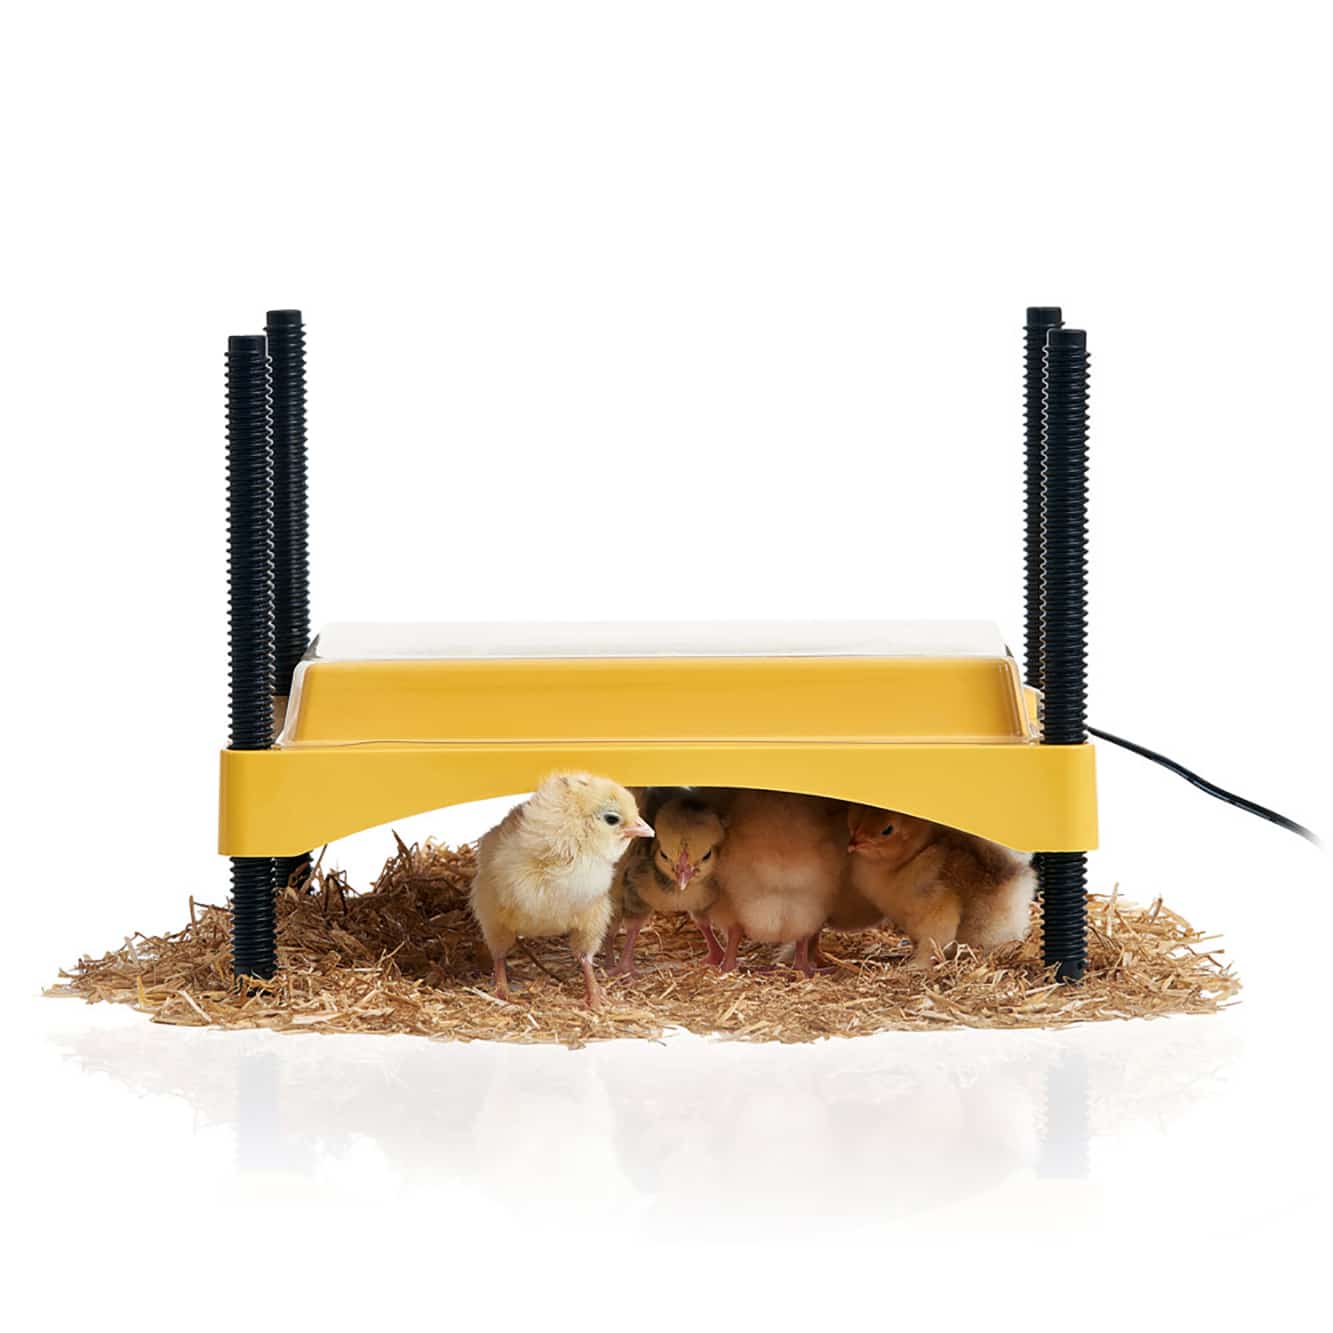 | Brooder for Chicks Or Ducklings
| Check Price |
SWEETER HEATER Overhead 11x16, 50 Watt 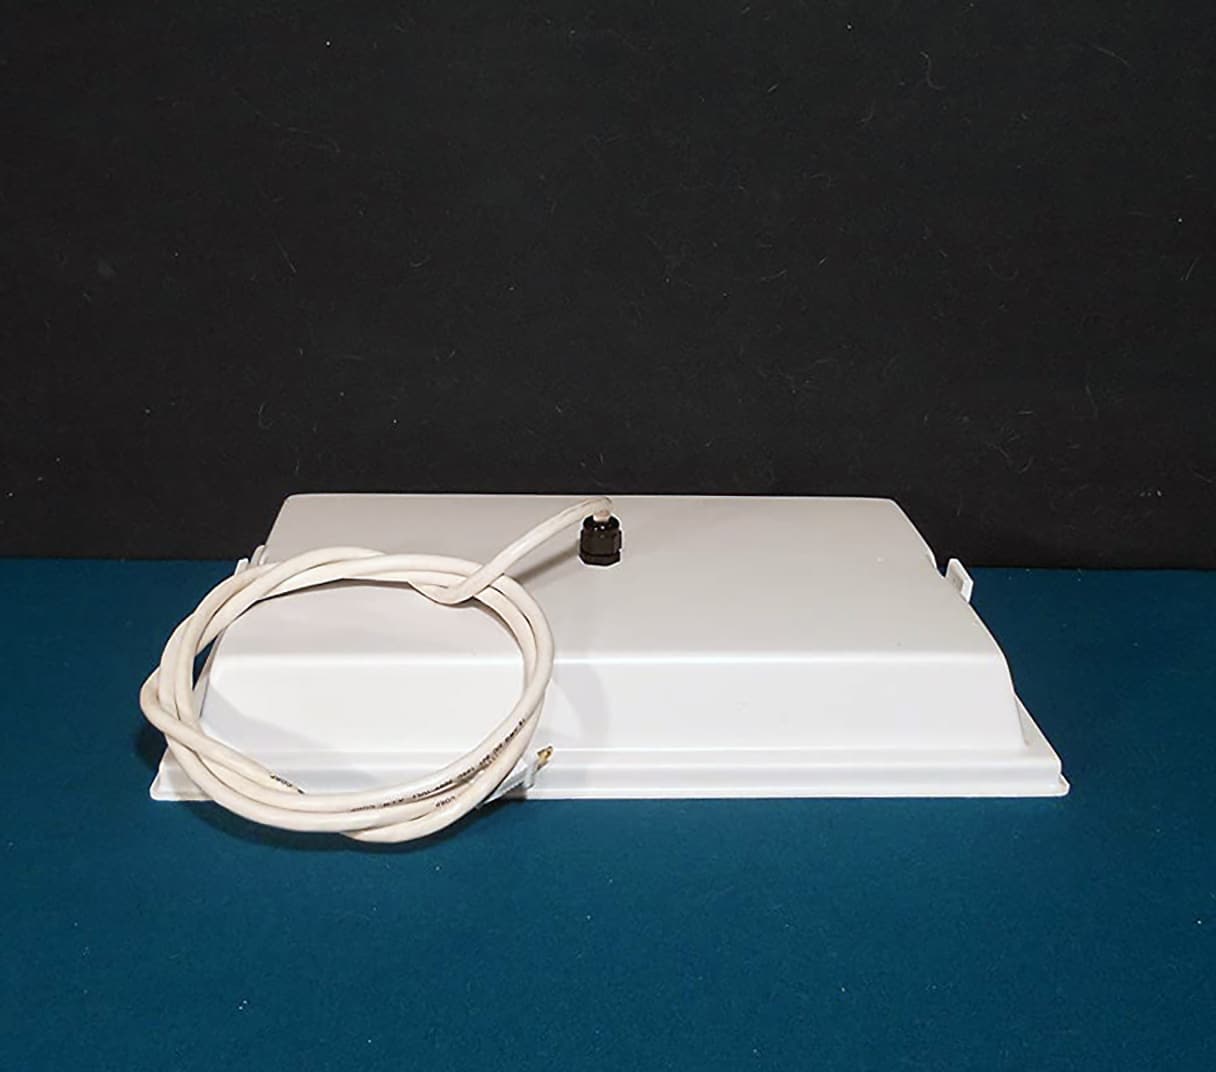 | Infrared Heater for Chicks & Pets
| Check Price |
How to Prepare a Chick Brooder?
1. Choose Your Container
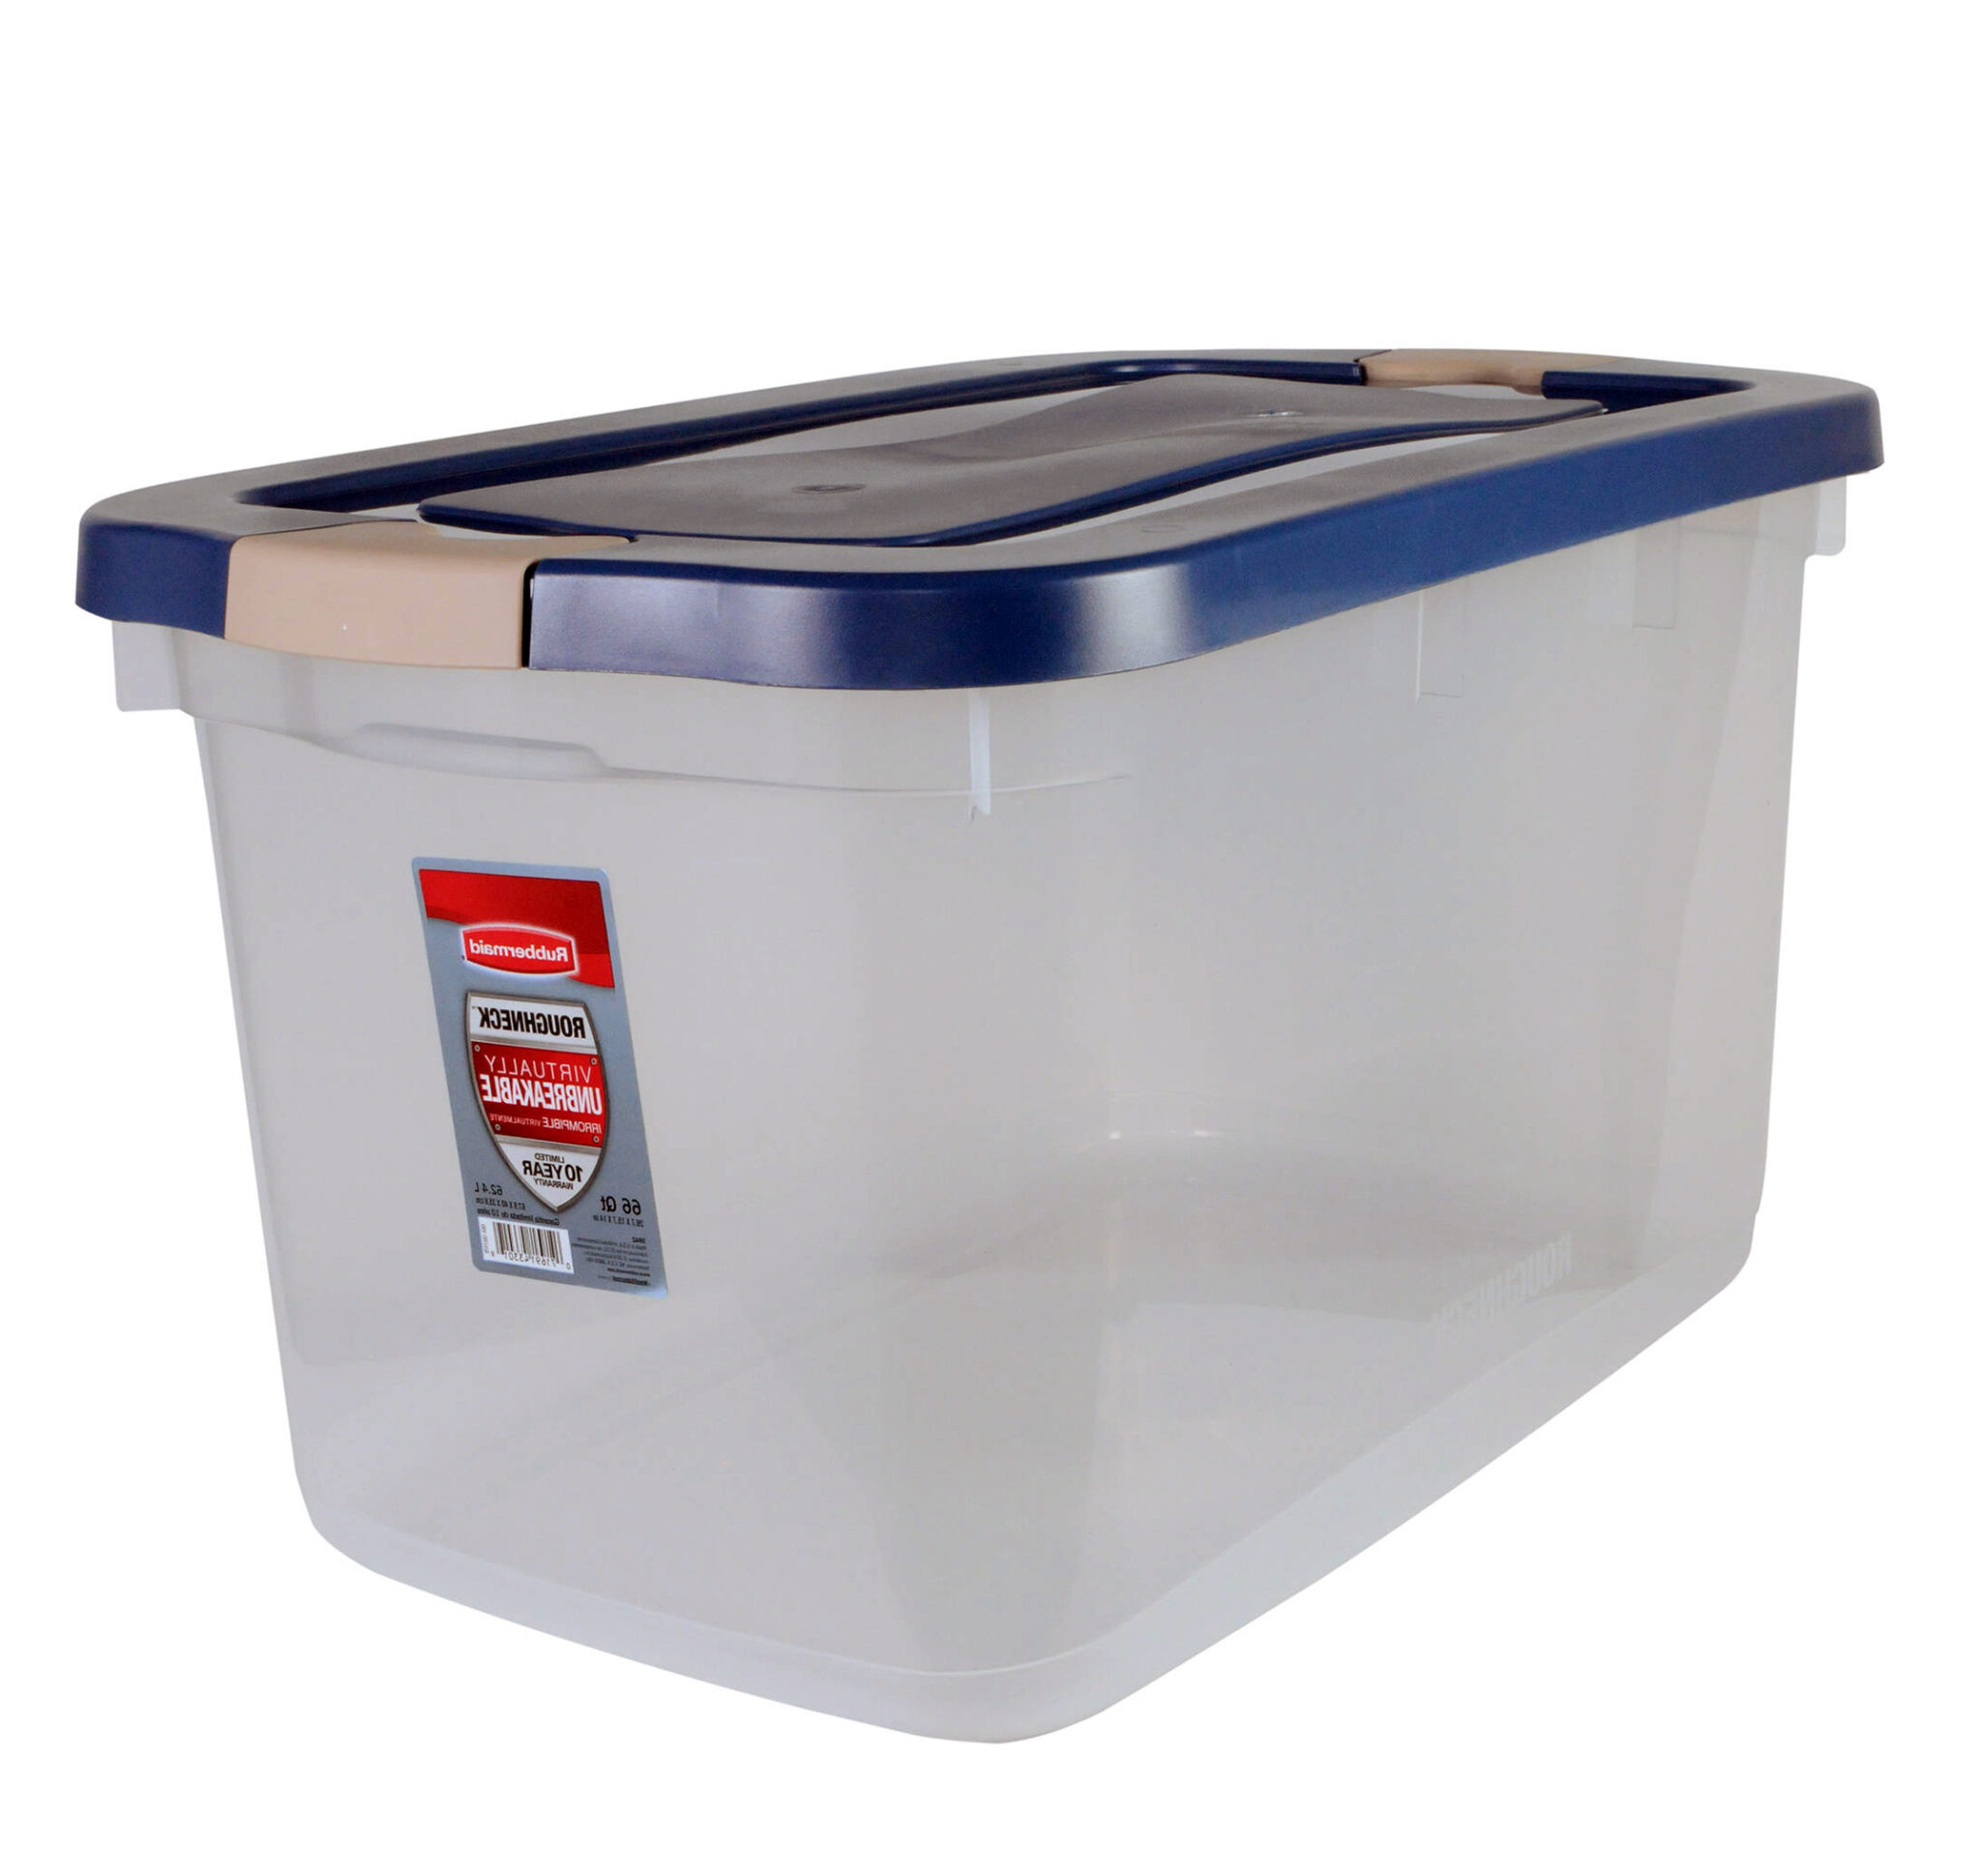
Most people will go for a plastic storage bin. The nonporous surface doesn't absorb odor and is easily wiped clean with some spray and a cloth. Plastic storage bins are also pretty easy to get a hold of. If you don't have one lying around the house, there's probably a store within two miles of you that sells them for an affordable price.
If you're planning to raise ten or more chicks, you'll be better served with a larger container, such as a kiddie pool, stock tank, old dog kennel, etc. You don't want to overcrowd your brooder, and you also want to leave room for chicks to grow. They should have enough room to stretch their wings, walk around comfortably, and then some. Chicks grow a little bit every single day, so a brooder box that's just right at the moment will have to be replaced in only a few days. Err on the side of caution and be sure that your brooder box is slightly larger than what you think you'll need.
2. Line Chicken Brooder Box with Substrate
The substrate has several functions inside of a chick brooder. First, it provides a soft, warm place for chicks to bed down. Second, it catches and absorbs droppings, which comes in handy when it's time to clean the brooder. Third, the substrate provides grip on the floor to help chicks learn to stand. The extra grip can also prevent spraddle leg, a condition in which the legs become malformed, making walking difficult.
The type of substrate is up to you, depending on your budget, preference, and what you have available at home. Paper towels, old terrycloth towels, and shredded paper are all common household items that can be used as substrate. Wood shavings are great as long as it's pine or aspen. Cedarwood has a high oil content, which can harm a young chick's delicate respiratory system.
Whatever substrate you choose, make sure it makes cleaning easier, not harder. Chicks make a lot of droppings. Wood shavings are loose and scoopable, so it's perfect for spot-cleaning. However, it can get kicked out of the brooder by chicks, forcing you to clean outside the brooder along with the inside. On the other hand, old towels have to be completely replaced, but they are cheap and reusable.
Read More from prestigequeen.com :
After every uses a chick brooder and also prior to the following brand-new great deal reaches use it, you ought to thoroughly cleanse as well as disinfect the chick brooder. It is essential to take on the workout with severity to get rid of any kind of microorganisms that can damage new chicks which are a lot more at risk of infection. For that reason, the most effective chick brooder would be the one you can clean up successfully and properly.
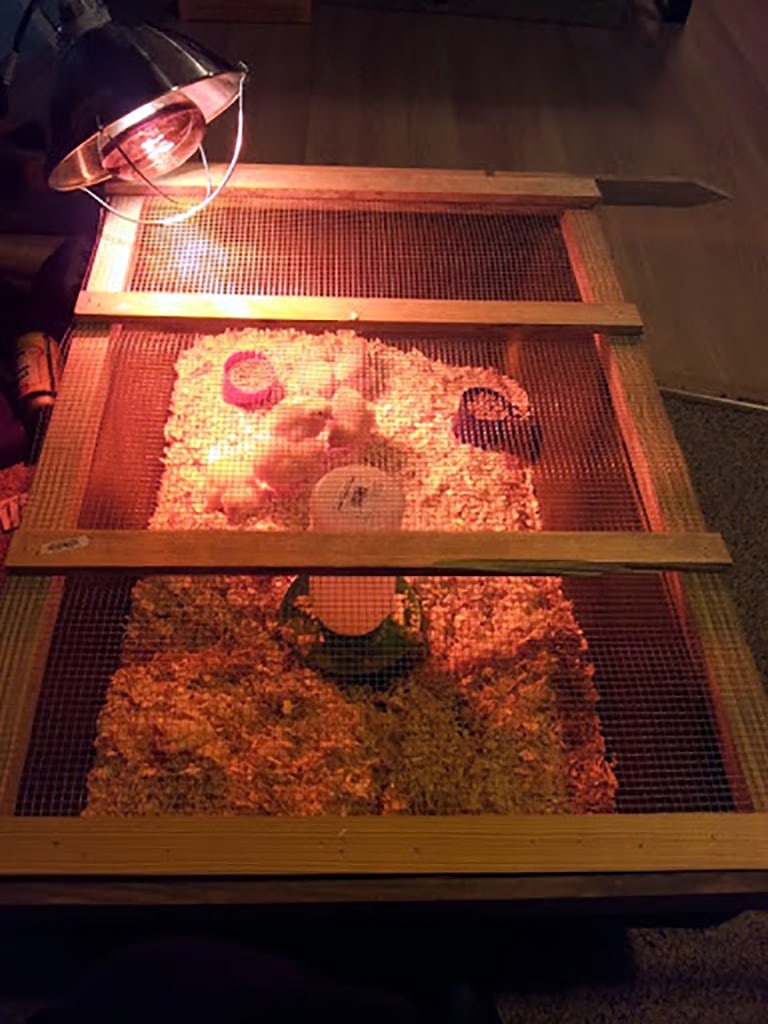
3. Position Lamp Over One Half of Brooder Box
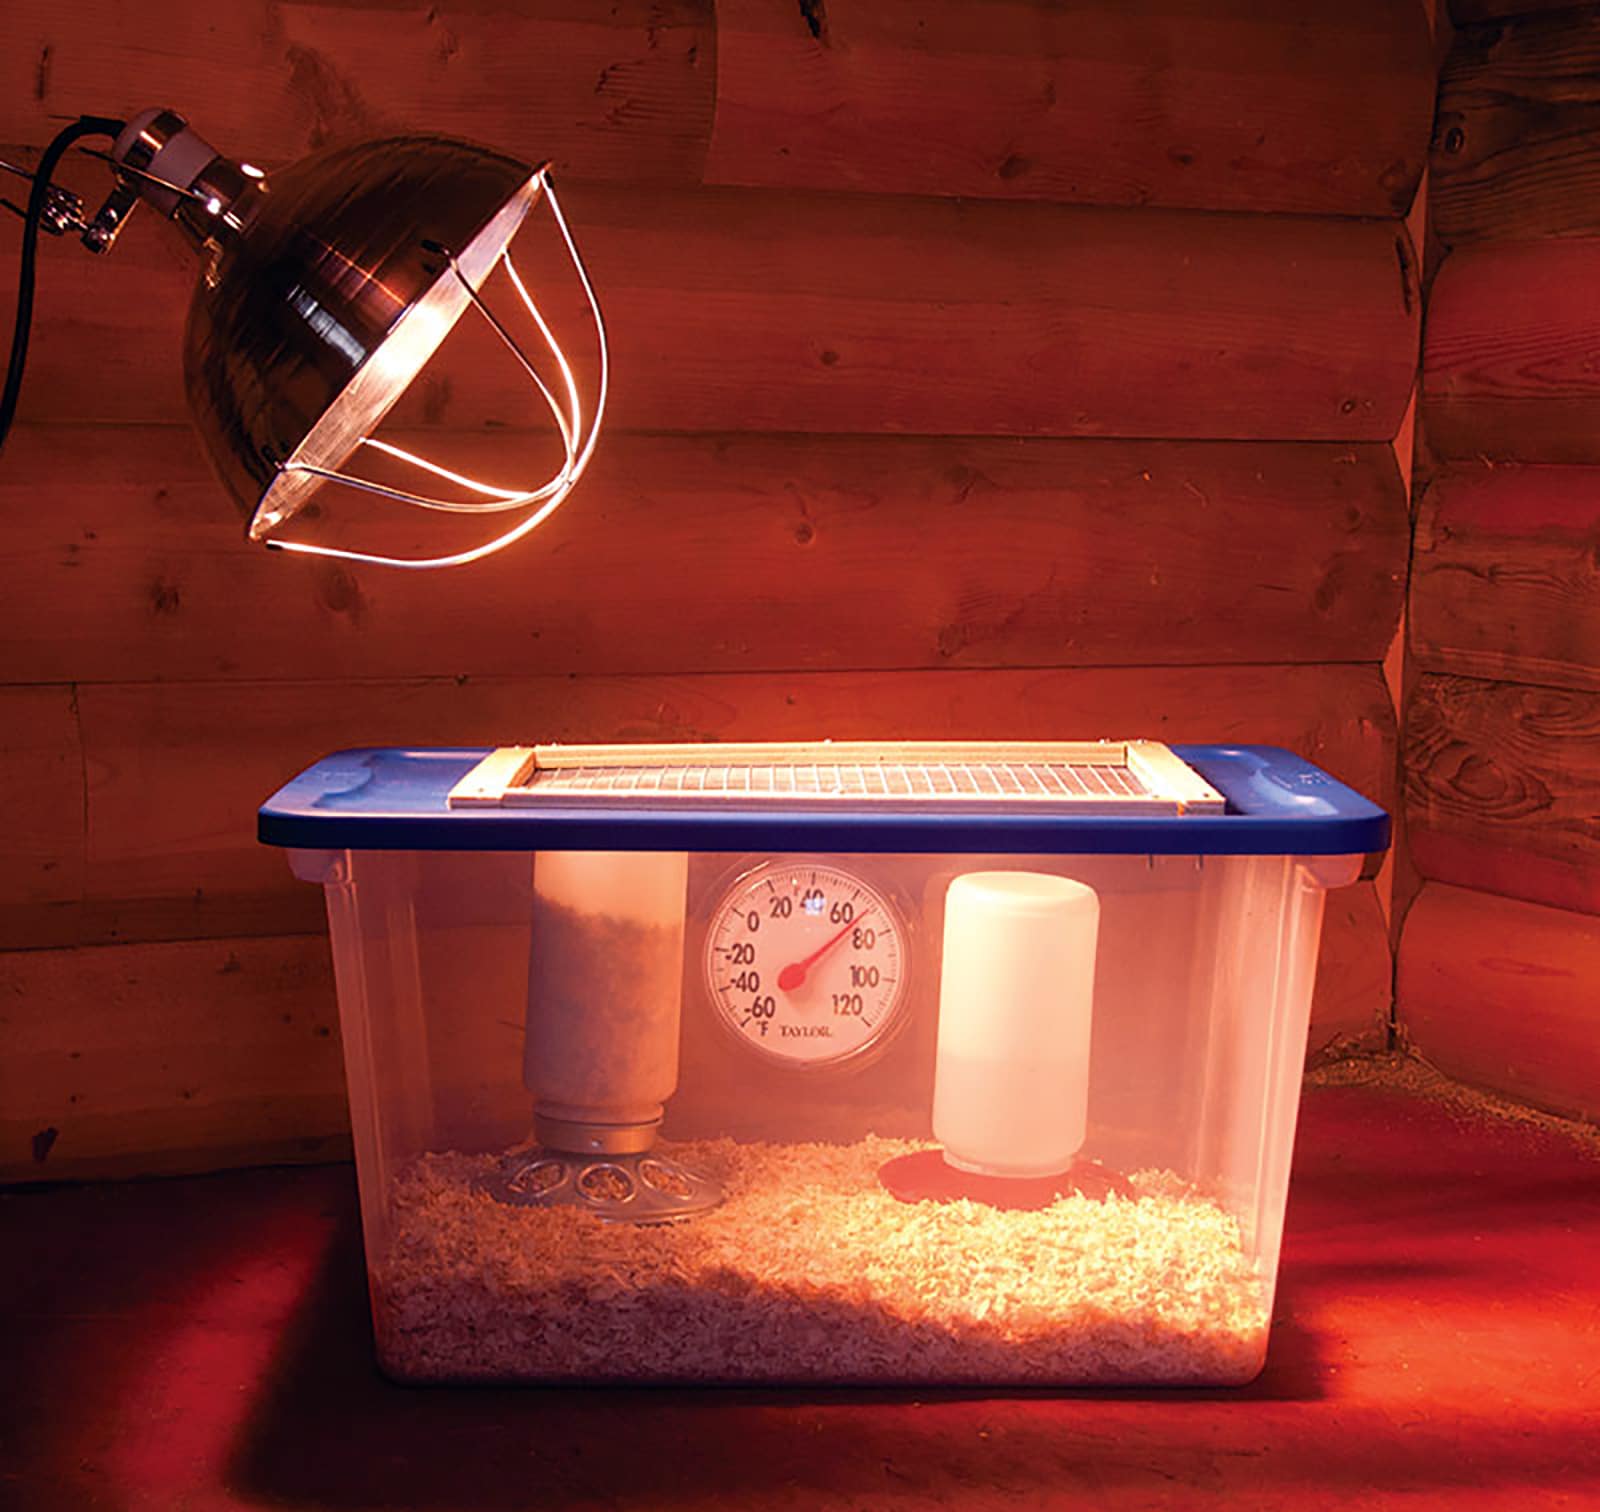
With the lightbulb installed, clamp the lamp into position so that it's shining down on only half of the brooder. The idea is to leave an area chick can run to if they get too hot under the lamp. Then, place a thermometer under the light on top of the substrate and check its reading after one hour. The sweet spot for chicks is 87-92°F, depending on the breed. Lower the lamp if the first reading is too low, or raise it if the reading is too high.
You can choose to take out the thermometer after setting up your lamp, or you can keep your thermometer in the brooder with the chicks. The thermometer will help you stay on top of temperature fluctuations if there are any. However, an easier way to monitor your brooder temp is to watch your chicks. Overheated chicks will spend all their time on the far, unheated side of the brooder while chilled chicks will crowd under the lamp. If your brooder temp is just right, you should see your chicks being active and walking freely between the different sides of the brooder.
One huge advantage of a chick brooder heater is that it's completely automatic, so there's no fiddling with lamp heights and positioning. All you have to do is plug it in, set the thermostat, and the temperature will monitor itself. Unlike a lightbulb, which hangs above the brooder, a heater is placed directly inside with the chicks. The height of the heater should be adjusted so the chicks have enough room to stand up underneath it.
What Brooder Temperature Do Chicks Requirement?
We had actually quickly mentioned temperature level previously, but for the purpose of efficiency, we will go through it once more below.
- Day 0-7 (95 ° F)
- Day 7-14 (90 ° F)
- Day 14-21 (85 ° F)
- Day 21-28 (80 ° F)
- Day 28-35 (75 ° F).
- Day 35 (70 ° F).
Keep in mind during each temperature drop to observe your chicks and also make certain they fit.
The most effective method to determine if it's cozy enough without a thermometer is to see your chicks. If they go to the external reaches of package it's as well warm; if they are gathered under the light it's also cool; if they are populated around the location you have it perfect!
At around day 28 chicks can go outside for short spells as long as it is cozy and also bright. Also if you are hatching out in winter you can go down the temperature by one more 5 degrees to 65 ° F till they are completely feathery out.
Read More from prestigequeen.com :
4. Place Feeder and Waterer
You should put the chicks' food and water near the middle so that it's accessible to both the warm and cool sides of the brooder. You can use a feeder and waterer from a feed store, or you can use whatever you have on hand. Food and water dishes should be low enough for the chicks to reach. Water dishes should also be shallow to keep chicks from drowning in them. Jam jar lids, yogurt lids, and sushi ramekins are some household items that make great chick feeders or waterers.
Some people choose to spread their chick starter on the floor rather than presenting it in a dish. Again, it's all up to personal preference. If you're using a loose substrate, then putting your chick starter in a dish will make it easier to monitor how much food they're eating. You'll also find that chicks are so messy that using a dish seems pointless. If you're using paper towel or cloth bedding, you can save a lot of work by simply scattering the food for your chicks to peck off the floor.
Read More from prestigequeen.com :
5. Add Baby Chicks to the brooder
If you've done everything right, you should be ready to introduce your chicks to their new environment at this point. It helps to stick around for a while to watch how they're settling in once they're inside the brooder. Not only are you observing them for temperature cues, you should also make sure they understand where the food and water are.
This is also your chance to confirm your brooder box is large enough for your group of chicks. Overcrowded brooders need to be cleaned more often and carry the risk of overheating. Chicks in overcrowded brooders are also more likely to pile up and suffocate any chicks unlucky enough to get stuck in the bottom.
6. Keep brooder box Clean
Once you have your brooder up and running with some chicks inside, it won't be long until you have to clean it. The frequency of cleaning depends on the number of chicks you have. You can use your trusty sense of smell to figure out when that will be.
There isn't one right way to clean a brooder. However, there are a couple of methods that are known within the chick-raising community thanks to generations of trial-and-error. Here is how Youtuber SimplyHal does a complete clean-out by removing all of the old bedding, hosing it out with some detergent, and filling it with clean wood shavings. This all-or-nothing approach is ideal for people who face bigger messes as they raise large numbers of chicks.
If you have less than a dozen chicks, then there's nothing wrong with spot-cleaning by removing and replacing the top layer of bedding. Some might call this lazy, but think of it as working smarter, not harder. Spot-cleaning is also a great way to maintain cleanliness inside of a brooder without doing a complete clean-out.
Baby chick brooder – Pro Tips:
Plan Ahead
There's nothing worse than bringing home a bunch of shivering, crying chicks with nowhere to put them. Starting a few days before your chicks are due to arrive, gather your materials, set up your brooder, and do a trial run to work out any kinks. That way, your brooder will be warmed up and ready to go once you get your chicks, and you can save yourself the panic of scrambling around for last-minute options.
Make Sure Chicks are Dry
This tip only applies if you're hatching your own eggs. Newborn chicks come out wet and sticky, which makes them vulnerable to catching a chill. Once hatched, chicks should stay inside the incubator until they're dry and fluffy. Usually, this takes anywhere between 12-24 hours. This would be a great time to get your brooder set up! Once all of your chicks have fluffed out in the incubator, that's when it's safe to take them out and introduce them to their new home.
Brooder Location Matters
Your completed brooder won't do you any good if you place it in an inappropriate spot. Your brooder should be in a well-ventilated area away from drafts and direct sunlight. Ideally, it should also be indoors. Chicks can attract snakes, owls, cats, rats, and many other predatory neighborhood animals. If you don't have space in your house for a brooder, the garage is an excellent alternative.
Chick Size Matters, Too
Not all chicks are created equal. Some chicken chicks can be much smaller than others, such as the delicate silkie compared to the robust Orpington. Ducklings and turkey chicks (a.k.a. poults) are generally larger and grow faster than chicken chicks. If you're thinking about brooding chicks of different ages or breeds in one brooder, make sure they are all roughly the same size, otherwise, the larger chicks may crush the smaller ones.
Add an Extra Lamp
If you're using a large brooder box, such as a stock tank or kiddie pool, you should definitely consider using two lamps or heaters instead of one. Don't forget to leave space for a shaded area where your chicks can retreat to cool off.
Need a Lid? Use a Window Screen
As your chicks grow in both size and strength, you may find that they can actually jump up pretty high. If the walls of your brooder aren't tall enough to keep your chicks inside, you might consider adding a lid to your brooder. The lid should have a grill or screen so that light, air, and heat can still pass through. Some people choose to build their own with a simple frame and some chicken wire. Do you know what's easier? Using a simple window screen from the hardware store.
Raising Chicks Can Be Rewarding
Let's face it, chicks are irresistibly adorable and make unique, fun pets. But just like any other pet, they have their own housing needs. A brooder keeps chicks safe, warm, and content, and as you can see, they're easy to build yourself.
Have you ever put together a brooder using the methods above? Do you plan to? Make sure to comment your thoughts below. And if you found this tutorial helpful, don't forget to share!
Last Verdict
Housing for baby chicks can be as simple as a big cardboard box, any large containable do, but it’s handy. If it’s easy to clean or even better disposable, you can usually get a cardboard box for free. And when the checks are grown, you can just put box beading and poop all in the compost. Start with the biggest box you can find because they will grow very quickly. Your container needs to have sides, at least 30 centimeters high to cut down on drafts. It’s also a good idea to put the whole thing in a sheltered place like a garage. It’s often a good idea to have some kind of a lid on top to stop interested pets from having to close and encounter and to keep the checks in that. Remember to allow plenty of ventilation it’s to the heat source, an ordinary old fashioned incandescent light bulb gives off a lot of heat.
If it’s not an energy saver, eco bulb, of course, but one light bulb can blow and leave the Czechs cold and dark. So too low wattage bulbs are better than one bright one. If you use a light bulb that gets hot, put some kind of shield in front of it or keep it well out of reach. So the chicks don’t burn themselves on it. Even worse, a bulb can explode or fall and cause a fire if it’s near inflammable material. So take care to ensure your setup is not a fire hazard. The heat source needs to be adjustable. Baby chicks need a really warm spot at first around 38 degrees, but then they need less heat as they grow. You can use a thermometer and adjust the temperature by a few degrees each week, but it’s easier and probably more effective to simply watch your chicks. If they’re all huddled together near the heat, it’s not warm enough. If they’re crowded around the edges, as far from it as possible, it’s too hot. If they’re eating and sleeping and looking comfortable, it’s probably about right on the floor of your box. You need some absorbent material, but not their newspaper. That’s slippery to tiny chicken feet.
I think the absolute best thing to put on the floor of your brooder is this it’s. So as drew liner, it’s a non-slip surface comes in a big row made in China. I get it from the $2 shop and it’s literally $2 for a roll that’s. I don’t know, one and a half meters long. You can cut it to shape. So that just perfectly fits the bottom of your brooder box. Apart from being cheap, you can actually put it in the washing machine or just rinse it out by hand to keep it clean. If you don’t want to dispose of it after one use, it gives the chicks a perfect non-slip surface so that when they are learning how to walk, they can get their hips underneath them. And they’re not slipping and sliding on a slippery surface and damaging their hips and their legs and developing a terrible affection pooled spread or league. If you give you a chicks, a good non-slip flooring, then they won’t develop, spread a leg.
Beginner's Guide to Raising Chicks – My experience
Course on how to raise chicks for the absolute beginner:
We have raised a ton of chicks over the last several years. And at the beginning, we really did a lot of research and we really did things by the book. But as the years have gone by, we’ve kind of developed our own ways that we’ve been doing things that have worked really well for us.
Chicken brooder box
We are going to go over the brooder set up which is a container that you’re going to keep your chicks in for the first five to six weeks, or until they’re fully feathered and ready to be moved outside to the coop.
The first thing to consider is the placement of your brooder you’re going to want a draft-free warm room to keep them in. We have ours in a spare bedroom. It is so even though they have the heat lamp, it’s still too cold for us to keep them in our unheated pole barn.
Good ventilation and a window if possible are also good ideas. Because starting in about three weeks of age, these guys really start to smell. A side note with the heat lamp, if you do decide to keep these in your house, make sure you do have a working smoke alarm in the same room. With these heat lamps, there is a significant fire risk, the size of your brooder is going to depend on how many and what kind of chicks you have.
Chicken brooder size
Keep in mind, chicks grow very fast. And they’re going to live in here for five to six weeks. So you want ample space for them to be able to not only get away from the heat source, but also to get away from each other. And that’s going to prevent packing and bullying issues.
DIY chick brooder
We prefer metal and rubber water troughs for our breeders. You can find these on the internet like marketplace for pretty cheap. Once they get holes in them and they’re not able to hold water anymore, people usually just want to get rid of them. Rubber one we actually bought for only $15. So they’re definitely out there, you just kind of have to look. A lot of people also build their brooders out of wood and chicken wire. So that’s also an option. I’ve seen rabbit cages being used. I see a lot of people using like Rubbermaid totes, and I think those would work in a pinch. But I think it’s hard to find ones that are actually big enough to really work for what you need. And also with the plastic, I worry about the heat lamp getting too close to the side and causing it to melt. I’ve even seen some people use a spare bathtub as a brooder.
So you can get creative for sure. And I do want to say that chicken math is a very real thing. So even though you may be thinking, I don’t want to spend a bunch of money on a brooder because this is going to be the only time I brewed anything. But I promise you guys, you will want more chicks after you raise your first batch. So go ahead and make the investment and if all else fails, you can just sell on the internet.
Need to think of is a brooder
If you were thinking about raising chickens, you are going to need a brooder. Let’s dig into this project. If you have ever thought about raising your own chicks to either start or expand a flock, the second thing you are going to need to think of is a brooder.
The first one is what breed of chickens Do you want to raise, which doesn’t sound like a big deal until you discover just how many different varieties there are and the differences between them. It can take four ever. However, once you decide on the chicks to get, it’s time to think about how to raise them.
When making a brooder There are five things that you need to provide for the chicks.
Number one is to give them plenty of space, the chicks start off incredibly small, and when you are looking at their tiny, fluffy awesomeness, it doesn’t look like they need much space. The thing that you need to remember is that they need a protected environment until they are fully feathered out, which can take up to eight weeks. By that time. The cute fluffy golf balls you brought home are nothing but a memory that has been replaced with opinionated dinosaurs about the size of a quart mason jar, set up your brooder accordingly.
Number two is that they need to get fed. This one is obvious and the easiest to provide. Make sure to get a bag of chick starter feed to begin with, and remember that they are going to be eating as much food as they can cram into their crops, so don’t be surprised when they chew through what you thought was plenty. Number three is easy access to clean water. Another obvious one, but with challenges that you would not expect if you have never raised chickens before. Young chicks can drown in their own waters and older chicks make it their mission to fill the water with as much bedding as possible. Your job in both cases is to save them from themselves.
Number four is bedding. Chicks love pecking, scratching and digging. Be sure to pick a bedding that is absorbent and not terribly expensive as you will be going through more than you expect, especially if they spread a lot of water into the bedding. That is something that you have to worry about more with ducks, but chickens will do it as well. We have had a lot of success with both Aspen shavings and pine pellets.
Number five is heat. When your chicks first come home, they need a spot in the brooder that can keep the temperature between 85 to 95 degrees under the heat source. If you do not keep them warm, you greatly increase the risk of sickness and death. That temp can be lowered about five degrees per week as they grow and feather out. It is also important that part of the brooder is a bit cooler so that the chicks can self regulate how warm they want to be. If they’re clustered under the heat source, then the brooder is too cold. If they are all on the other side of the brooder then it is probably too warm, pay attention to their behavior and adjust accordingly.
Now that we have gone over what you need to provide, let’s get to building our brooder. Personally I like using the largest Rubbermaid container I can find they’re fairly sturdy, come with handles and once you are done using it as a brooder it can be used for storage around the house. This particular container is 40 inches long, 20 inches wide and 18 inches tall. Take off the lid and set it aside. We don’t want to destroy it as we will need it again once the chicks are out of the house.
First up, we need to make a lid for the brooder the chicks will need to secure space as cats and dogs may very well try to eat your tiny chicken nuggets. Also, once the chicks are a couple of weeks old, they will be big enough to jump out of the brooder and run around the house. Oh yeah. And then they will start to poop everywhere. Let’s go ahead and avoid that one and get our materials together. I would typically use one by two lumber for this kind of thing, but I had an extra two by three laying around so I decided to just rip it down to size and use that. Remember when you are cutting the wood for this that the lid will need to be big enough to fit over the entire bin. For the sides of the lid
I cut the edges flat but for the top I mitered the edges at a 45 degree angle so that they would sit together nicely. Once I had everything cut, I made sure to clean up after myself.
There is nothing worse than trying to clean up wet sawdust. So I wanted to make sure I got it vacuumed up before it decided to rain on me again. A wet dry shot back is another one of those tools that you don’t think you need until you actually have one and find out they are amazing.
Next we need to assemble the lid. Take the four side pieces that you cut and pre drilled holes. You need to pre drill when you are working with thin wood like this. Otherwise it will quickly split and become unusable. Once you have them pre drilled.
If you want you can also use some wood glue between the pieces but I have found that just screws works fine. Once you have that part put together It is time to attach the chicken wire. This roll is mostly empty and really wants to roll back up. If you’re having that happen put one staple in the end and hold the other side down with something heavy, in my case a cordless drill. Take your time with this part.
You want to be putting tension on the wire as you place each staple. By doing that around all four sides, it helps to make sure that the chicken wire will be nice and tight. Once you have it all stapled down, take a pair of wire cutters and trim off all of the extra. Next up is attaching the top trim. This part really isn’t necessary as the chicken wire would be enough to keep it in place on top of the container, but it certainly will look better.
Again, be sure to pre drill all your holes to avoid splitting the wood. We cut them at a 45 degree angle as they now fit together like a picture frame which gives it a much cleaner appearance.
Now that everything is put together, it’s time to see if your measurements were correct. In my case, I managed to not mess things up and the lid fits securely over the container. I decided last minute that I actually wanted a hinged opening.
I use my Leatherman to cut the lid in half and then I use the wire cutters to separate the chicken wire as well. Once it was separated into two solid pieces, I made a hinge out of a section of bicycle inner tube stapled into each half of the lid. We have taken care of the first rule by providing the chicks with enough space and now it is time to move on to the rest of the list.
Container that I have started out with a nice base of Aspen shavings, they smell good are quite absorbent and give the chicks and excellent substrate to scratch and peck in.
Next up is the water and I cannot stress enough that you should not just place it directly on the Aspen shavings, the chicks will fill the water instantly with the shavings which will lead to pretty much all of the water being absorbed by the bedding. If that happens, you will wind up having to replace the shavings every other day or so. The key here is to get the water elevated and isolated from the shavings while still allowing the chicks to get into it. In our case, we stacked a couple of small pieces of wood with a plate on top followed by the water. This will keep the vast majority of shavings out of the water. And if any water does get spilled out, it will be caught by the plate.
After that is taken care of it’s time for the food, you can place a mason jar on these theaters to give them more food to eat. However, when they are little, we just build the bottom of the feeder. The reason is that they will also be getting quite a few shavings into the feed. And once it gets to be too full, we just dump out the remaining bit of feed into the shavings, which again gives them something to scratch and peck at.
This next thing wasn’t on the list. But it is a nice little extra chickens of all sizes love to stand on the tallest thing available. If that is the water, they will stand up there and poop right into their water. What I like to do is give them something to roost on, they will play on it, fight over it and just use it in general to keep themselves occupied. After that I went ahead and put our three chicks back into their bin so that I could close them up and get the heat source on there.
Finally, it is time for the heat. What we use is a ceramic reptile heat bowl and a reflective metal shield.
These are a bit expensive, but they are worth every penny. All of the energy they use goes to making heat. And it is really nice that when you turn the lights off that will be dark for them as well and they will actually quiet down and go to sleep.
You should never, ever use one of the more affordable heat bulbs that are just oversized incandescent bulbs. Yes, a lot of people use them. No, they don’t always cause a problem. But when something goes wrong, it usually goes horribly wrong. I have seen those bulbs shatter for no reason sending molten glass fragments raining down.
Many people don’t secure them well enough and they wind up falling to the floor and starting a fire. The bulbs are exceptionally hot and will quickly set any flammable surface ablaze. If you do have to use one because you simply cannot afford a reptile bowl. I would say again, please reconsider. search Google for heat bulb fire and read some With the results, they are truly heartbreaking.
There you have it, how to make a brooder and set it up to raise your own chicks. We do this every other year as our hens get older and we were tired of the half of the flock that have slowed down laying eggs. Let me know down in the comments if you are planning on raising some chicks up this year, and if so, what breed you went with?
Chick Brooder Heating Plate
Okay, so let’s talk about the heat source. So even though these guys are in a heated room, it’s probably 70 degrees in here. Now, they still need an additional heat source so that they can get up to about 95 degrees.
Electric heat lamp for brooder
There’s a couple of new options as far as heat sources, but the most tried and true and I think probably the most common version are just your good old heat lamp, which is what I’ve got here.
The red color hides any scabs or bloody spots and so it keeps the other birds from pecking at each other. You will keep the heat lamp on 24 seven even at night until the chicks are fully feathered and they’re ready to go outside. Occasionally, if they are ready to go outside, but the weather’s not cooperating, I’ll go ahead and I’ll turn the heat lamp off. But I’ll keep them in the brooder for another couple of days, just until the weather improves, and they’re ready to go out.
When you buy your heat lamp, they will have a clamp that looks like that attached, I’m using it here to hold my cord, but like I was one of those, and it’ll attach with one of these type of bracket things. And that’s how you can clip the heat lamp to the side of your brooder.
But I don’t really like doing it that way, I think it’s too easy to knock it off. So instead, what we do is we have hooks in our ceiling. We just use a dog chain and we hang it from the ceiling, I find that this is a lot safer, less of a fire risk, just because as the chicks get older, they’ll start jumping around and flying. And they knock into the heat lamp pretty frequently. That’s another reason why you want to have that guard there.
And so whenever it’s hanging, it just kind of swings around, you don’t have to worry about it falling and getting in the shavings and catching on fire. For placement of the heat lamp, I like to put it slightly off to the side, you can see the cameras kind of exaggerating this a little bit. And then like over here, this is all shadow.
Chicks are very good at regulating their own temperature, they’ll go where they need to be if they’re cold, or if they’re too hot. So you want them to be able to get completely out of the heat or completely underneath it. So this kind of ties in with the size of your router, you want to make sure it’s big enough, you don’t want them to be stuck. If my router was only this big, they would, they wouldn’t have any choice but to be underneath the heat lamps the entire time. And so they would probably overheat pretty quickly.
Another consideration with the heat lamp is how high to hang it.
So most guides will tell you for the first week, if you have less than one week old chicks, you want the heat lamp to be about 18 inches from the ground.
And then they say every week, you’re supposed to raise it, I think it’s three inches a week. So I think that’s a fine guide to start out with for beginners, I think 18 inches is pretty good across the board.
And that will change as they get bigger. These guys are just starting to get their wing feathers in so they aren’t really feathering enough to change much but as they get more feathers, they’ll start hanging out further and further away from the heat lamp.
They still rely on it every once in a while but you’ll be able to see the difference when they don’t need it as much. So don’t worry too much about the heat lamp. So long as they’re active and they’re moving around most of the brooder you should be okay. But if you do see them hovering right underneath it most of the time, you can go ahead and lower it a couple of inches. If you notice that they’re trying to get away from it as much as they can, you can go ahead and raise it a couple of inches and just play around with it.
Chicken brooder bedding materials
For bedding. I like just regular old pine shavings. It’s cheap, it’s easily available. I don’t really care as far as fine or medium flakes. It doesn’t really matter to me. I like a fairly thin layer. If you get it too deep. Once they really start scratching guess where all those shavings are gonna go right into the water. So save yourself some time and don’t put it too deep.
They don’t really need To be that deep anyways, you could also use like shredded paper or paper towels, those are fine. You want to avoid using cat litter. And I’ve heard that that’s not very good for them if they eat it and they will eat it.
Every time I add new chicks, they’re just pecking around in all the flakes and I’ve never had any have any issues from that it always just passes right through. You also want to avoid using just flat newspaper. What will happen with that is it’s too slippery of a surface and they’ll end up getting splayed legs from that. So in my opinion, the best option is just pine shavings, it gives them something to scratch in and it’s nice and easy to clean to.
Poultry brooder
If you’re going to have any type of waterfowl in with your chicks, ducklings and goslings love to sit next to the waters and just splash water everywhere. So it only takes maybe an hour for them to completely trash a freshly cleaned Bruner with shavings. So if you’re breeding chicks with
ducklings, or Gosling’s,
my recommendation is to have a section of your brooder that also has straw on top of the shavings, the straw won’t absorb the water and it’ll give the chicks somewhere dry to stand.
You’ll also want to get some waters, the more the merrier. Especially as you get more and more chicks. If you have like less than 10, I would say one water’s fine. But if you have the room to put more, I think that’s always a good idea, just in case there’s some bullying going on.
And especially if you have chicks of different sizes. So as you can see, in this, this brooder, we’ve got a little water over here and then a much bigger one down there. At any feed store, you can get these super cheap, little plastic check waters for only a couple dollars apiece. And I like to have multiples of these since I breed chicks and I go through several different batches. I’m always rotating these out. So I can bleach the dirty ones and let them dry out and replace them with clean ones immediately. So these are super cheap.
Same with the bigger ones. If you’ve got a lot of chicks, you’ll probably want to get one that’s more of that size. You could use an adult water for chicks. But you want to make sure if the water is super deep that a they can reach it.
You know, when they’re only a couple days old, their little legs are real stuffy, so they can’t reach very high up. And you also want to make sure that it’s not so deep that they’re going to drown in it. So if you find that it’ll otherwise work, you’re just kind of worried about them drowning, you can just put some rocks in the bowl down here, and that’ll keep them from getting hurt.
So probably for the first week, the waters get emptied and refilled at least once a day. But as they get older and they start scratching around and getting those shavings in there, it’s usually at least twice a day. And then once a week, everything gets taken out and scrubbed out and bleached.
Chicks feeder
You’ll see in stores like Tractor Supply, they’ll sell these little vitamin and electrolyte packets that you can add to their water. Those are perfect for like if you bought some hatchery birds, and they’ve been in the mail for three days, and you think they could probably use a little pick me up that is perfect for that. But so long as your birds are otherwise healthy, those are not necessary for daily use just playing tap water is perfect.
When we have freshly hatched chicks, what I like to do for the first couple of days is just lay a paper towel in the brooder and pour the feed on top of it. I do that just so it’s easier for them to find and I make sure that they are eating a lot in the first couple of days.
But after that, I like to switch them just to one of these cheap plastic chick feeders. Again, you can use an adult feeder for chicks just as long as it’s not so deep that they can’t get into it. The main purpose of this type of a feeder is just to keep them from scratching it and getting the feed everywhere and getting shavings all up in it. It just helps keep everything cleaner. If you have a lot of chicks, you can use one of these style feeders.
Again, the same with the waters, the more chicks you have, it’s better to have multiple feeders, just so nobody is ever left out. As far as cleaning the brooders. The shavings in both these are about a week old. And it’s still actually looking pretty good. So I might wait another day or two. But in general, I try to clean out all the bedding and replace it with new about once a week. But that’s gonna depend a lot on how big your brooders are and how many birds you have.
Outdoor chicken brooder
As they get closer to being able to be outside they are going to get a lot messier and a lot smellier. So at that point, typically I’m cleaning that the breeders probably twice a week. So don’t worry if this seems a little bit overwhelming at first, I promise once you guys get set up correctly for chicks, they’re actually very easy and very low maintenance to take care of and they are so much fun to have So that completes our first crash course on raising chicks.
CHICK BROODER Off-Grid With a Solar Generator
We have 20 silver grade dorking chicks coming in June in order to expand the genetic diversity of our flock. Except we have one little problem. We’re off grid that we need to figure out how to brood those beans.
Now, the obvious choice for raising day old chicks off grid is to have a broody mama raised the chicks herself for 20 chicks that were getting in. We would need to have two hands that are broody at that time, and they would have to adopt the babies.
There’s a good chance that a hen will not adopt the babies that they’ll reject them. So you do need to have another plan in case you don’t have broody mamas or in case they do choose to not adopt the babies.
Another option is a woodstove woodstove would be great for keeping those babies nice and warm. Great option.
Some hot water bottles to keep in with the checks Or using hot coals to create a platform that the babies can get warm under.
But both of these options require you to be up all night, making sure that the water stays hot, who are that? The coals stay nice and warm, not something I’m particularly fond of considering I’ve already raised my own babies, and I don’t want to stay up all night raising another 20 for three weeks.
Another option that we heard about is this foil bubble bubble wrap, heard of a guy that made a little shelter out of this, and it traps in the heat of the little chicks, as long as you have enough chicks, but this isn’t something that we’ve tested yet. And to me, it’s a little bit risky right now to try this on our next batch of chickens.
So that leaves us with two options in order to keep our chicks warm.
The first one is this traditional chick lamp. And then the other one is a brooder such as this ego glow breeder that we have the regular heat lamp with this red bulb in it, uses 250 volts or 660 Watts. And this is not an option for our solar system. The way it is set up. Now it’s just withdraw way too much power. Now, the draws 18 Watts of power. Uh, it does use radiant heat and it is possible that we could run this off of our solar power.
However, it would leave us really limited with our refrigerator and other uses. So we do need another alternative. And so we’re going to show you what we came up with.
Small portable solar generator for chick heater
So the solution I came up with that we’re going to try is to use a small portable solar generator, which is nothing more than a rechargeable battery. That includes a built-in inverter and a way to it.
And all in one little portable package that you can just take with you. They make these all a bunch of places make these I’ve fought one on Amazon that we’re going to try. And if this, brooder only draws 18 Watts, cause it uses eight, uses radiant heat.
If it only draws 18 Watts, we need to run it for say 10 to 12 hours at night when the sun’s not out and we don’t want to use our battery bank. And then we can switch to our regular solar system during the day when the sun is out. And the goal would be to try and run this 24 seven for three, four weeks until baby chicks are old enough to not need a 95 90 degree heat source.
So we’re going to try this solar generator picked up. This has a battery in it that has 20 amp hours, supposedly of energy, which would allow this thing to run for 13 hours. And then we could charge it during the day. So that’s what we’re going to test. So I picked us up on Amazon.
I believe this is the battery haven’t even opened it yet. Like the little suitcase it’s pretty small.
So it’s a little inverter, Pure sine wave inverter, output and USB output of five volts. So you could charge your phone DC output of 12 volts, five amps.
This thing might work. It’s got a DC plug, uh, an AC plug USB outputs. And then these two little ports for like 12 volt DC, something else. I think you could charge it with your, uh, like a cigarette lighter in your truck and you can charge it with solar panels, which is what we got.
So here’s a cigarette lighter charger with a cigarette, lighter adapter. Here’s an AC plug to charge it from your wall, which plugs into this And then you can charge it. So there’s like pretty much everything, all kinds of ways to charge it.
I think this is the solar panel deal. Do we also got foldable solar panel, 60 Watts. This is kind of cool. It comes in a little bag.
It’s got this stuff.
It’s like a cigarette adapter. Look at all those little plug adapter things. Pretty much every possible adapter you’d ever want. Here’s like alligator clips to charge 12 volt battery Cables, cables, cables.
It’s like some sort of a power pack, like an, a voltage adapter that does not come out. Solar charger, solar input, 60 Watts output 18 volt three at max.
You could run the bronzy right off this. That’s kind of cool to get solar panels. The solar generator, battery, solar panels I’m going to and lay them up here. I’ve got it plugged in from this output into that input and the little blue lights on You cannot run this while it’s charging, which is one thing I don’t like.
So you can’t see it, but there’s all these blue lights are on. It’s just very dim. So I think this comes fully charged. It’s very hard to see, but all the lights are lit.
Even though this comes with like every possible cable adapter configuration you would ever need to charge this thing from AC or DC. We only need one cable to run it from the solar panel to here to charge it.
It’s on. Pulling by half an amp
Almost fluctuates between 0.3, three and 0.4, turn it on. See the blue lights. So it’s fully charged. I plugged the brooder into watt meter and we’re going to plug that into here.
So we’re drawing 112 volts 0.3, one amps, almost 21 Watts. This brooder sends it only draws 18 Watts, but it’s obviously drawing 21. So we might get nine to 10 hours out of this battery. And we’re going to watch that. So put this on the timer. We’re going to run this until it dies. And we’ll see how much time that is, how much time that takes. And this will also measure the total kilowatt hours that this thing produced. So this will be a good test. Can we run a brooder for nine or 10 hours at night?
This thing has been running for eight solid hours and pulling 20 and a half Watts.
And it’s finally on his last bar of power, eight hours. We could probably make it eight and a half, but we’re not going to push it.
So it’s the next day I let this run last night until it pretty much went dead. There was only one light blinking. It ran for eight hours and 10 minutes and put out 370 watt hours over that eight hours, ran consistently at like 20 and a half Watts drawing 0.3, five amps.
So it worked and I think I can use it to, run this brooder. I’ll I’ll still have to plug it into our, our solar, our wall on, on our main solar system for probably three or four hours from the time the sun goes down. And before I plugged this into the, uh, solar generator, but overall it does exactly what I bought it to do. Now I have it sit in here in the sun with the solar panels charging back here.
It’s so small and easy to use comes with so many like adapters and things.
Read More from prestigequeen.com :
- Best Egg laying Chicken Breeds
- How to Use an Egg Candler?
- Incubating & Hatching Eggs chicken keeping
- How to hatch chicken eggs without an incubator
Contents
Farm Innovators Model 3700 Baby Chick Starter Home Kit
My partner as well as I have actually gotten two of these brooder packages since they work well as well as grow with the chicks. Throughout the summer season as well as early loss we hatched out a few sets of hens and also ducks to get our group established. Numerous brooders were either very expensive, wouldn’t expand with the infants as they got bigger, or were made from cardboard for a 1 or 2 time use before tossing out.
The dimension of this brooder can be adjusted as it is made from interlacing plastic panels and they can be repositioned as preferred. When all the panels are used the brooder is of a generous dimension that you can keep a number of chicks or ducks in till they are ready to go out to the cage. The wall surfaces are nice as well as tall so the ducks were never able to raise and out, and also the chicks have to be numerous weeks old (as well as not have their wings cut) before they can try to jump onto or over the walls. We would put hen wire or momentary plastic fencing over the top of the brooder to prevent any type of jail-breakers as the brooder was in an old garage on a utility table (we really did not have killers to stress over in the garage simply put, or we would have made use of hardware cloth over the brooder rather).
Brinsea Ecoglow
We had three Araucanas/Ameraucanas and one Enthusiast Orpington in a brooder (Rubbermaid lug) with the 250W red heat light recommended by the feed store where we got our chicks. By the 2nd day, however, the Buff Orpington fell victim to pasty butt. We attempted to save her, however she went quite promptly. So, I added a thermostat to package, however it was still tough to regulate the temperature. Plus, I did not sleep popular that the lamp presented a major fire risk to the chicks along with our home. I maintained my door open during the night so that I might keep an eye on the red glow originating from the cooking area. I did not want to shed an additional chick!
Fast forward a week, when we brought home 2 more Aficionado Orpingtons. We put them into package with the others and also observed that the chicks were panting, although the temperature at the bottom of the brooder had to do with 90-95 levels Fahrenheit. I went online as well as located Raising Satisfied Chickens, where they discussed the Brinsea glowing heating units. There were none available in my local area, so I ordered one here.
I can not define the calm feeling I have about our little group currently. They are happy and healthy and balanced (not one sign of pasty butt in the bunch), and also they appear to actually like going under the heating system to remain warm as well as secure. It is like a mother chicken. And, it features a 3 year service warranty. The plastic cover is fantastic– makes it super very easy to clean. I might not be better with this acquisition!
BRINSEA ECOGLOW has actually functioned excellent for our chicks. They are currently practically fully feathery and ready to go outside. I really did not lose a single chick as well as they are really silent, due to the fact that they have the warmth that they require, as well as the capacity to get away from the warm quickly. It had been a lot very easy as well as more secure than a heat lamp, as well as I would highly suggest it. It is easy to tidy. The one challenge I have actually had is when the chicks poop on top of the Ecoglow, sometimes their poop is really sticky and also difficult to scrub off of the plastic cover, yet I’m glad it has the plastic cover! It has actually also been extremely easy to change the elevation as the chicks have grown. I extremely recommend this item and also would certainly never ever utilize a heat lamp rather.