
How to hatch chicken eggs with an incubator
by Poultry farmer – Miriam Rolling| Last Updated– April 16 2021
Hatching your chicks
The first consideration is the availability of productive eggs. These need to come from a
poultryman who is in the business of producing eggs for a breeding ground. Eggs you
purchase from a store are not abundant. Industrial groups have no males. This is a
surprise to the novice poultryman but the fact is that a cockerel is not required.
in the manufacturing of eggs for the table.
You can search online for hatcheries. Talk with the county agricultural extension.
a supervisor or ask other poultrymen for feasible sources. Ideally, pick up the
eggs on your own rather than having them delivered or sent by mail It is hard for
breeding grounds, the post office, or UPS to handle tiny orders of eggs correctly.
What temperature does an incubator need to be for chicken eggs
Fertile eggs are subject to spoiling as well as require careful handling prior to incubation starts.
Avoid extreme variants in temperature level. Ideally, eggs ought to not be more than
7 days old when they are set. Beyond that point, the percent that will
hatch declines.
If it is needed to hold the eggs prior to establishing, transform them daily maintaining them
in an area where the temperature is around 50 °, as well as the relative humidity, is 70 to
80 percent. The veggie area of your refrigerator could be utilized for holding
eggs up until you are ready to nurture. Temperatures listed below 40 ° minimize
hatchability. Do not hold at room temperature since embryos begin to create
at subnormal rates when the temperature level gets to 80 °. This will minimize the number
that hatch.
How to incubate your eggs
Eggs have actually been bred by fabricated means for hundreds of years. Both the
Chinese as well as the Egyptians are credited with coming from fabricated incubation
treatments. The Chinese developed a technique in which they shed charcoal to
supply the warmth.
They also used the hot-bed method in which rotting
manure provided the heat. The Egyptians built huge block incubators
which they warmed with fires right in the spaces where the eggs were bred.
Over the years incubators have been refined and developed to the point where
they are almost completely automatic. Modern commercial incubators are heated
by electricity, have automatic egg-turning devices, and are equipped with
automatic controls to maintain the proper levels of heat, humidity, and air
exchange.
Present-day commercial incubators vary in capacity from a few
thousand to many thousands of eggs, and they have made possible the
development of modern hatcheries that produce almost all the chickens grown in
this country.
Read More from prestigequeen.com :
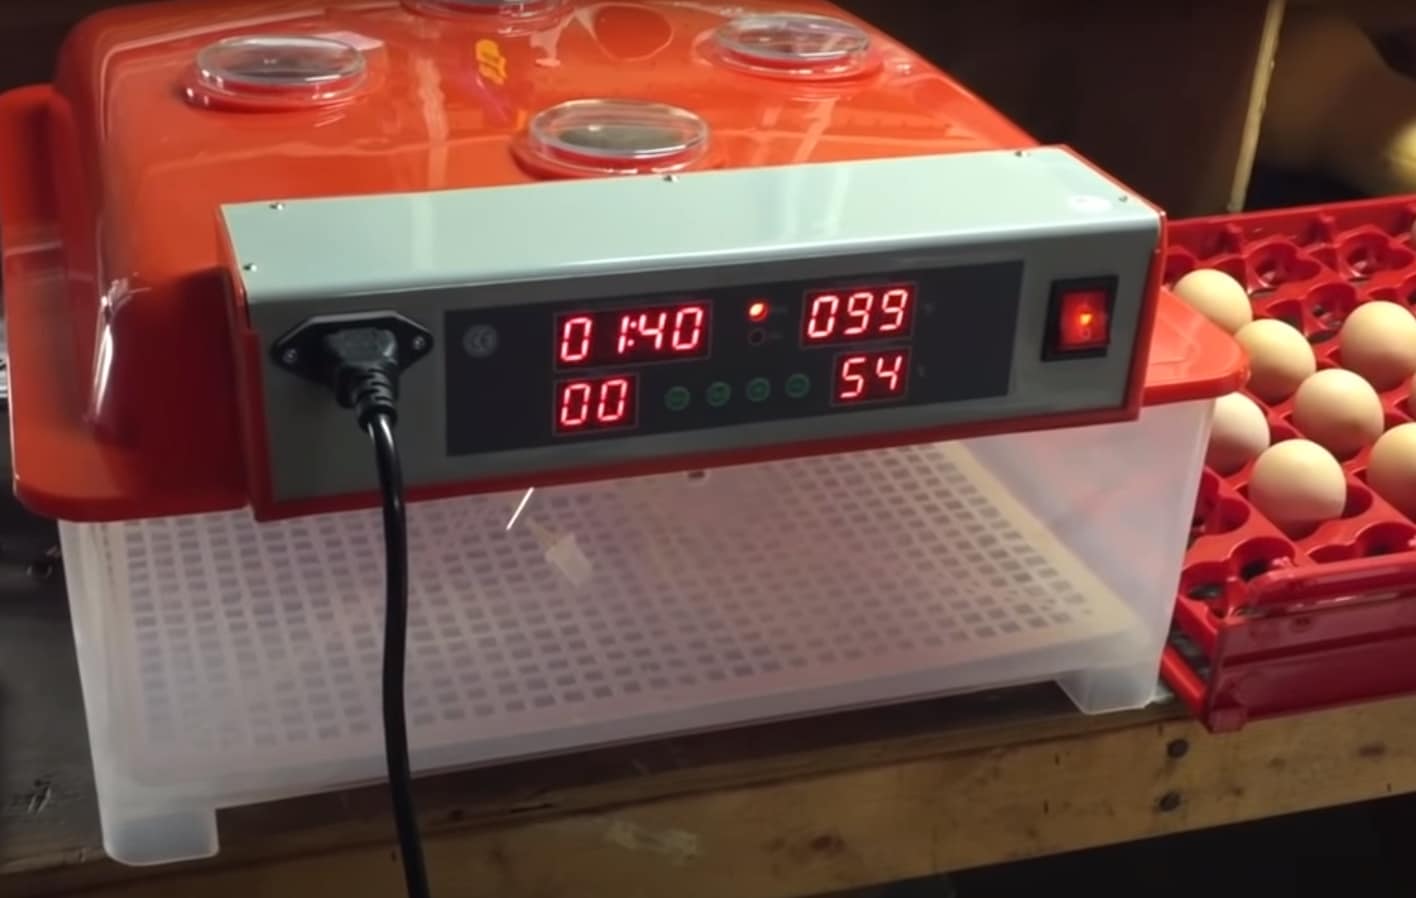
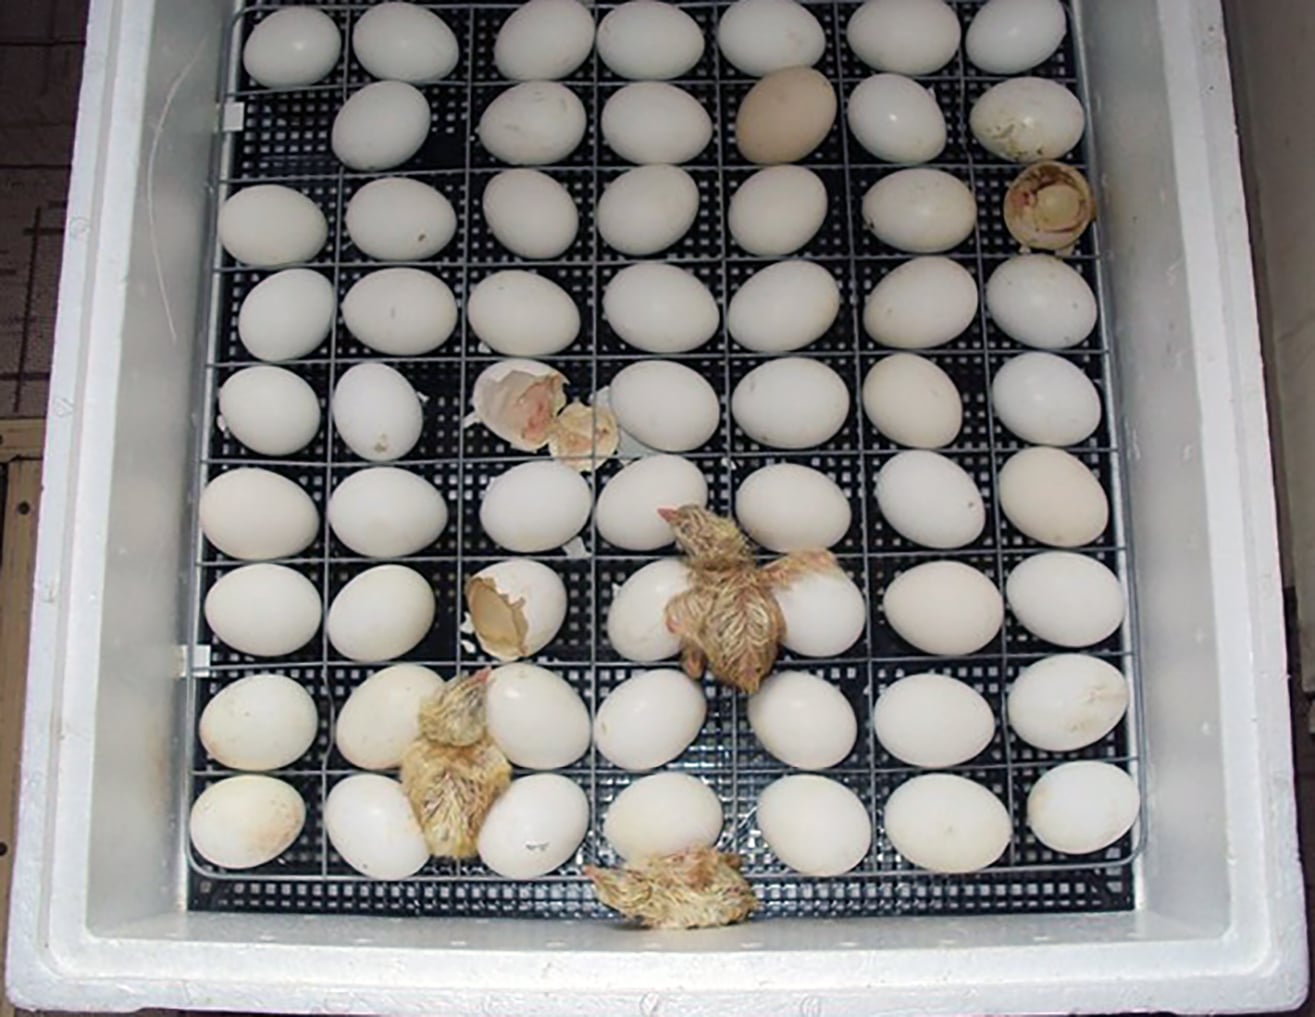
This picture shows a typical commercial incubator for the family flock. The unit has an electrical heating
element with a thermostat for automatic temperature control. A moisture pan helps maintain humidity.
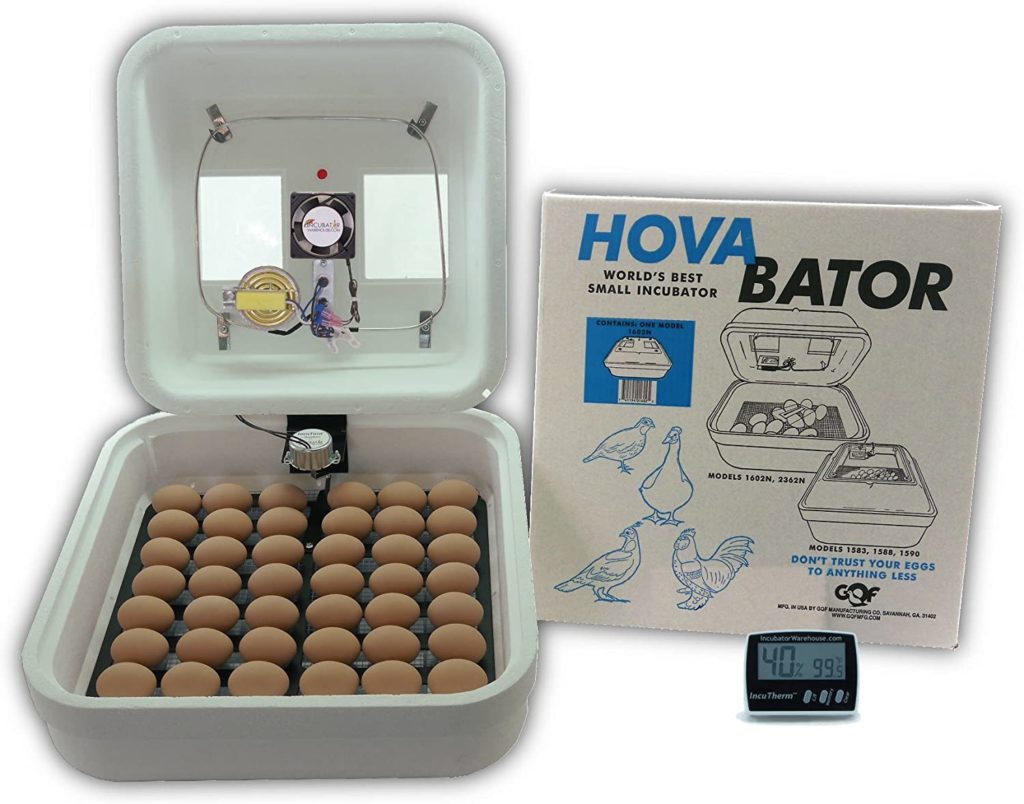
You can build a small incubator or you can buy a unit from various websites
or mail-order catalogs. These have been designed to serve the needs of the family
flock owner. Built-in heat control and ventilation take some of the risk out of
hatching eggs. However, the investment may be more than you can justify for a
few birds.
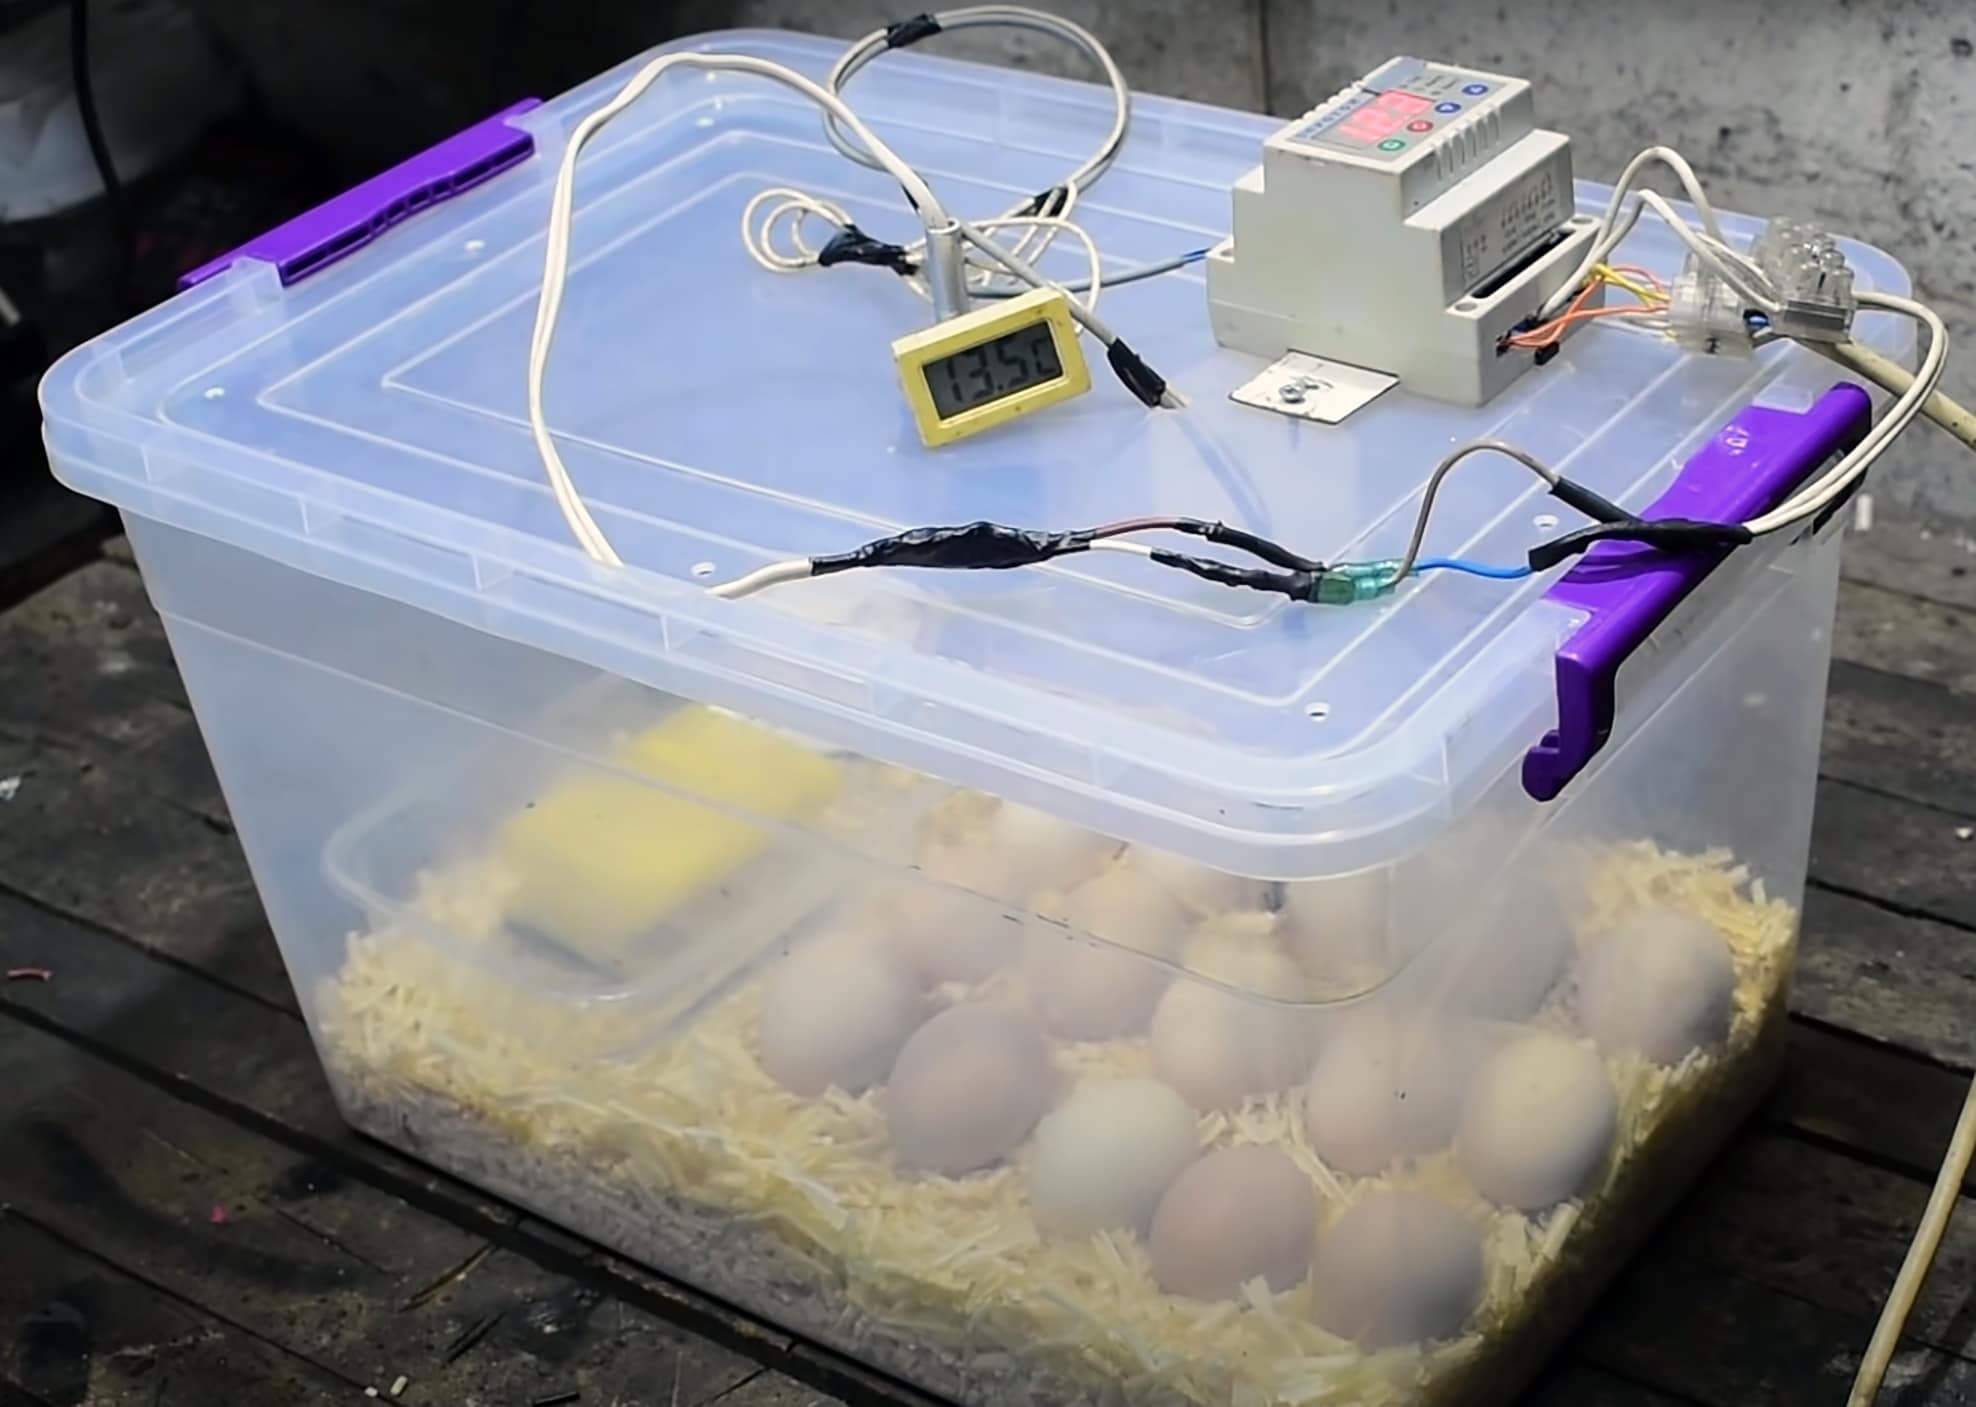
If you have average handyman skills, you can build an incubator suitable for
two or three dozen eggs. Plans for two units follow. The cardboard box model
was developed by E. A. Schano from Cornell University, and the plywood box
was developed by John Bezpa from Rutgers University.
A cardboard box incubator – DIY incubator
Read More from prestigequeen.com :
The following supplies are needed to construct an inexpensive cardboard box
incubator that will hold three dozen or more eggs:
• Two cardboard boxes, one 16″ wide x 20″ long x 12 ½” high, the other 14″
wide x 18″ long x 13″ (or more) high
• Single-strength pane of glass 16″ x 20″
• ¼”-mesh welded hardware cloth 18″ x 22″
• Commercial heating unit or porcelain socket and light bulb
• Cake tin (water pan) 1 ½” deep x approximately 9″ x 14″
• Glue
• Masking or scotch tape
• Newspapers
• Two brooding or incubator thermometers
The incubator is made in the following manner:
how to make a chicken incubator
- Place the smaller box inside the larger one. The inner box should be higher
than the outer box and approximately two inches smaller in both length
and width. - Mark a line on the inside box approximately ¼ inch below the level of the
outside box. Use a yardstick to make a straight line on the inner box after
it is removed from the outer box. - Cut off the top of the inside box along the line made in step number 2.
- Use cut-away pieces of the inside box to line the bottoms of both the inner
and outer boxes where the flaps do not meet. If there are no cut-away
pieces, use pieces from a third box. - Put glue on the bottom of the inner box and then center the inner box in
the outer one. There should be a one-inch space between the sides of the
boxes. Secure the inner box until the glue dries. - Mark a line on the flaps of the outside box where they come in contact with
the inner edge of the inside box. - Cut off the flaps of the outside box along the lines drawn in step number 6.
Cut the corner pieces on a diagonal so that they will make a neat, flat
corner. - Stuff strips of newspaper lightly into the space between the boxes. Do not
bulge the sides of the incubator. Wood shavings, excelsior, or styrofoam
can be used in place of the newspaper strips. - Use tin snips to cut a two-inch square from each corner of the ¼-inch
mesh hardware cloth, then bend the projecting pieces of the screen down
so that they form legs to support the screen. - Place the cake tin, which will cover about one-half of the surface area of the
inside box, under the hardware cloth screen. - Install the commercial heating element as directed in the instructions sent
with the unit. If you use an electric light for heat, mount the porcelain
socket on a board six inches square, then place the mounting board on the
screen. Next, place a tube of cardboard around the light. Position the tube
so that it surrounds the light and stands like a chimney, but to reduce the
fire hazard do not let it come in contact with either the lightbulb or the
covering glass. An oatmeal box makes a good tube. - Tape the flaps of the outer box to the sides of the inner box. This seals the
area in which the insulating material was placed.
A plywood incubator
The following materials are needed:
• Plywood
• Glass
• Cake tin
• ¼”-mesh welded hardware cloth
• Heating unit: either a commercial unit or porcelain socket and lightbulb
• Masking tape
You may construct the incubator according to the size preferred. It can be a.
a small one for only a few eggs or it can be a rather larger one that will certainly hold.
several loads of eggs. The larger the incubator, the more difficult it will be.
keep a consistent temperature in it. In fact, you may find it essential in the.
bigger incubator to put in a tiny fan (three-or four-inch blade or smaller sized) with a.
low revolving price.
Don’t expect one hundred percent success in hatching out eggs in these or any other.
incubators. Commercial breeding grounds with all their very automated as well as.
specialized tools do not average far more than an 80 percent hatch of all.
the eggs they incubate. You possibly must not depend on hatching more than 50.
percent, as well as you may not also do well in hatching 50 percent.
Location of incubator
To assist your incubator to keep a continuous temperature level, place it where it will
receive as little temperature level fluctuation as possible. Do not put it near a.
the home window where it will certainly be exposed to guide sunshine. The sunlight’s warmth can elevate the.
temperature high sufficient to kill the developing embryos. Link the unit to a.
trustworthy electrical source, and make certain the plug can not be mistaken.
separated from the electrical outlet.
Preparing the incubator
Prior to you nurture, be sure the incubator is functioning correctly which you
understand exactly how to operate it. Location cozy water right into the humidity pan, as well as readjust the
warm source up until the incubator temperature remains in between 99 ° as well as 102 ° F. Inspect
the thermometer frequently for a minimum of 1 day prior to your nurture to make sure it
will certainly stay at the right temperature level.
Warm resources having a thermostat are most dependable. Lightbulb devices without a.
the thermostat can be tough to manage unless the room temperature is reasonable.
consistent.
Occasionally, people try to breed eggs in stoves or others.
unique centers. They are virtually constantly dissatisfied due to the fact that.
temperature, as well as moisture requirements, are within a rather narrow array.
Despite having great tools, incubation is not constantly effective, so make every.
attempt to offer the appropriate environment making use of a reliable incubator.
When eggs are placed into an incubator operating at the proper temperature level,
the temperature level will go down. Do not change the thermostat upward throughout this.
warmup period. The moment that the temperature level in the system will remain below.
normal relies on the temperature level of the eggs and the ability of the home heating.
device. This temperature level lag period can be lowered by warming the eggs to space.
temperature level before they are placed into the incubator.
Incubator operation
Temperature
Temperature—Maintain the temperature in the 99° to 102° F. temperature
range (100° to 101° F., if possible). Place the thermometer to measure the
temperature at a level at or slightly above where the center of the egg will be.
Overheating the embryo is much more damaging than is underheating it;
overheating speeds up embryo development lowers the percentage of
hatchability, and causes abnormal embryos. Although a short cooling period
may not be harmful, longer periods of low temperatures will reduce the rate of
embryo development. Excessively low temperatures will kill the embryos. Avoid
temperatures outside the 97° to 103° F. range. If the temperature remains beyond
extreme for several days, hatchability may be severely reduced.
Humidity
Humidity—The moisture level in the incubator should be about 50 to 55
percent relative humidity, with an increase to about 65 percent for the last three
days of incubation. Moisture is provided by a pan of water under the egg tray.
The water surface should be at least half as large as the surface of the egg tray.
Add warm water to the pan as necessary. If more humidity is needed, increase
the size of the pan or add a wet sponge. Humidity adjustment can also be made
by increasing or decreasing ventilation.
Using a wet-bulb thermometer, you can determine relative humidity from this
chart:
If a wet-bulb thermometer or hygrometer is not available, the size of the air cell
in each egg can be used to estimate whether the humidity should be increased or
decreased (see candling instructions). The air cell increases in size during
incubation at a rate that depends on temperature and humidity as moisture
evaporates from the egg. The drawing shows the normal size of an egg’s air cell at
7, 14, and 18 days of incubation.
Ventilation
Ventilation is adjusted by increasing or decreasing openings in
the sides or top of the incubator. Normal air exchange is needed during embryo
development and should be increased as the chicks begin to hatch. The embryo
needs oxygen and produces carbon dioxide. However, the correct relative
humidity must be maintained until most of the chicks are out of their shells. Do
not open the incubator unless necessary during the last three days of incubation.
Turning
Turning—The eggs should be placed into the incubator on their sides. Turn
them at least three times a day, except for the last three days when they don’t
need turning. Turn the eggs an odd number of times so the position that is up
the longest (at night) will be changed from day today. Mark the date or an “X”
on each egg so you can tell if the eggs have been turned. When you turn the eggs,
move them to a different part of the tray to minimize the effects of temperature
variation in the incubator. If the eggs are not placed on their sides, they should
be placed at an angle so the small ends are in the downward position. Weekends
often pose a problem for teachers incubating eggs at school. They sometimes
take the incubators home (placing the eggs into egg cartons and wrapping them
to keep them warm when traveling back and forth), especially the first weekend.
Some teachers have found leaving incubators unattended during two-day
weekends has had little affect. Often the effect of not turning the eggs may be
much less than that of the jostling, jarring, and possible temperature changes
involved in taking the eggs home.
Length of incubation
Approximate incubation periods for commonly hatched poultry and game bird
species in small incubators are:
Species Days
Chicken 21
Most ducks 28
Muscovy ducks 33–35
Turkey 28
Most geese 29–31
Ringneck pheasant 23–24
Japanese quail 17–18
Bobwhite quail 23
Chukar partridge 22–23
Guinea fowl 26–28
Peafowl 28
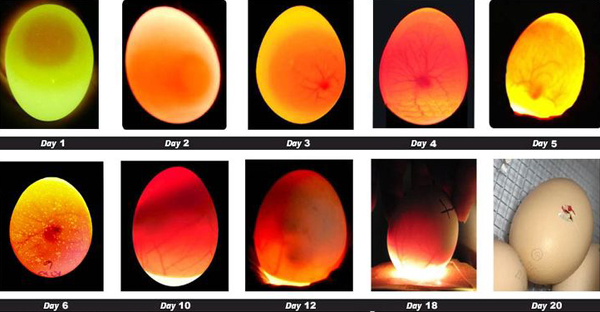
Candling the eggs
“Candling” is the examination of the contents of the eggs using a shielded light in
a darkened area. Eggs should be checked for development; then, if fertility is
poor, you do not have to wait the entire incubation period to learn you are going
to have a poor hatch. Candling to check air cell size can determine incubator
humidity. You can also observe the development of the embryo.
You can make an egg candler from a wood or metal box or from a container in
which you mount a 40-watt light bulb. Make a one-inch hole in the end near the
bulb. For better viewing, place a felt or cloth cushion around the opening so an
egg fits the opening better and so light does not leak around the egg.
Hold the large end of the egg up to the candling light. You won’t see much
development until the fourth or fifth day of incubation. White or light-colored
eggshells permit better viewing of embryo development. The contents of the egg
have a pinkish color or cast when the embryo is developing properly. As the
embryo grows, it occupies most of the space within the shell. Toward the end of
incubation, the contents will appear dark except for the air cell. Eggs that appear
clear at 4 to 5 days in incubation or that show little development at 10 days
should be removed from the incubator. They are infertile or contain early dead
embryos.
Read More from prestigequeen.com :
Candling will not influence embryo development if you handle the eggs gently.
When eggs are removed from the incubator only a few times and are not allowed
to cool to any extent, candling makes little difference in hatchability or the time
required for hatching.
Getting ready for the hatch
When the eggs are last turned, three days before hatch, place a layer of crinoline
or cheesecloth on the screen under the eggs. It will make cleaning the incubator
easier after hatching.
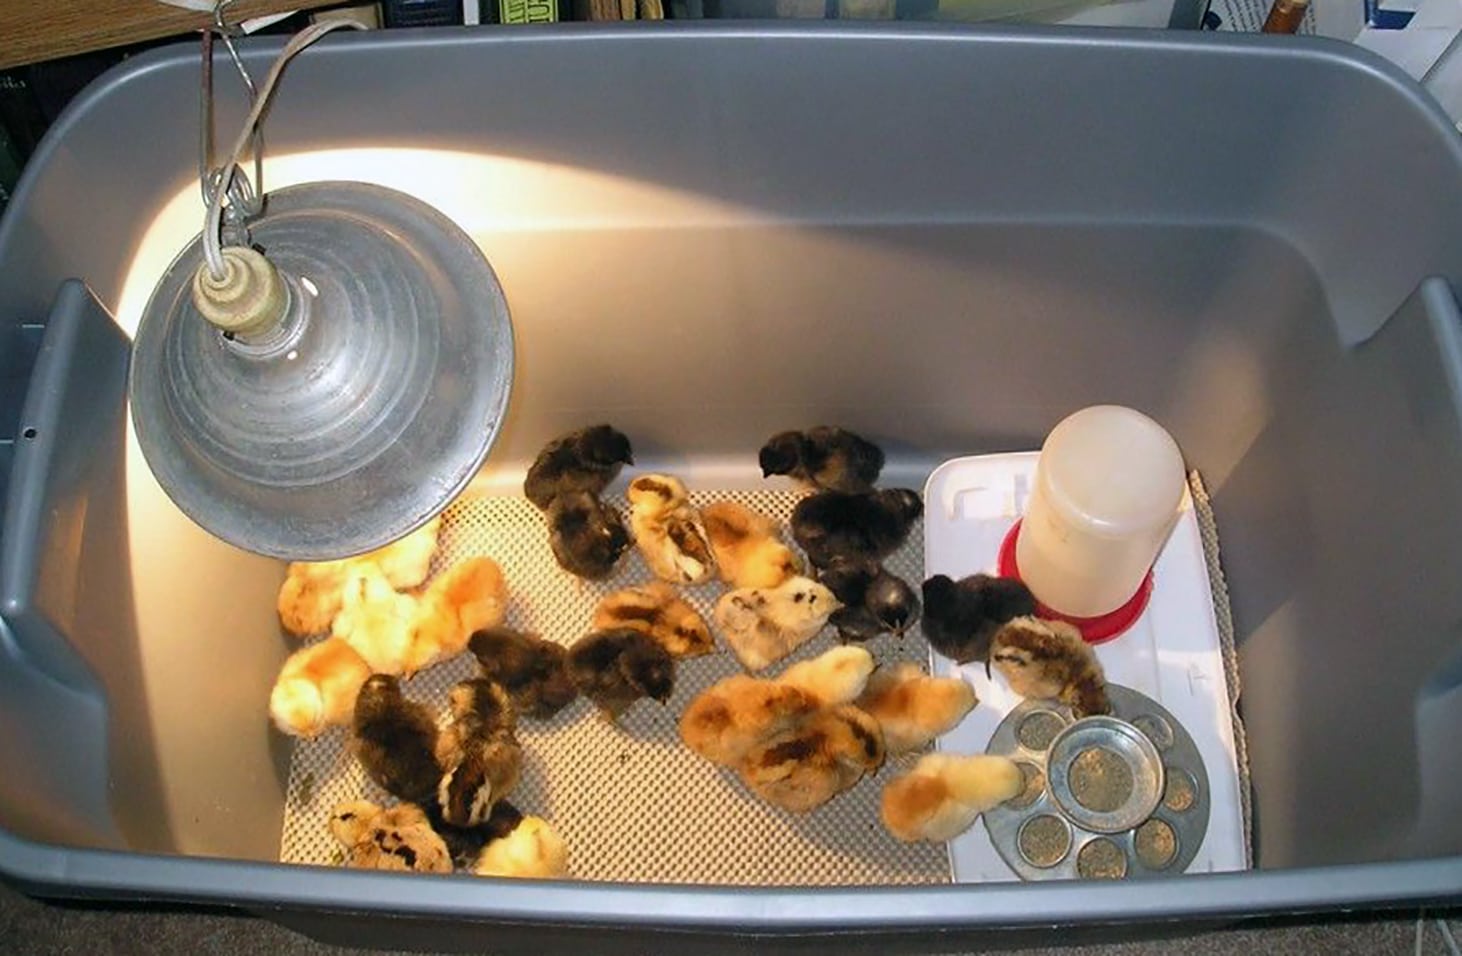
Most chicks should hatch within a 24-hour period. Late-hatching chicks may
lack vigor or be abnormal. After the chicks have dried and fluffed up completely,
they can be removed from the incubator. When most of the chicks have hatched,
you can lower the incubator temperature to about 95° F. if the chicks are to be
kept in the incubator for one or two days.
Clean the incubator after the hatch, so it will be ready for the next time.
Sanitation is an important part of incubating. Remove and dispose of the
crinoline or cheesecloth, together with the shells and other remains. Clean the
inside of the incubator with soap and water, and let it dry completely before
putting it away.
Starting with chicks
If possible, order your chicks from a local hatchery several weeks in advance. A
personal visit to the hatchery gives you the opportunity to learn about the
background of the chicks.
Ask about egg production of the breeding stock. You can’t get top production
from a poorly bred hen. She must have a high production potential in her makeup. A good goal is 65 percent, or 237 eggs a year per hen housed.
Choose a strain with good egg size and quality. Both are basically inherited.
However, there are limits as to how far one should go with egg size. Eggs can be
so large as to cost more to produce and so small as to bring lower prices. After
mature egg size is reached, the ideal weight is 25 to 26 ounces a dozen. Choose a
strain that will lay over 90 percent Grade A or AA eggs. You want birds that are
known to have good livability under reasonable environmental and management
conditions. The high cost of growing a pullet to maturity makes laying house
mortality especially serious. Adult mortality should not exceed 1 percent a
month, and growing-period mortality should not exceed 5 percent.
Plan to pick up the chicks yourself. It is amazing how much abuse day-old
chicks can stand in shipping. When a chick hatches, nature has provided it with
nutrients for about three days. However, elimination of chilling, overheating,
and starvation is sure to help your birds get off to a better start. Be sure that mail
order chicks are guaranteed.
Baby chicks usually leave the hatchery when they are one day old. They
normally require heat during the early weeks. They sometimes are vaccinated,
dubbed, sexed, and debeaked at the hatchery.
Straight-run chicks cost less than other ages and types of live birds. Straightrun birds are boxed at random as they come from the incubator; normally, about
half the chicks are pullets and half are cockerels. When space and labor are
available on the farm, cockerels of medium-weight breeds may be grown as
meat-type birds at the same time that pullets are grown as layers. Leghorn
cockerels aren’t worth the feed they eat and should not be purchased.
Sexed chicks are sorted after they leave the incubator into lots of pullets and
cockerels. Sexed pullets of lightweight breeds cost more than twice as much as
straight-run chicks; sexed pullets of medium-weight breeds—while usually not as
expensive as lightweight breeds—cost more than straight-run chicks.
The average family flock should be started with 25 to 35 straight-run chicks or
15 to 20 sexed pullet chicks. This should give you 12 to 15 pullets at 22 weeks of
age. The meat type straight-run birds will give you 12 to 15 cockerels for your
table or for sale as well as the layers. Late spring or early summer probably is the
best time to start a home poultry flock
Buy started pullets
Many poultrymen make a business of raising pullets for sale to laying flocks.
They either sell immediately after brooding or when the birds are 16 to 20 weeks
of age and ready to lay.
Buying pullets eliminates both hatching and brooding. You save on facilities
and the amount of time and labor required is vastly reduced.
There should be an understanding between the buyer and the grower
concerning the strain or cross of the started pullets, the type and number of
vaccinations, the kind of feed, and the disease history of the birds. There are
three basic things that will help get satisfactory results when you buy started
pullets: (1) Always buy from a person who has a reputation for furnishing a good
quality pullet. (2) Place your order for pullets five months or more in advance.
(3) Have a written agreement so that both parties fully understand all the little
details that should be a part of any buy-sell agreement.
Buy pullets from a hatcheryman or grower who makes a specialty of raising
pullets to sell—a person who raises only birds of one age in the same building—
and, one who cleans up between broods and gives the buildings a chance to air
out. If the pullet raiser is close to home, so much the better. The buyer can drop
in occasionally and see how the pullets are coming along. Also, a short haul for
started pullets is better than a long one.
Ask the same questions about started pullets as you would in buying chicks.
What is the background of the parent stock? How well is it adapted to your
climate and equipment? How about resistance to common diseases?
One of the advantages of started pullets is that they usually have been
vaccinated and debeaked to avoid feather picking and cannibalism.
Started pullets usually are sold between six and eight weeks of age. Individual
lots may vary with seasonal needs for heat. Their high purchase price reflects the
costs involved in getting the birds through brooding.
Ready-to-lay pullets are sold at 16 to 20 weeks of age. They begin to lay
almost as soon as they reach the farm. Ready-to-lay pullets sell for more than any
other age group of similar quality birds because they are through their
unproductive months. The grower has invested considerable time and feed in
them.
Read More from prestigequeen.com :
Start with second-year layers
Second-year or “recycled” hens offer the easiest, most economical way to
establish the home poultry flock.
Large commercial flocks usually replace their layers after 12 to 15 months of
production. Pullets begin laying when they are 20 to 25 weeks of age. Production
peaks at 34 weeks, then decline steadily at about 0.5 percent per week until the
hen’s molt. During the molting period, production drops drastically. After this
relatively short phase is over, the birds return to a laying rate perhaps 15 percent
below the first year.
The lower rate may not be profitable for the large, automated flock. However,
it works out well for the home poultry flock. The eggs are large and have good
shell quality.
The purchase price will vary with the age, breed, and strain of the birds and their
potential productive life. You’ll find them very cheap compared to started
pullets. However, make sure that the hens are in the 12-to 15-month age range. A
bird heading into her third year is a poor choice. You should neither buy a hen of
that age nor keep her in your own flock.
When a hen molts, she loses her old feathers and grows new ones. Egg
production normally stops as molting starts. The hen first sheds head and neck
feathers. She then goes on to lose feathers in this order—breast, body, wing, and
tail.
The birds in a flock that molt first are the low producers. Try to avoid them in
selecting hens for your home poultry flock. The early molters may not resume
satisfactory egg production for four to six months. In contrast, the birds that
molt late usually are high producers. After a rest of two or three months, they
begin to lay again.
Read More from prestigequeen.com :
Contents