
How to Use an Egg Candler
by Jennifer Behm – Chicken farmer| Last Updated– 17 January 2021
Read on:
- What does an egg candler do?
- What is candling chicken eggs?
- What you’ll need to candle your eggs?
- How do you make an egg Candler?
- The best egg Candler
- Instructions – What to look for when candling chicken eggs?
- When to candle chicken egg? Pro Tips
- Chick Embryo Development
- Day by Day Summary of Embryo Development
What does an egg candler do?
Egg candling is a process that gives you the ability to steal a sneak peek inside of an egg without having to crack it open. This process comes with many benefits, offering you more accurate hatch dates as well as an improvement in your skills with egg-handling since you can learn from your mistakes this way.
What is egg candler?
Candling is a method of checking an egg’s fertility. Natural fertility is never 100%, in fact, if you have bought shipped eggs for hatching the fertility rate is likely to be nearer to 50%, as even the best shipping method will have damaged some of the eggs. Otherwise, if they are eggs from your own hens or ones that have never been shipped then you may expect up to an 80% success rate.
You will need to check your eggs for fertility when artificially incubating using an incubator. Infertile or bad eggs should be discarded so that there is no risk of them going bad and exploding inside the incubator, which would contaminate the other eggs.
When is candling chicken eggs?
It is easiest to see the development of the embryo after a week. The most critical period in the incubation process is the first week so if you do decide to candle your eggs before a week then be very careful with them and do not overheat them. Always clean your hands well before touching the eggs, otherwise, you risk transferring harmful bacteria to the chick embryos. Limit your candling, to a very maximum of three times during incubation as each time humidity and heat is lost from the incubator, which could jeopardize your hatching success.
You should be able to see what is inside the egg and with practice, you will be able to identify fertile eggs by the spider-like blood veins spreading out, bad eggs, (may have blood rings and will be cloudy) where the embryo started to develop but later died and infertile eggs that are clear except for the shadow of the yolk.
Don’t be too quick to discard an egg that does not appear to be developing. We recommend that you wait until Day 14 before getting rid of it. The development will be clearer by then and you will be more easily able to compare the egg in question with others of the same age.
Read More from prestigequeen.com :
What You’ll Need to Follow This Tutorial
- Any type of candler
- Egg incubator
- Eggs
- Notebook
- Pencil
- Dark room
How do you make an egg Candler?
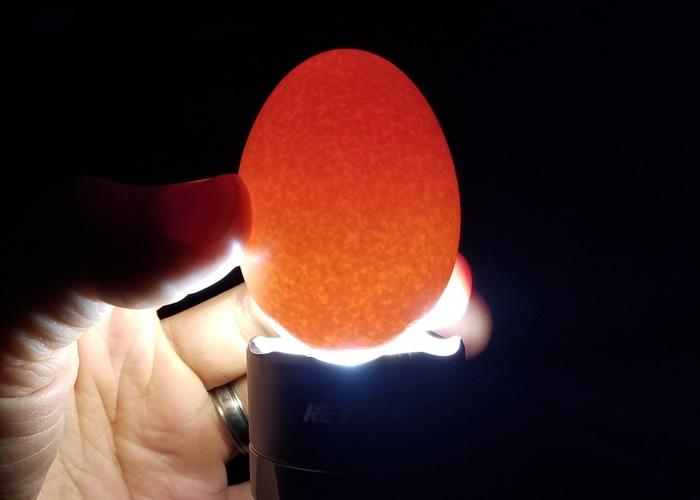
Candling gets its name from the days when people used candles as their light source, of course, these days you can buy or make your own candler using a light bulb as the light source. The easiest way to make your own candler is to place a light bulb (low energy light bulbs are best as you can get a very bright bulb but without the heat of a conventional one) and light fixture inside a cardboard box. Cut a small, round hole in the top of the box, just big enough to sit the pointed end of your egg into. Place your egg into this hole and turn the light on.
Candling does not damage the embryos inside the eggs as long as you don’t heat them up too much with the heat from the candling device.
The best egg Candler
| Image | Product | Top rated |
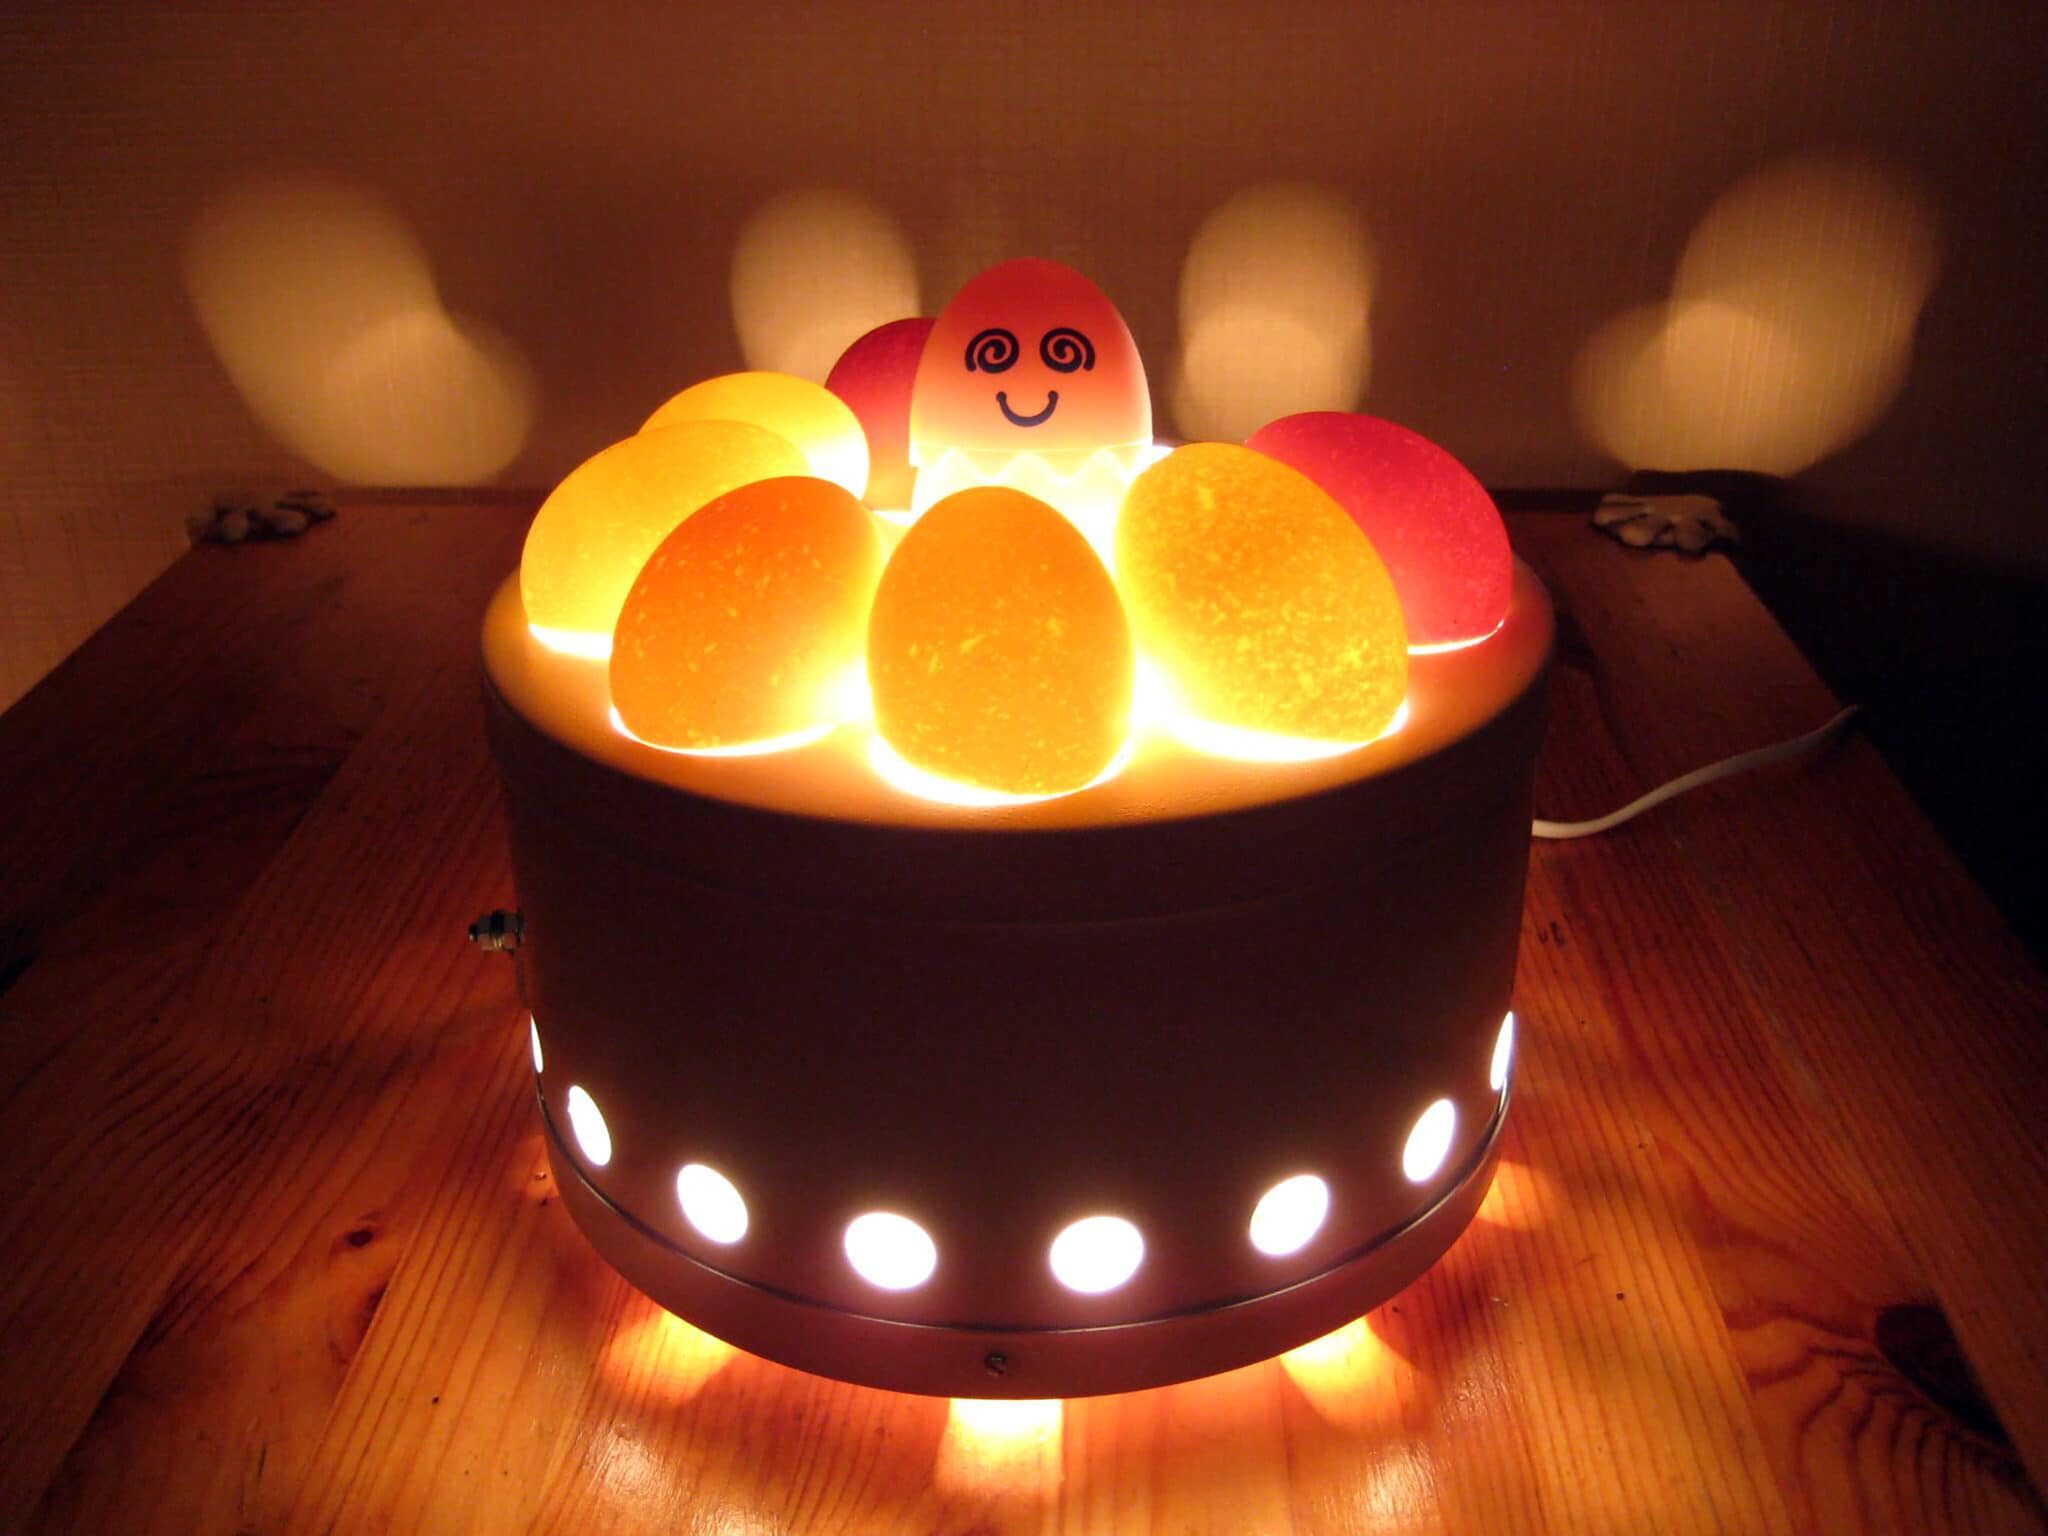
120 LUMENS for Monitoring The Development of The Embryo within The Egg 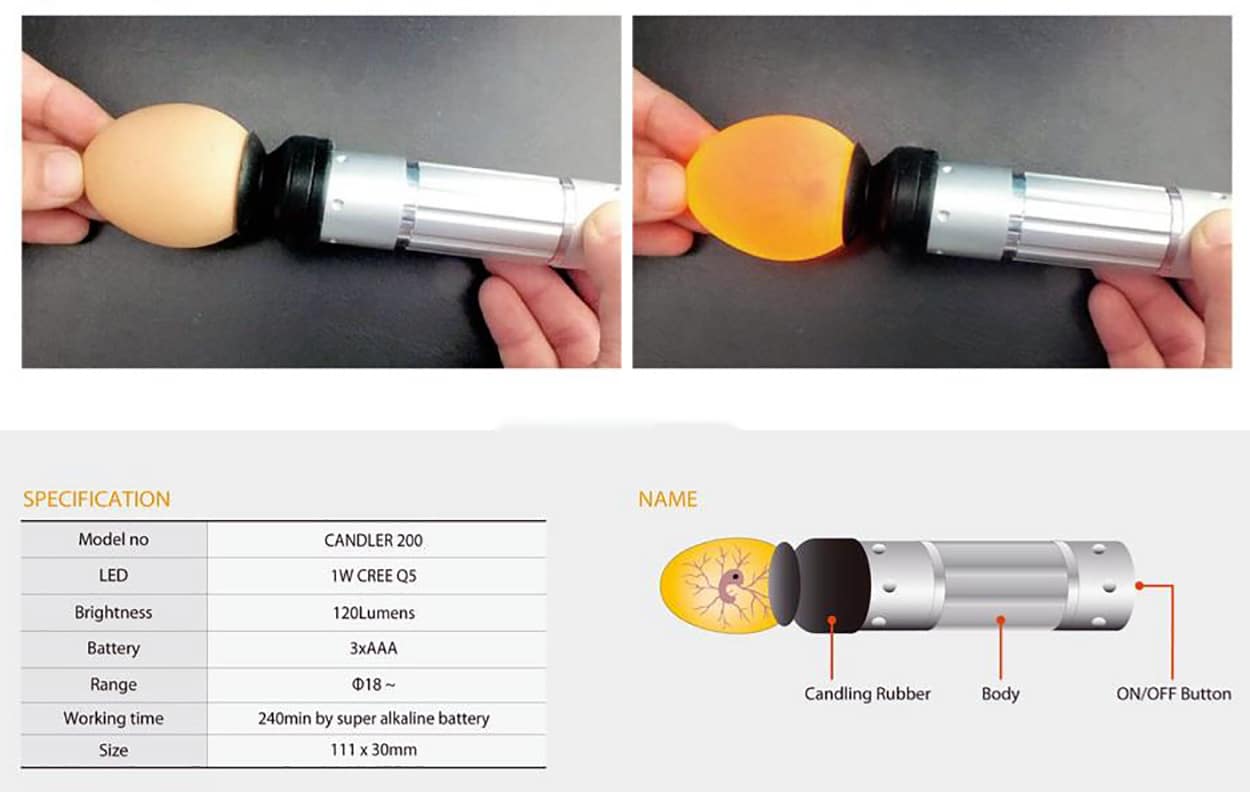 | RCOM LED Cool Light Egg Candler
| Check Price |
Egg Scope for Monitoring The Development of The Embryo within The Egg 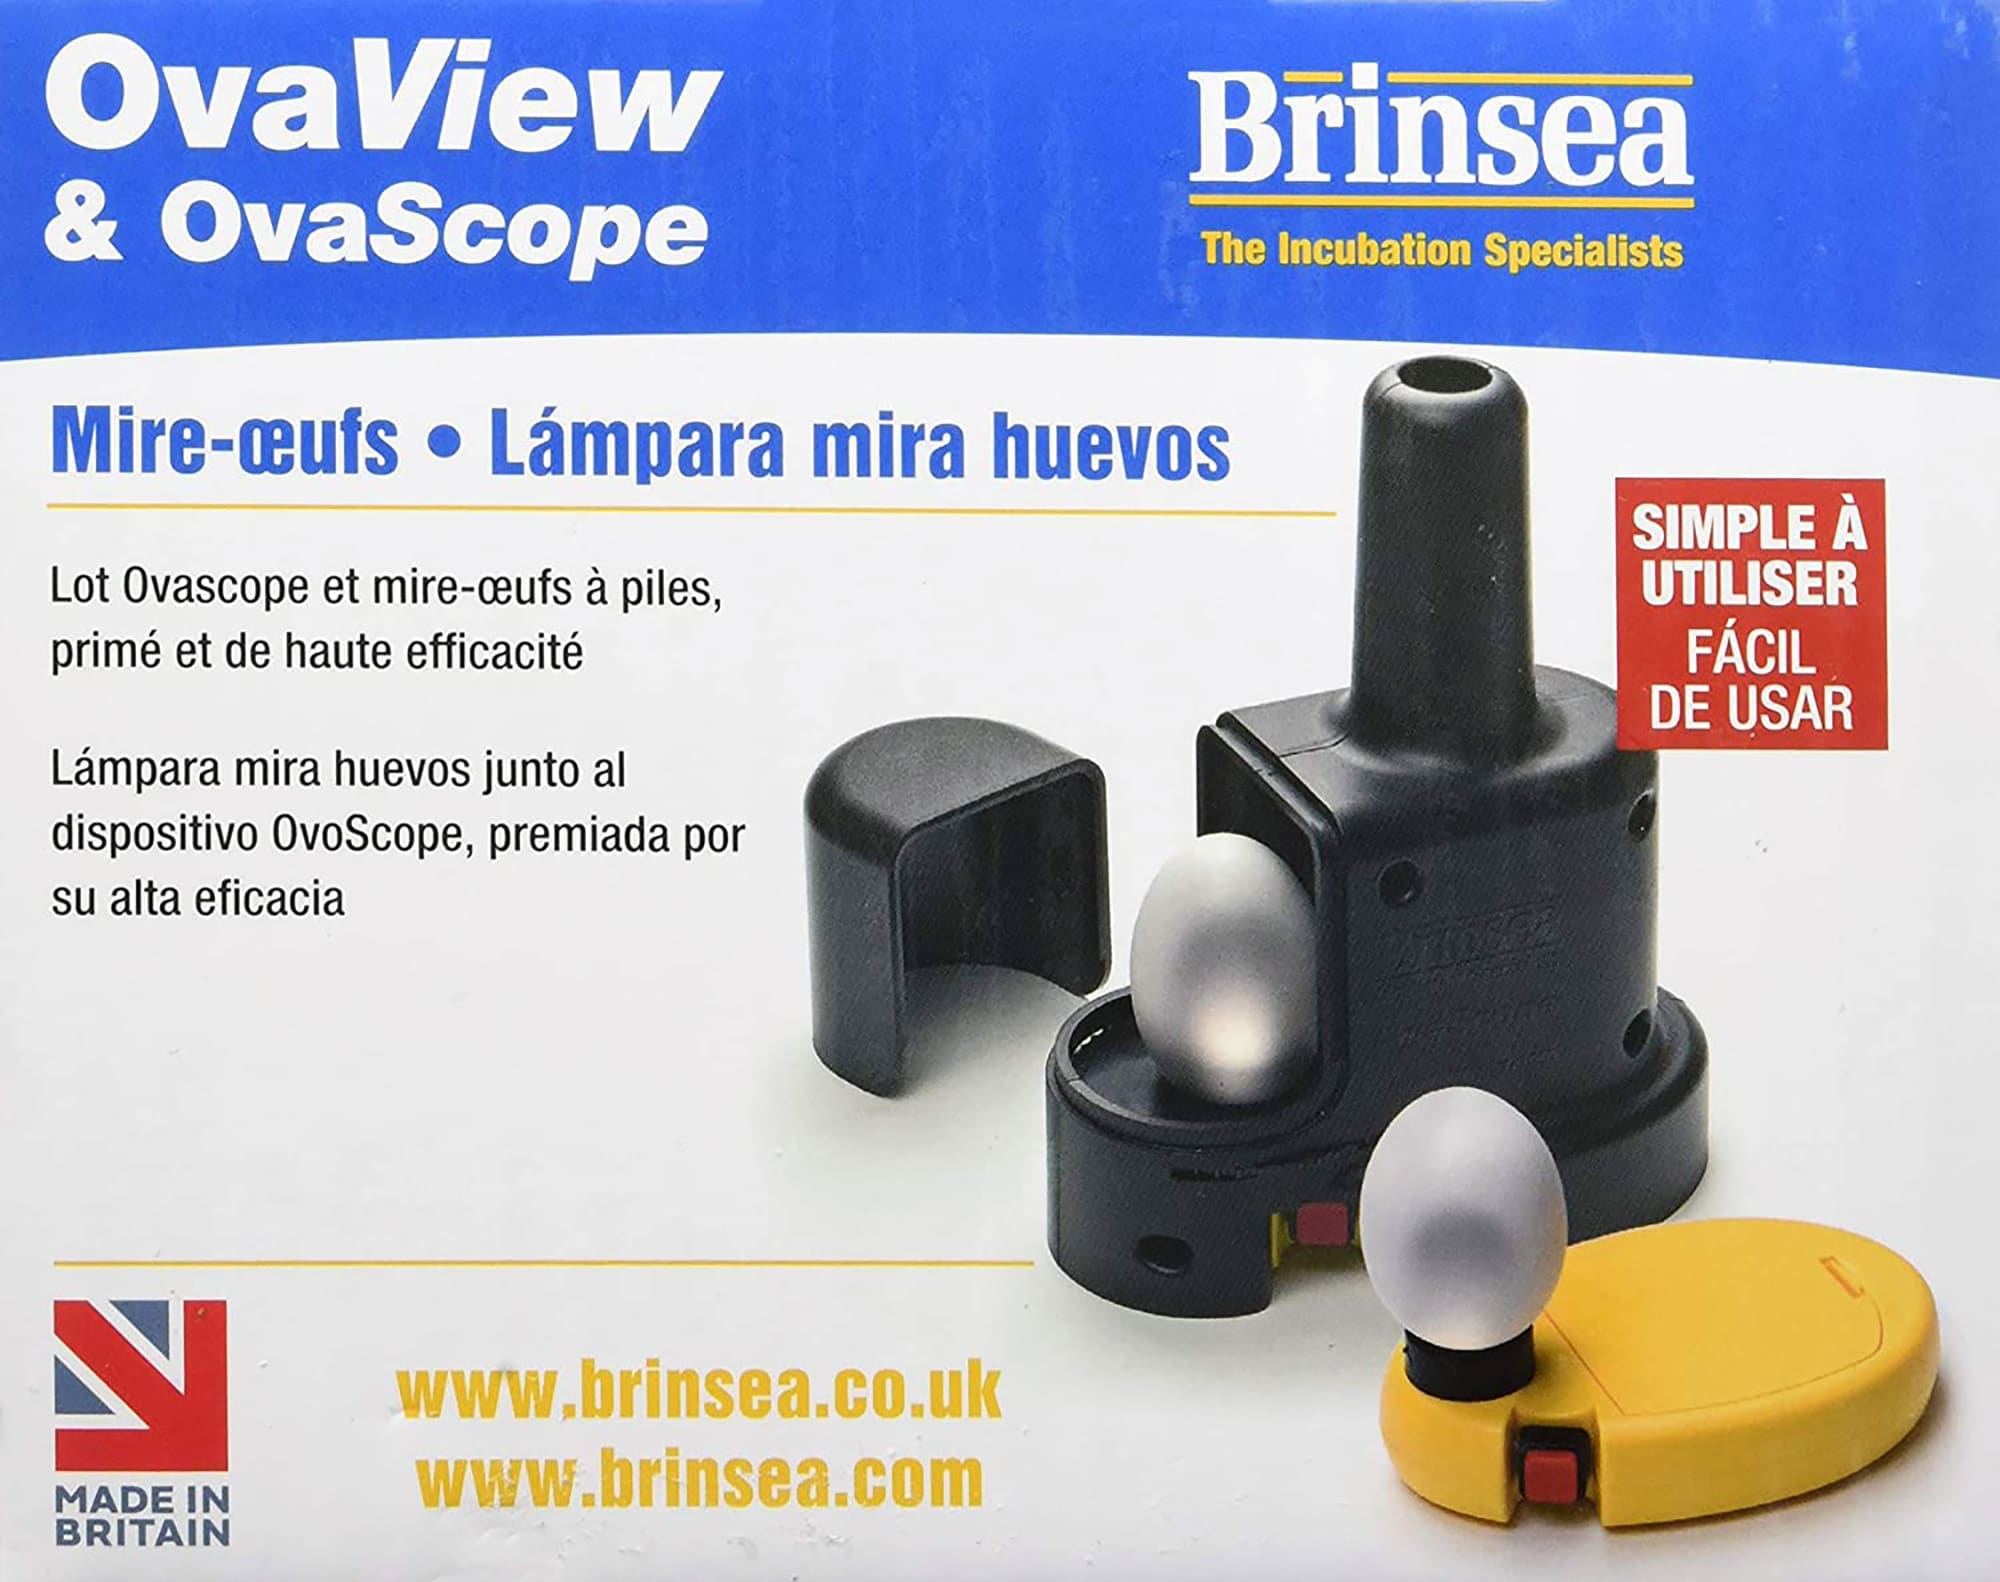 | Bright, high efficiency LED light
| Check Price |
Cool LED for Monitoring The Development of The Embryo within The Egg 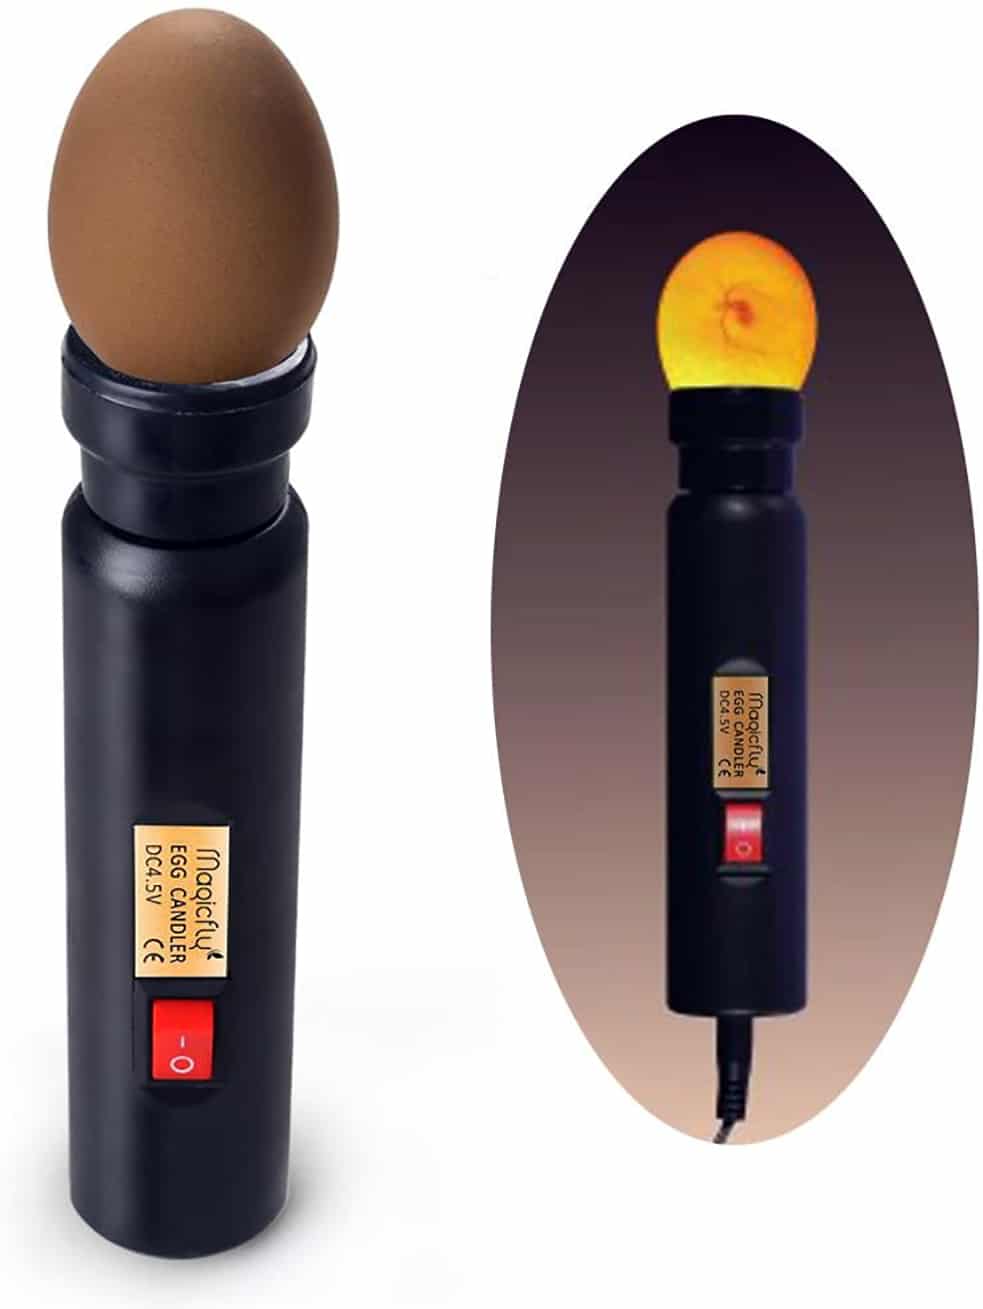 | Light Egg Candler Tester
| Check Price |
Dark brown eggs
Dark coloured shells are more difficult to see through, so you will need a brighter light. Even with a brighter light you may need to leave the egg longer until the embryo is potentially bigger and hope that you don’t in the meantime have any eggs that go bad and explode.
Instructions – What to look for when candling chicken eggs?
Step-By-Step:
1. Choose a candler for eggs
First, it’s important that you consider what type of candler you’re going to use for your candling process. Technically, simple flashlights or candles can be used for candlers, since they’re capable of shining light up into the eggs without causing harm to the babies inside of them. But there are also more high-quality and technical candlers that come with features that can make your life easier.
For instance, there are even high-tech candlers on the market that are capable of photographing the interior of the eggs to make your monitoring easier. Furthermore, there are even candlers that you can make on your own using an LED flashlight and a piece of cardboard. For further assistance, this YouTube video may be helpful.
The specific type of candler that you use depends on the number of eggs that you’re processing as well as how often you engage in the candling process. Your experience level can also impact the type of candler that you should be using since it requires more skill to successfully examine the interior of eggs with an LED flashlight. Once you have your candler set up and functional, you’ll then need to become familiar with the different times at which you candle the eggs.
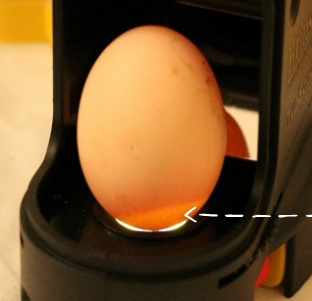
2. Candle as soon as they’re placed in the incubator
Perhaps the most important time to candle your chicken eggs is when you first place them inside of the incubator. This is vital to the overall egg-handling process because if you don’t candle the eggs to check for tiny cracks or other issues, then the egg may be useless later on.
When eggs are cracked, they can risk collecting bacteria on the interior of the egg’s contents, which may even cause the egg to explode. Because of that, you’ll want to examine all of the eggs for wrinkles, cracks, or other deformities before placing them into the incubator. To see what a cracked egg over a candler looks like, this YouTube video may be helpful.
3. Second time candling on the 4th or 5th day
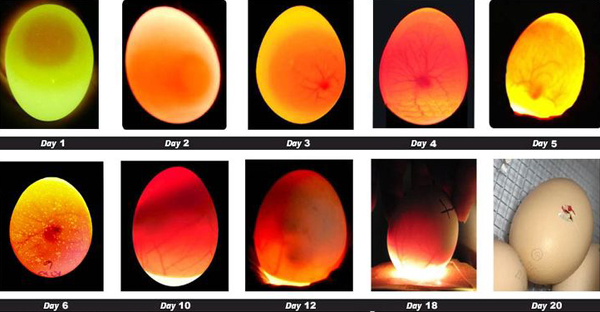
The second time to candle the eggs is on the fourth or fifth day, and you should see small veins that are the size of hairs spreading throughout the entire egg. This image should show help in showing what the veins should look like. If you don’t see the veins, then simply put them back into the incubator and wait for day seven.
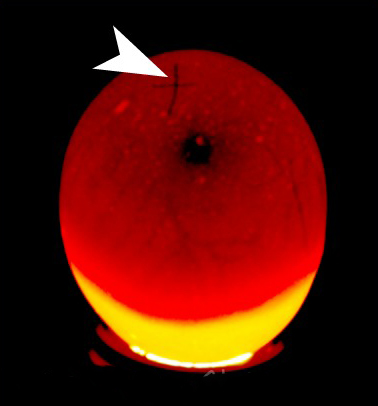
4. Candle ALL eggs on day 7
It’s important that you candle every single egg on day seven because this is where the real progress should be starting, not only should there be a wide array of veins throughout the egg, but you should also notice the start of an air cell at the base of it. This is essentially what it should look like by now.
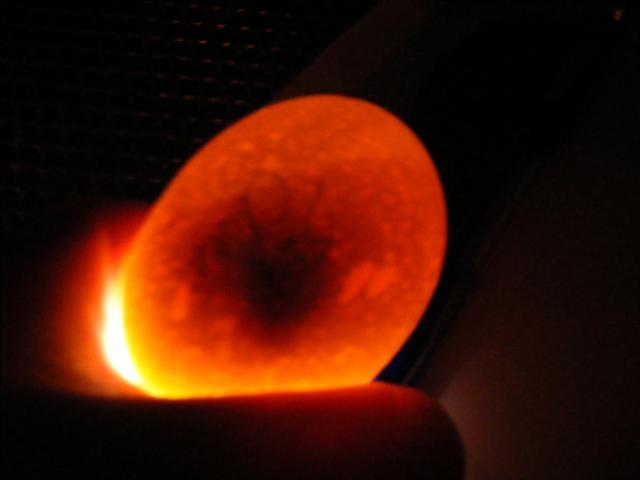
5. All eggs should then be candled on day 10
By the time the eggs reach day 10, you should see that the chick has filled up a larger amount of space within the egg’s interior. You should be able to clearly see the eye as well as an expanded air cell. And you may even be able to see some movement inside as well. This image should help to clarify.
6. Stop candling by day 18
It’s important that you stop the canceling process by the time day 18 reaches since this time period is when the baby is getting in the hatching position. You should avoid moving the eggs around too much because it can negatively impact the hatching time of the egg. Also, you’ll want to turn off the automatic turner feature on the incubator to avoid any more movements. To make sure your eggs are on the right track, here is what a standard egg looks like on day 18.
When to candle chicken egg? Pro Tips:
- Don’t candle daily, since this can negatively influence the egg’s development
- Make sure the eggs are clean before you handle them to ensure clear vision through the eggshell
- Take extra care when you’re candling darker eggs, as they’re more difficult to see through
- Keep good notes each day of the candling process, recording the egg’s temperature, humidity, its air cell size as well as the number of the day
- You can even use a pencil to mark a number on each of the eggs to allow for more accurate results
- Don’t keep the eggs out of the incubator for more than 30 minutes
- Only hatch eggs of the same kind together, since different eggs require different environmental conditions
Read More from prestigequeen.com :
Conclusion
I’ve been candling eggs for years, so the information compiled throughout this guide is derived from both my professional expertise as well as my own personal experiences. There can be many problems associated with eggs while they’re in the developmental process. And there’s essentially no easy-way of telling how the chick is progressing inside of the egg.
Egg candling gives you the opportunity to see inside of the egg before it’s hatched in a limited way. It can help you to see any problems early on, and you may be able to either save that egg or learn from that experience for future ones. The process is easy to do, since you need minimal equipment and it requires basic skills.
After you have the right kind of candler that you want to use, make sure that you’re in a dark room and check each of the eggs on the specified days. Make sure that you keep track of their progress and treatment throughout their 21 days in the incubator, and care for the chicks just as you would care for your children.
Read More from prestigequeen.com :
Chick Embryo Development from Egg Formation to Hatching

Fertilisation of the ova (yolk) by the sperm takes place in the infundibulum about 15 minutes after its holding sac ruptures and releases it. The combination of the ova and the sperm form a single cell called the zygote. The zygote reaches the isthmus about 5 hours after fertilisation and it is here that the embryo starts to develop, through cell division. By the time it leaves the isthmus it has grown to an eight cell embryo and by the time it leaves the uterus it has grown to 256 cells. The developing embryo will stay at this stage until incubation conditions are right for further development.
Cell division continues as the egg passes along the oviduct and is laid. An egg takes about 25 hours from the release of the ova to the point of lay. This means that in actual fact a chicken egg takes 22 days to hatch, not the 21 days which is usually quoted: 1 day in the oviduct and 21 days in the nest or incubator.
Embryo Development During Incubation
Formation of the ectoderm, endoderm and mesoderm

Once in the incubator or under a nice warm hen, development through cell division starts again. Two layers are formed over the yolk these are the ectoderm (uppermost) and the endoderm (underneath) layers. At about this stage the central cells of the blastoderm ( the layer of cells that develops on the surface of the yolk and gives rise to the germinal disk from which the embryo develops) separate from their contact with the yolk and form a cavity. It is in this cavity that subsequent embryo development occurs. Soon after the formation of the ectoderm and endoderm, a third layer of cells called the mesoderm or middle layer is formed.
The important organs and body tissues develop from these three layers. With the ectoderm producing the nervous system, parts of the eyes, the feathers, beak, claws and skin. The endoderm produces the respiratory system, the digestive system and secretory organs. While the mesoderm produces the skeleton, muscles, circulatory system, reproductive organs and excretory system.
Extra Embryonic Membranes
Not only do the early embryonic germ layers (ectoderm, mesoderm, and endoderm) develop into specialised tissues of the body, but they also form membranes outside the body which help protect and nourish the developing chick embryo. Three extra-embryonic membranes are formed from the these first germ layers and are as follows:
The Yolk Sac
The yolk sac envelops the yolk and draws nourishment from it, producing an enzyme that changes the yolk material to a form that can be used as a food source by the developing embryo. Any remaining, unused yolk material in the yolk sac when the chicken hatches from the egg is drawn into the abdomen for use by the chicken for the first two to three days after hatching, while the chicken learns what to eat and drink and where to find it.
The Amnion
Ectoderm and mesoderm surrounding the embryo, form a protective covering over the embryo called the amnion. The inner layer of cells secretes amniotic fluid in which the embryo floats. This fluid keeps the embryo from drying out and helps absorb shocks when the egg is knocked.
The Chorio-Allantoic Membrane
The chorion which lines the eggshell and performs gas exchange and waste elimination is formed from the ectoderm and mesoderm layer and the allantois is the embryo’s connection to the chorion. The allantois appears as a balloon-like structure coming from the hindgut at about 4 or 5 days. The allantois develops an extensive circulatory system connected to that of the embryo and driven by the new embryonic heart. When the allantois is fully developed it completely surrounds the embryo.
The allantois membrane has a number of functions, including a respiratory role. The growing embryo uses oxygen and produces carbon dioxide, but is unable to carry out respiration itself yet and therefore it is the role of the allantois to oxygenate the blood and eliminate the carbon dioxide.
The allantois serves an excretory role, removing waste that the embryo metabolizes. It also has a digestive role, providing a means for the embryo to access the albumen and the calcium of the shell.
Day by Day Summary of Embryo Development
Day 1: Appearance of some tissue development.
Day 2: Tissue development becomes very visible and blood vessels appear.
Day 3: Heart is beating and blood vessels become very visible.
Day 4: Eye becomes pigmented.
Day 5: Knees and elbows appear..
Day 6: Beak can be seen and voluntary movements start.
Day 7: The comb begins to develop as does the egg tooth.
Day 8: Feather start to be visible and the top and bottom beaks line up.
Day 9: Embryo now looks like a bird and the mouth opening appears.
Day 10: The embryo has toe nails and the egg tooth is clearly visible.
Day 11: Comb is fully developed and the tail feathers are now visible.
Day 12: Toes fully formed. .
Day 13: Appearance of scales as the body is now covered with light feathers.
Day 14: Embryo turns its head towards the large end of the egg.
Day 15: Gut is drawn into abdominal cavity.
Day 16: Feathers now cover the complete body and the albumen is nearly gone.
Day 17: Amniotic fluid decreases and the head is now between the legs.
Day 18: Growth of the embryo is nearly complete. Yolk sac is still on the outside of embryo and the head is under the right-wing.
Day 19: Yolk sac now draws into the body cavity and the amniotic fluid is all gone. The embryo now occupies most of space within the egg, excluding the air cell.
Day 20: The yolk sac is now drawn completely into the body. Embryo becomes a chick and breathes in air. Internal and external pip or cracks appear.
Hatching
Finally, after an incubation period of 21 days, the chick is finally ready to make its escape into the world. The chick begins by pushing its beak through the air cell. The allantois which has served as its lungs begins to dry up as the chick starts to use its own lungs. The chick continues to push through the shell, using its egg tooth (this will drop off a few days after hatching), which is situated on the upper beak and remarkably strong neck muscles. This can take some time and the chick will stop and rest many times before its head falls free from the shell. It will then kick off the bottom part of the shell and then rest exhausted while its navel opening heals and its downy feathers dry off.
Read More from prestigequeen.com :
- Incubating & Hatching Eggs
- How to make an egg incubator?
- Everything you ever wanted to know about Eggs
- The best chicken BROODER box & heater
- Best Egg laying Chicken Breeds
References:
- Candling and grading manual for shell eggs – cdm16884.contentdm.oclc.org
- Embryonic development and the physiological factors that coordinate hatching in domestic chickens – www.sciencedirect.com
- Candling – en.wikipedia.org
- Candling Eggs – web.extension.illinois.edu
Contents
Good Instructions!)
how to make an egg candler?
it is difficult
what to look for when candling chicken eggs?
watch the video instructions
It’s really a great and helpful piece of info.
I’m glad that you simply shared this helpful info with us.
Please keep us up to date like this. Thanks for sharing.
where can i buy egg candler light?
the article has links to products
The Best Guide
Like!! Thank you for publishing this awesome article.
best material on the topic
Magicfly Bright Cool LED Light Egg Candler Teste
in general, this is a terrific buy. I indicated to purchase the one with the battery pack option, and I clicked on the incorrect listing. Absolutely my fault. Nonetheless it’s the same keynote, as well as it functions truly actually well. I utilize it to check eggs that my free-range hens choose to hide, and also to seek development when hatching out eggs. Checking them in a dark area is the easiest. I have a range of shades from really brown to blue-green two darker brown. My good summer eggs are the darkest, and also I can still see them quite well. Interestingly enough the turquoise eggs are thicker or something, so they are the hardest for me to translucent. I can still see well enough to inspect air cell and also most likely for capillary, etc, but I have not had any establishing that needed monitoring. The picture in the listing of the various phases of egg advancement is an actually fantastic source, as well as I wish they sent a duplicate with the actual candler.
Rcom Excellent portable egg candler. Does an excellent job. Powered by AAA batteries. Works well with rechargeable Batteries
Magicfly Bright Cool LED Light Egg Candler Tester is the best. My grand daughter was easily able to candle the eggs and the results were spot on. 4 healthy chicks Christmas Eve!!