
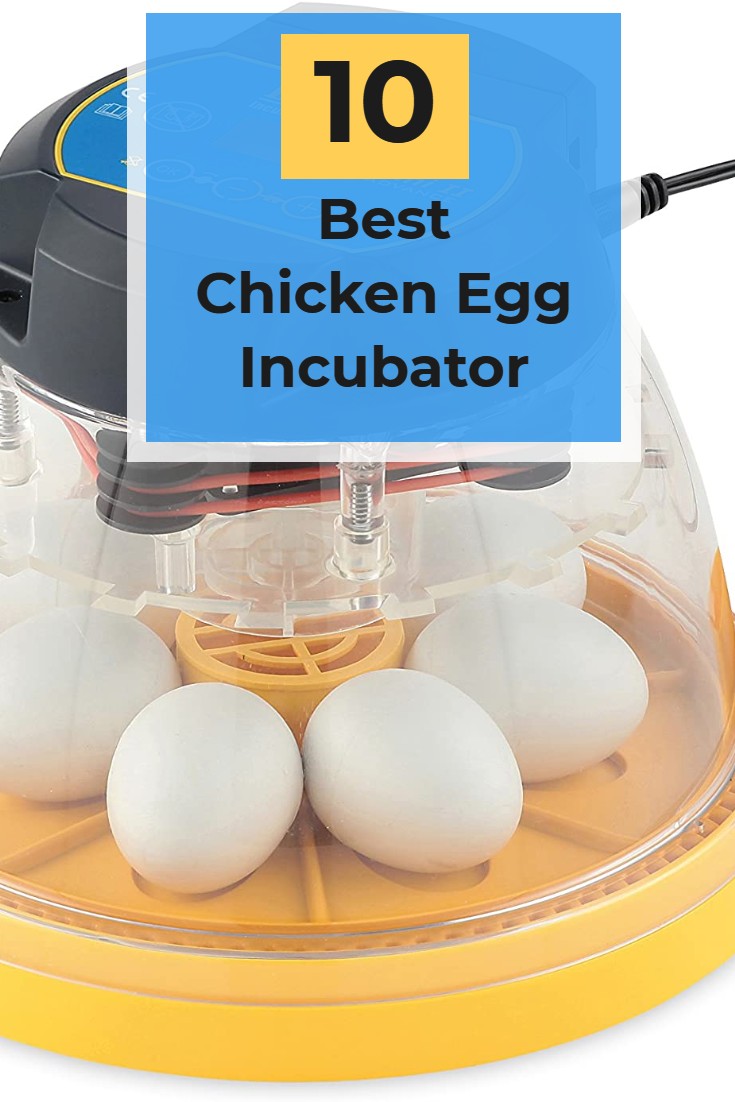
Best Chicken Egg Incubator
by Jennifer Behm Chicken farmer| Last Updated 15 March 2023
- Harris Farms 360 INDUCED AIRFLOW incubator “Best for Chicken Eggs & Great View“
- HovaBator Combo Kit 42 eggs incubator “Best Beginner Kit & Easiest to Use“
- Farm Innovators with Automatic Egg Turner“Best Temperature Indicator & Transparent Dome“
- Budget Large 56 Eggs Incubator “Best Large Incubator & LED Candler“
- Magicfly Small Egg Incubator “Best Compact Design & Most Affordable“
- ESTINL Poultry 12 Eggs Incubator “Best Led Display & Most Protective“
- R-com Fully Automatic Egg Incubator “The Most Reliable & High Egg Capacity“
- Magicfly Eggs Incubators for Hatching Chickens Eggs “Best Overall & Most Versatile“
- HBlife 9-12 Digital cheap Incubator “Best for Large Eggs & Largest Design“
- Brinsea Mini II Best Small Egg Incubator “Best Visibility & Easiest to Clean“
For those of you that have chickens, quails, ducks or other types of birds, you're probably aware of the importance of having the right kind of equipment for hatching season. Female birds of all kinds are capable of laying eggs right after mating season, and it can be difficult to figure out what to do with all of the eggs that she lays.
If you want to make use of the entirety of your female birds' egg-laying abilities, then you may want to consider purchasing an egg incubator. Egg incubators are devices that are capable of keeping the bird eggs alive and healthy throughout the beginning of their lives. They act as though the mother is sitting on them, helping them to increase the success of their hatch rate.
But there are so many different kinds of egg incubators on the market, making it difficult to choose the best one for your specific purposes. To be more helpful, here is a guide containing the best egg incubators on the market as well as some helpful information that you should consider before choosing a certain one for you.
Read on:
- Top 10 Chicken Egg Incubators Reviews
- Egg Hatching Machines Buyer's Guide
- Quick Tips for Hatching Poultry Eggs
- Caring for Eggs Pre-incubation
- Broody Hen to Hatch Eggs
| Image | Product | Top rated |
360 Degree & View eggs  | Harris Farms Nurture Right Incubator
| Check Price |
BEST COMPACT DESIGN & MOST AFFORDABLE 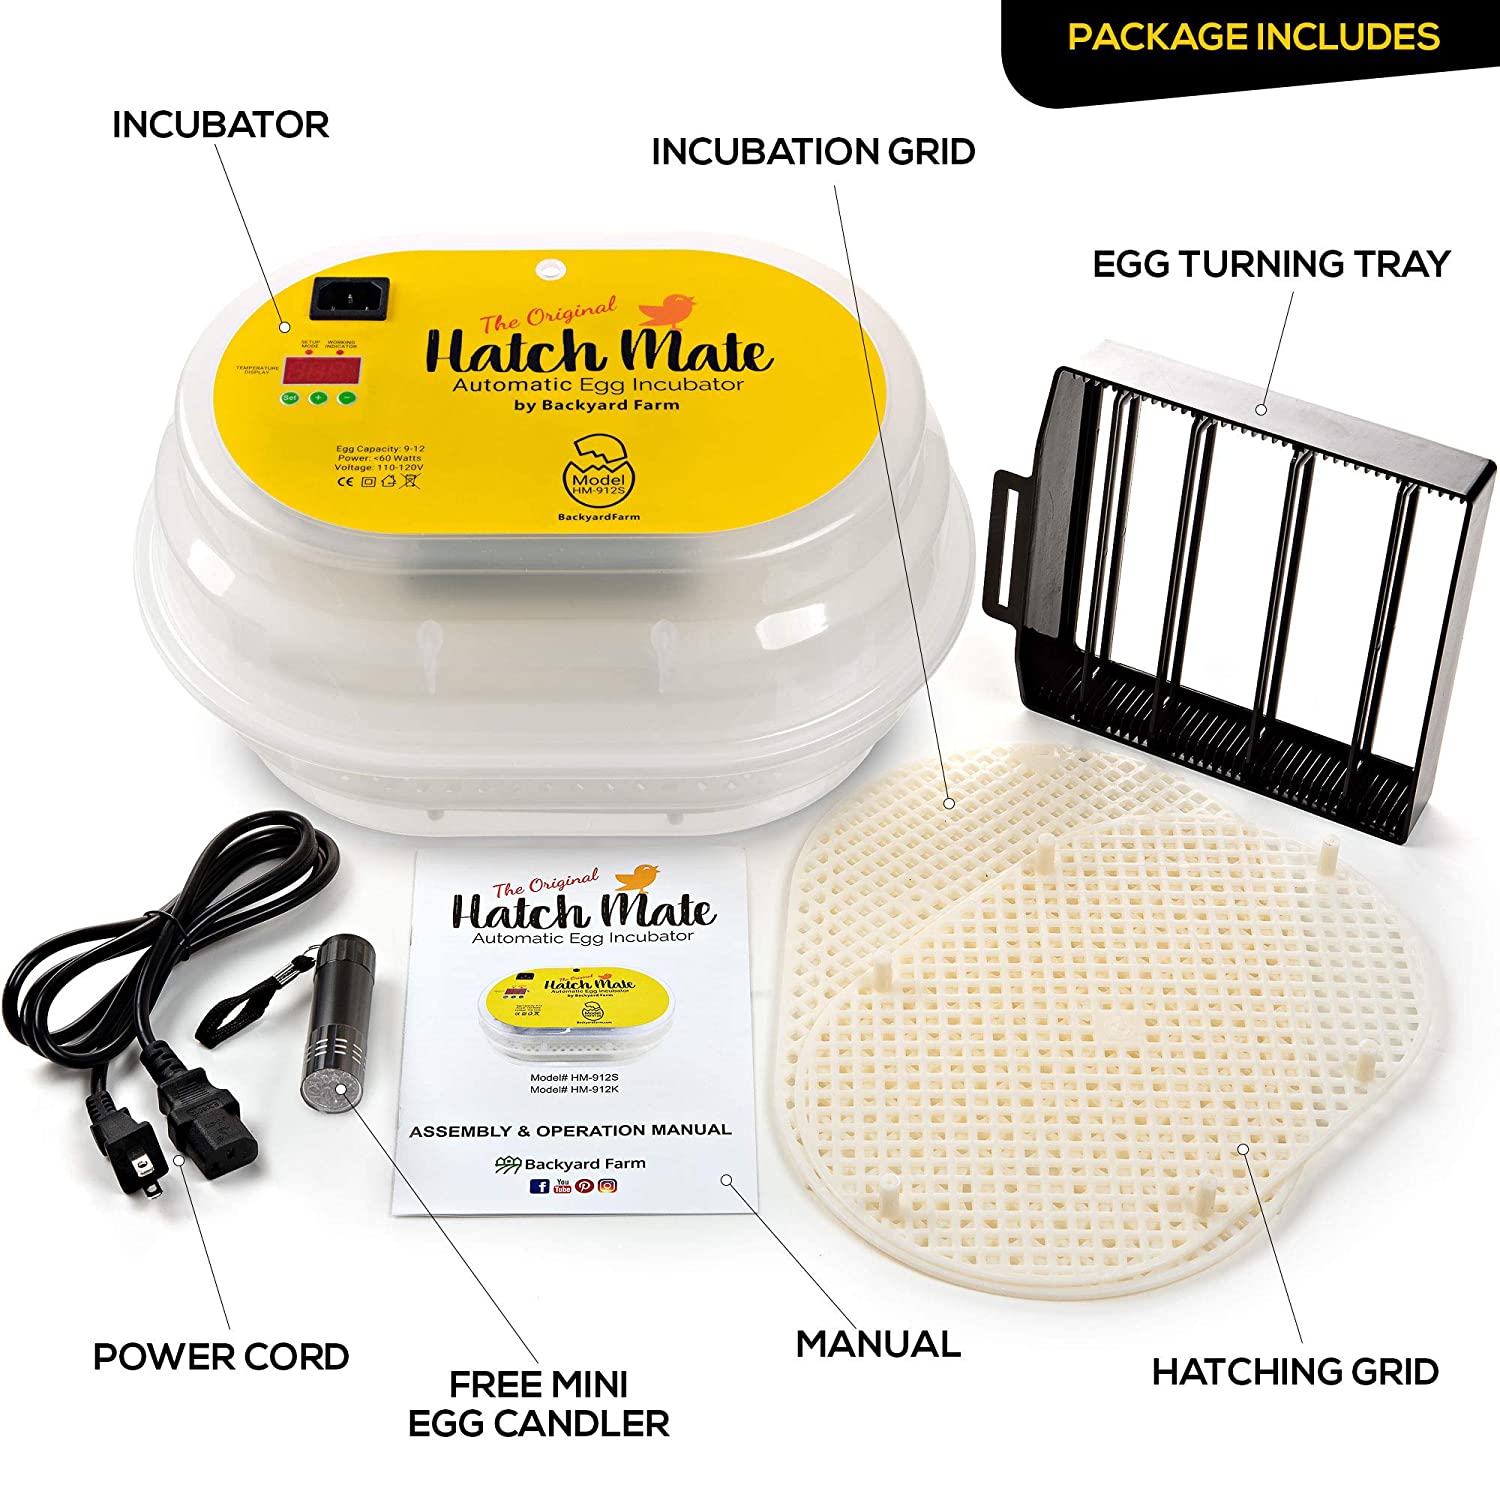 | Egg Incubator HBlife 9-12 Digital Fully
| Check Price |
Best Led Display & Most Protective 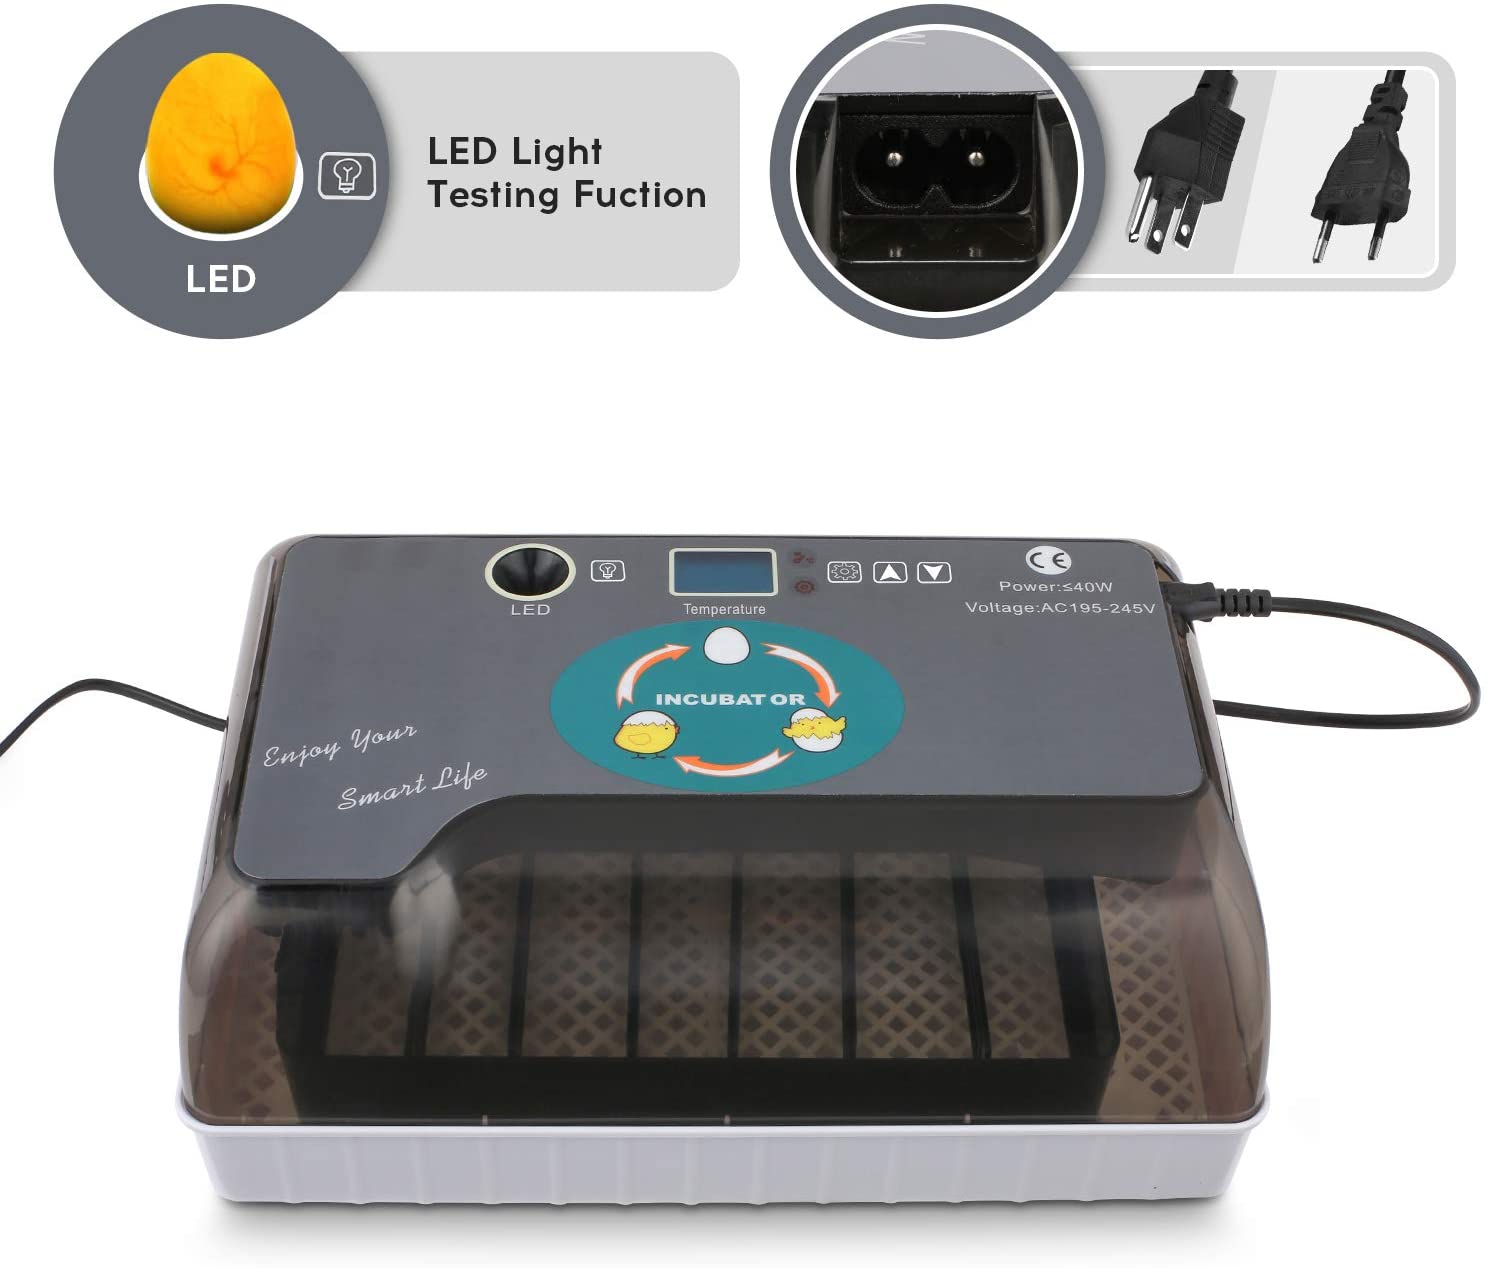 | ESTINL Eggs Fully Automatic Poultry Hatcher Machine
| Check Price |
Read More from prestigequeen.com :
Egg Hatching Machines Buyer's Guide
Factors to Consider
If you do not have access to a broody hen and want to go with artificial egg incubation, then it is important to spend a little time working out the best incubator for your needs. There are a lot of incubators on the market for both the small backyard chicken keeper and bigger poultry operations. Here is a guide to help you understand some of the different types of incubators and the terms you will come across. You should of course have purchased your incubator before buying or acquiring your hatching eggs.
The Less you Pay for an Incubator the More Time You Spend
As a rule, the less you spend on an incubator the more time you will have to spend monitoring and aiding the incubation process. The cheapest incubators are the styrofoam models. These hold about 4 dozen eggs at a time, which is probably more than most backyard chicken keepers will need to set. However, these inexpensive incubators have manual temperature control, manual turning, and manual control of humidity. So you will really need to keep a constant eye on things and know exactly what you are doing. These incubators are usually bought by first-time hobbyists, who due to their lack of experience, tend to get very poor hatching results. Which can be expensive if the hatching eggs are rare breed ones. Of course, you can be very successful with these inexpensive incubators, but you must be prepared and understand how much time and effort it takes to get those results.
If you choose this type of incubator you must be prepared to be available for the whole 21 days the eggs takes to hatch. You will not be able to go out unless you recruit a replacement to take over from you. With a manual incubator, eggs will need to be turned by hand every few hours, at least three times a day. It should always be an odd number so that the eggs do not rest the same way two nights in a row. You will have to monitor humidity and adjust the temperature precisely throughout the day. If you forget chances are you will lose all the embryos.
Still Air or Forced Air Incubators
You will see the terms still air and forced air incubators, the difference is simply a fan. In the forced air incubator, a fan circulates the air around the incubator, thereby keeping the temperature constant in all parts of the incubator. The temperature can be measured anywhere within the airflow. In a still air incubator, there is no fan, and the heat forms layers inside the incubator, making the temperature difference between the top and bottom of the incubator.
Care has to be taken when setting the incubator up, the temperature at the center of the egg should be correct for the species of bird being incubated. It is usual to measure the temperature at the top of the hatching egg, with a correction made to this according to the manufacturer's guidelines.
Minor Upgrades to the Basic Incubator
Every little bit helps when it comes to adding on to basic incubators. For example, styrofoam incubators can be purchased with an egg turner and a fan. This makes things much easier as egg turning is handled automatically. Measuring temperature will be easier as it will be more constant throughout as the fan circulates the heat so that the temperature can be measured anywhere and you will not get the hot and cold spots you do with a still air incubator. However, temperature and humidity control are still manual on these incubators.
Fully Automatic Incubator
With a fully automatic incubation, you can simply set your eggs and let the unit get on with things. These incubators control the temperature with no input from you. Some of the more expensive ones control humidity as well, while others at least provide a built-in hygrometer (an instrument that measures humidity) so you can more easily monitor what is going on. Automatic incubators will turn the eggs on their own and count down to hatch day and automatically stop turning on day 18. Obviously, these are more expensive but if you are going to be hatching lots of eggs then it will be a good investment.
Conclusion
If you are prepared and able to devote the time and effort for 21 days, a manual incubator will work very well for you. However, if you are not able to do this then you should choose an incubator with as many automatic controls as you can afford.
TOP rated Egg Incubators Review 2022
Best Automatic 22 Eggs Incubator
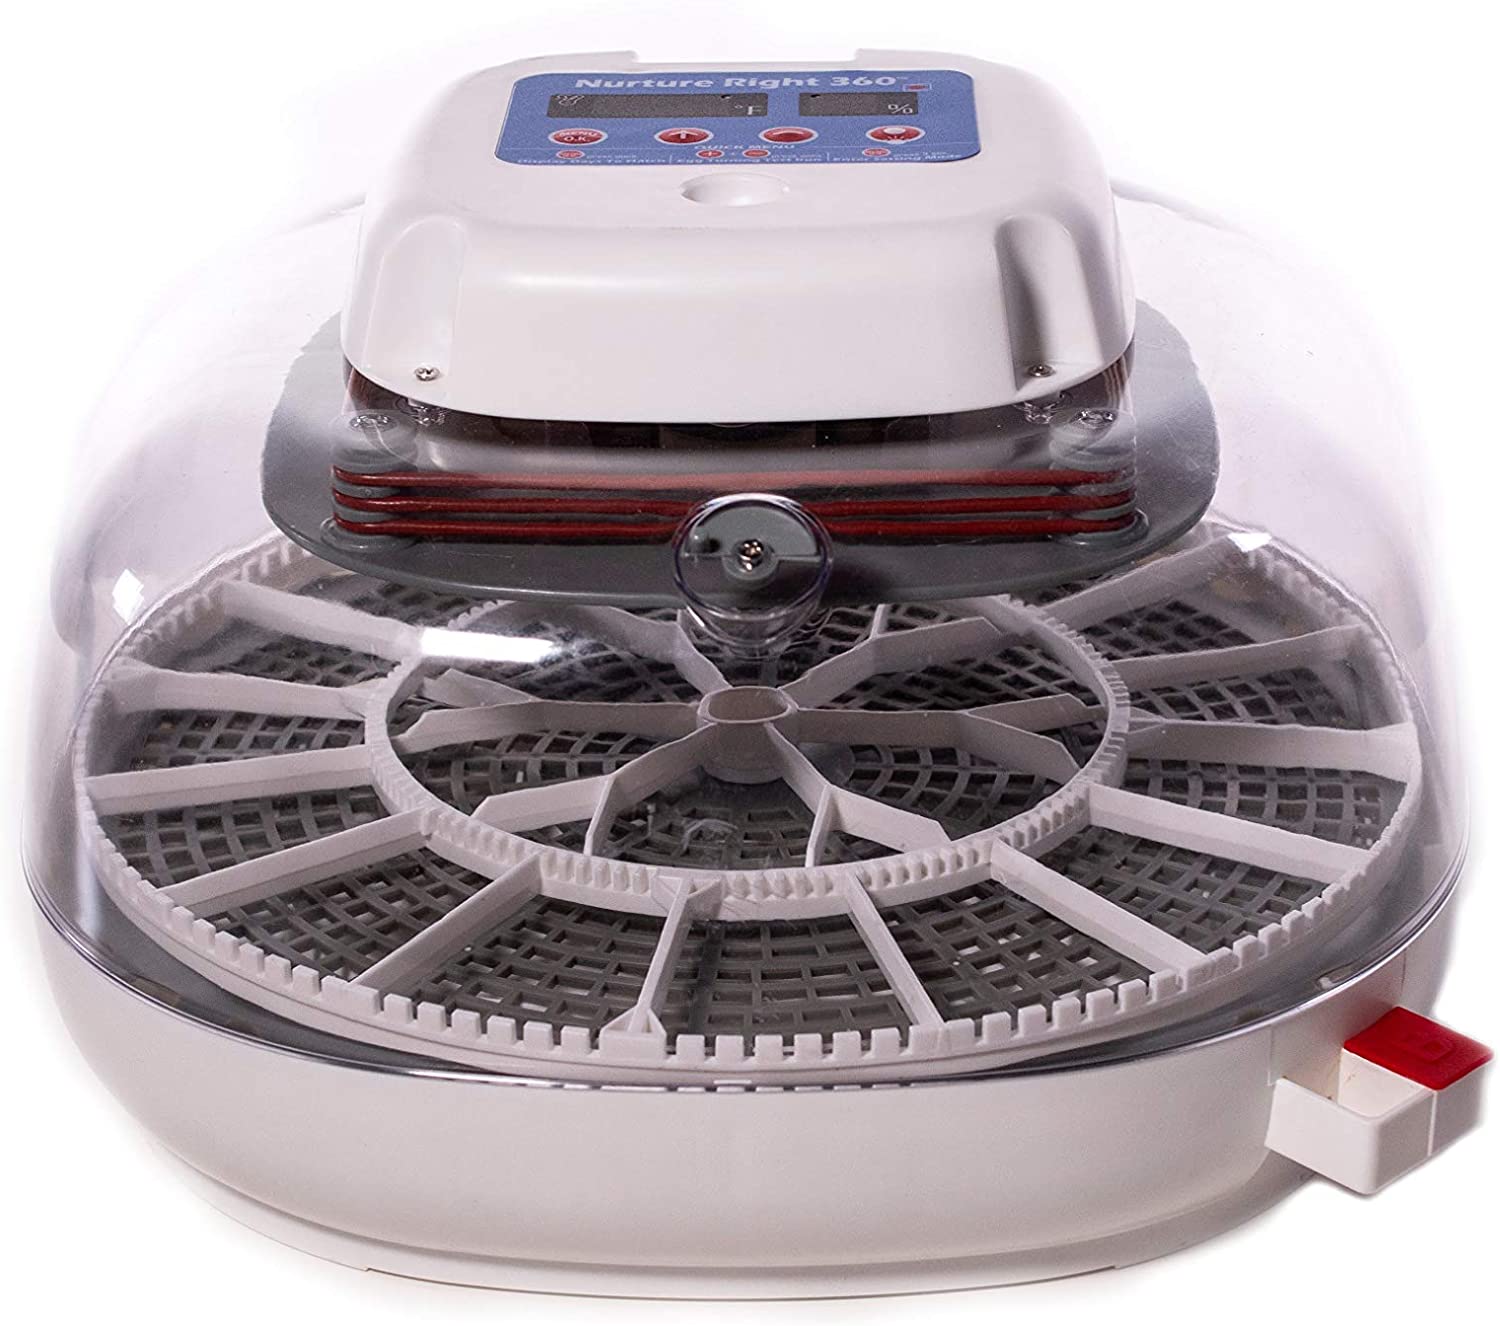

Harris Farms Nurture Right Incubator
Featuring an Automatic as well as an external water pot design, this Harris Farms All-in-One Incubator is great for anyone needing an incubator specifically for chickens. Although it's compatible with various different-sized bird eggs, this incubator is specifically beneficial for chicken eggs because you'll notice that the egg tray is the perfect size for chicken eggs.
Even more, this incubator comes with an automatic egg turner that helps to reduce the risk of contamination from your hands touching the eggs several times a day. Not only that, but you'll even notice that this device comes with the ability to count down from day one, making it easier for you to remove the egg turner three days before hatching because it conveniently tracks everything for you.
Design & Materials
Unlike the other incubators on the market, this device is especially easy to maintain because it comes with an external water pot that makes it especially easy to add water to the device. This is beneficial because other incubators require that you disassemble or move around various different components in order to reach the water pot to add water.
Lastly, the clear view of the transparent full view window is great for those of you wanting to view the eggs more clearly. Given that this incubator comes with everything that you need in order to operate the device, it's highly recommended for beginners that want to more closely watch their eggs. It's even recommended for more advanced egg-layers since it comes with advanced features that can optimize the amount of control that you have over the device.
Pros:
- Comes with an air vent under each corner
- Features an external water pot
- Specifically beneficial for fitting and turning chicken eggs
Cons:
- More expensive than some other incubators on the market
Best Bird 42 Egg Incubator
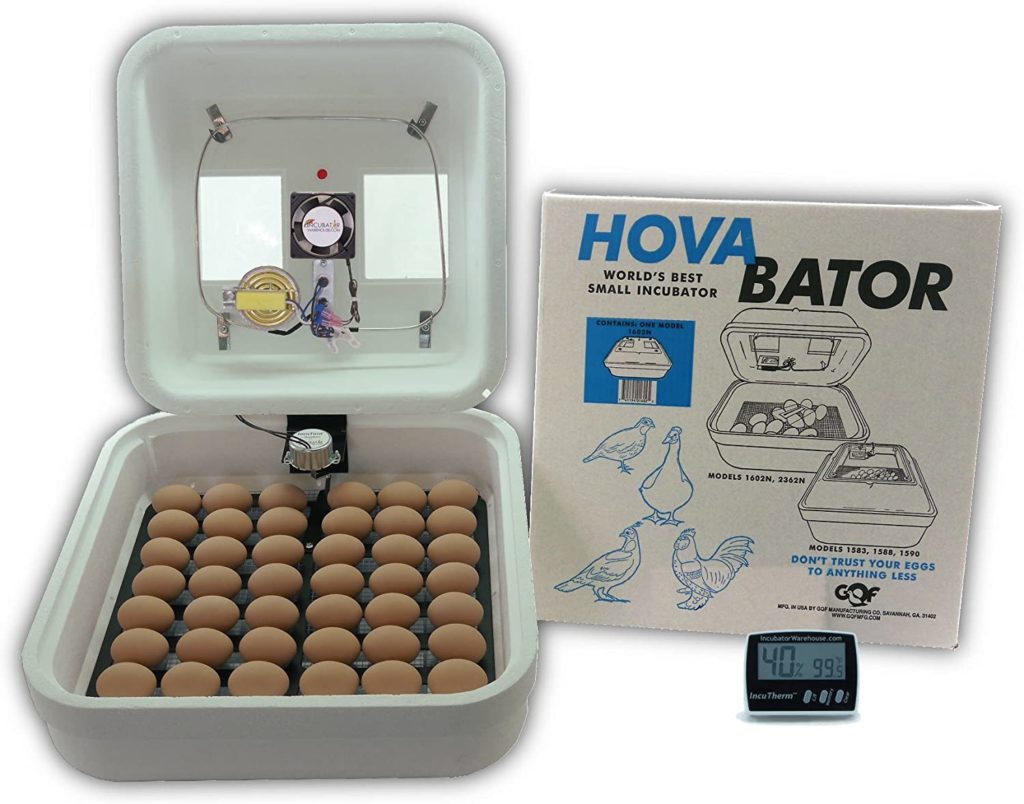
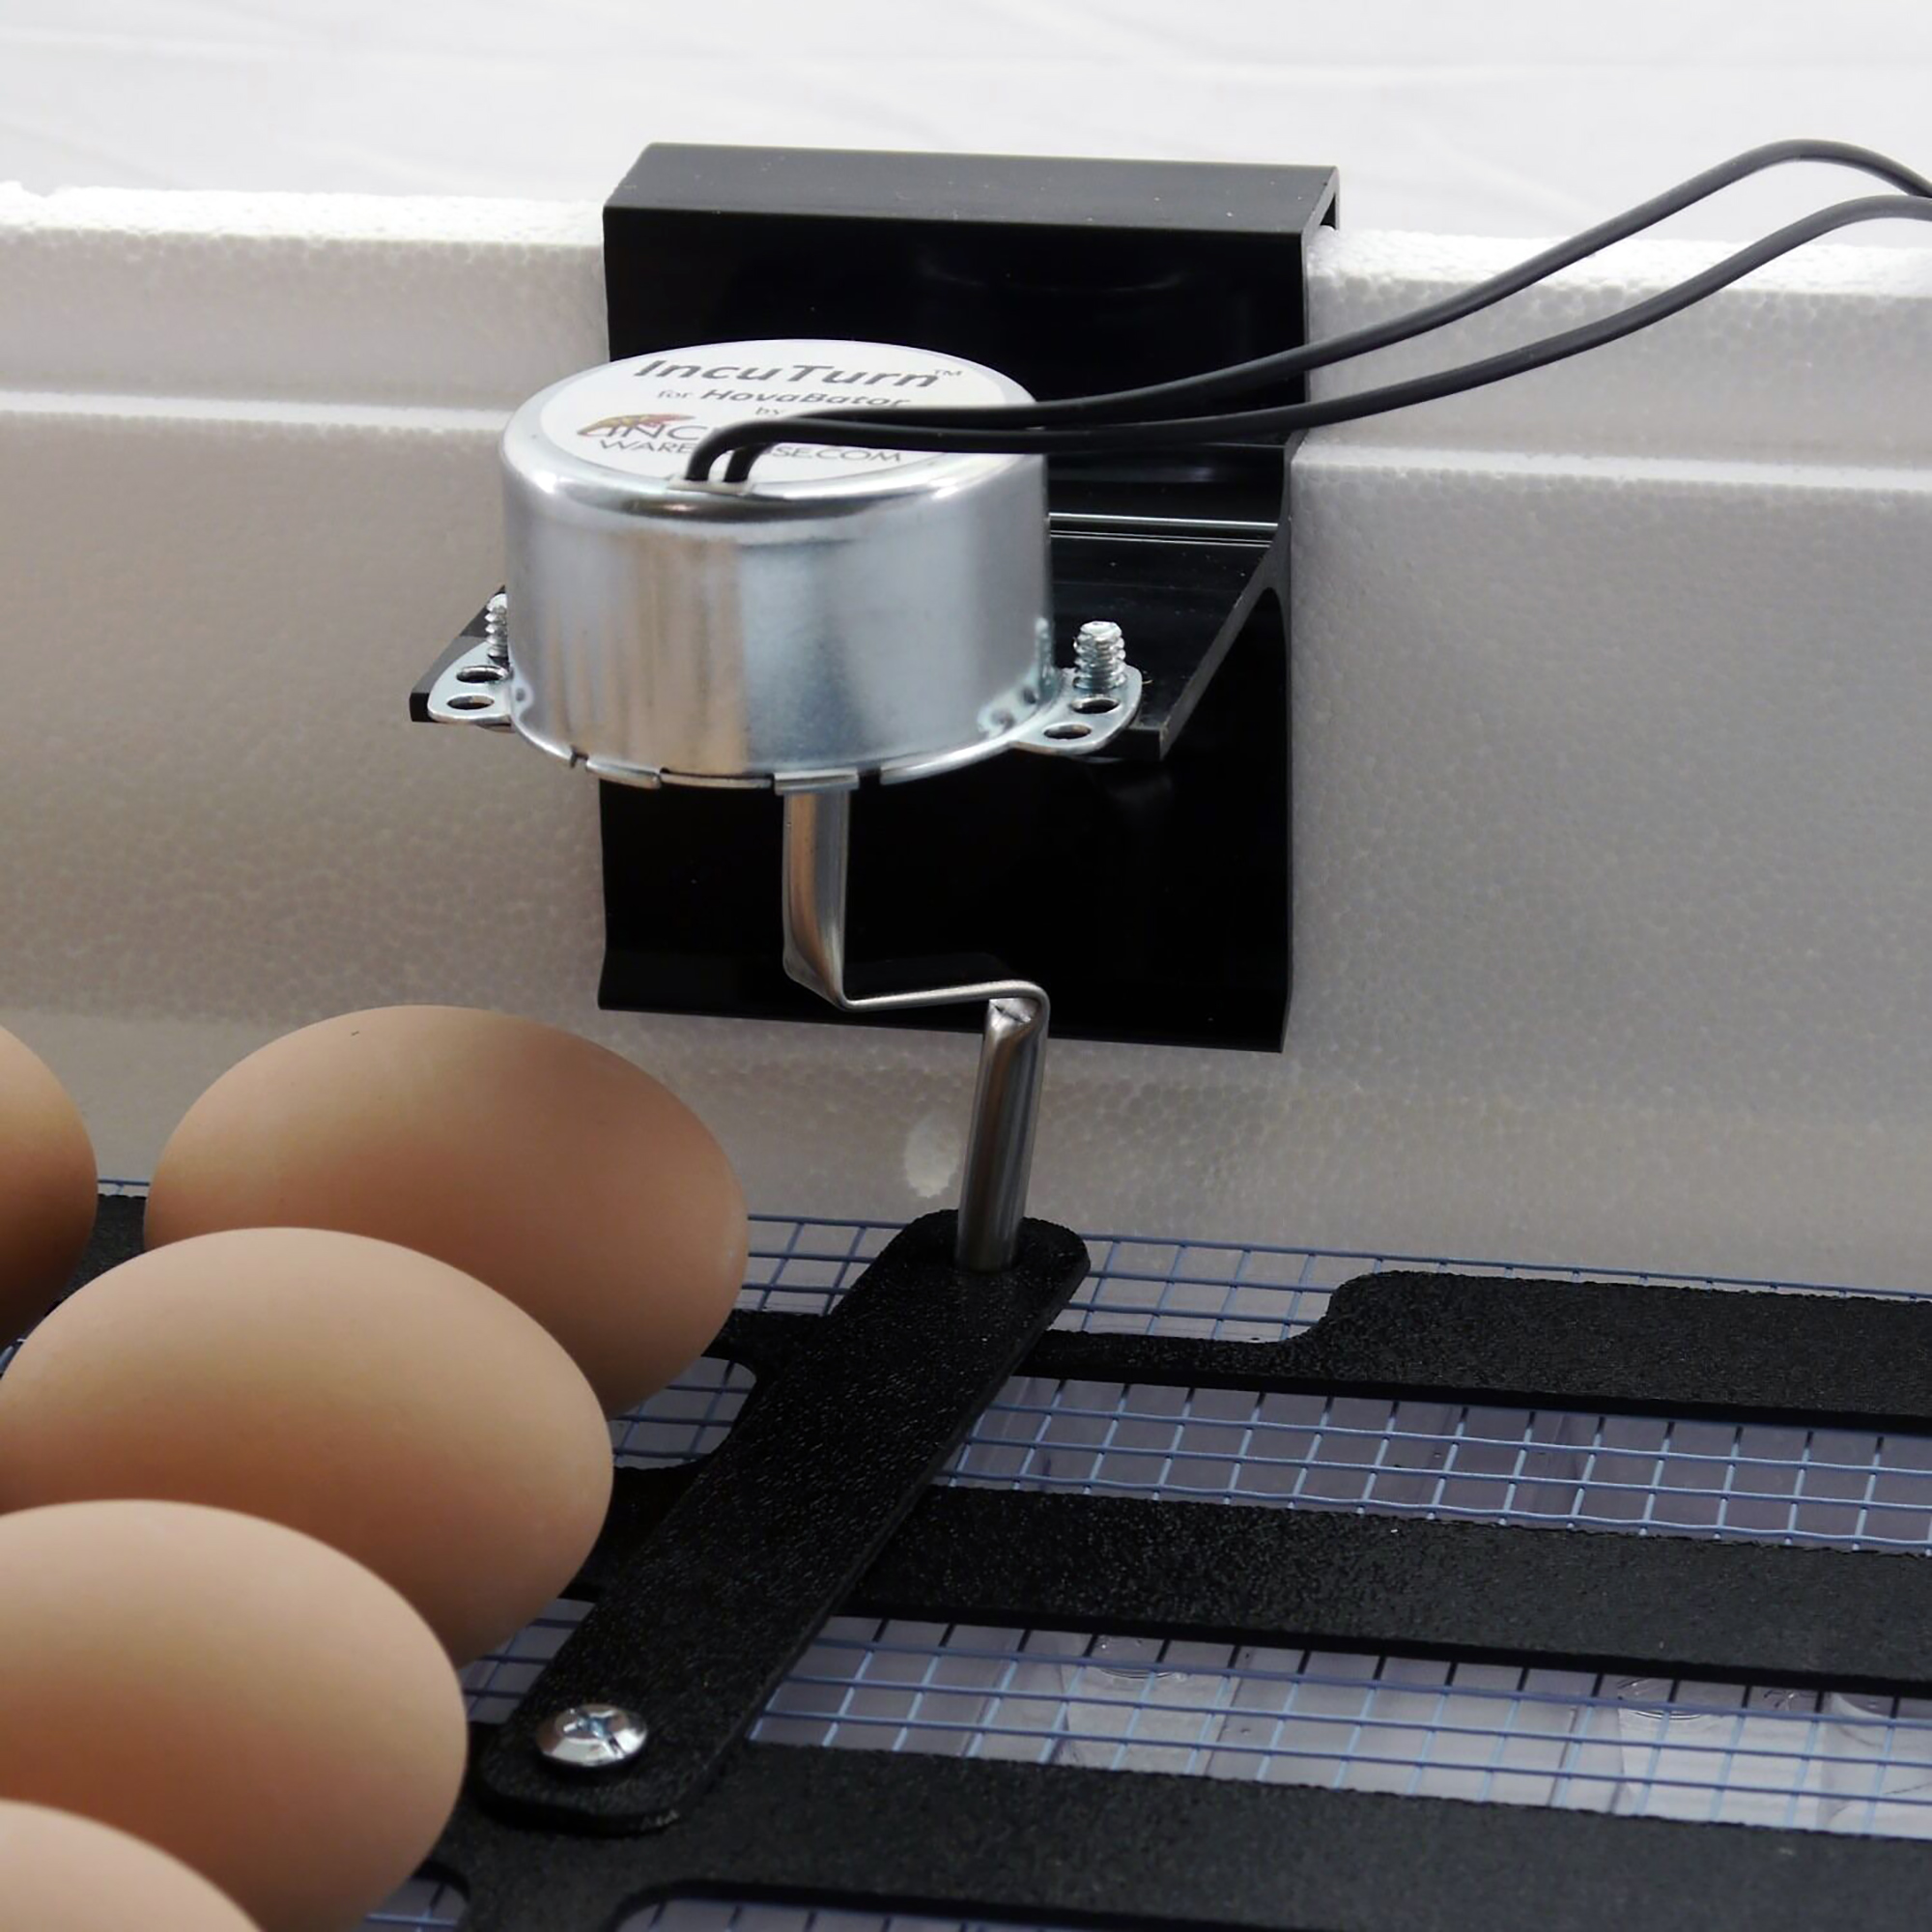
HovaBator Advanced Egg Incubator Combo Kit
After first receiving the HovaBator Advanced Egg Incubator in the mail, you'll first notice that this incubator comes as a kit. Because of that, you don't have to worry about purchasing any of the other additional accessories separately. More specifically, you'll notice that this combination kit comes with everything that you need in order to first begin using the incubator right away.
It comes with the ability to automatically turn the eggs around, which can prevent the babies from getting stuck inside of the egg itself. Additionally, it comes with a forced air fan kit that can keep the air evenly distributed throughout the inside of the incubator. And it even comes with a thermostat and a hygrometer that can effectively measure the temperature and the humidity levels.
Design & Materials
As for the actual design of the incubator, it's made with a durable, solid white plastic material that can provide full protection for the eggs from external debris. And there are even two windows on top of the incubator that gives you the ability to clearly see inside without having to move things around.
Additionally, this combination kit is capable of holding 42 eggs, which is larger than most other types of kits. Even though it features a larger design than others, it's more lightweight and easy to carry than other products on the market, weighing less than six pounds.
Given the all-inclusive combo kit as well as the easy-to-use features, this incubation kit is highly recommended for anyone that's new to incubating their birds' eggs. The kit overall is made with high-quality material, and it includes everything that you would need to make your egg-hatching process a success.
Pros:
- Fits up to 42 eggs
- Comes as a combo kit with everything you need including
- Lightweight, despite the larger design
Cons:
- Doesn't have an LED digital display like many other incubators
Digital Circulated Air Incubator with Automatic Egg Turner
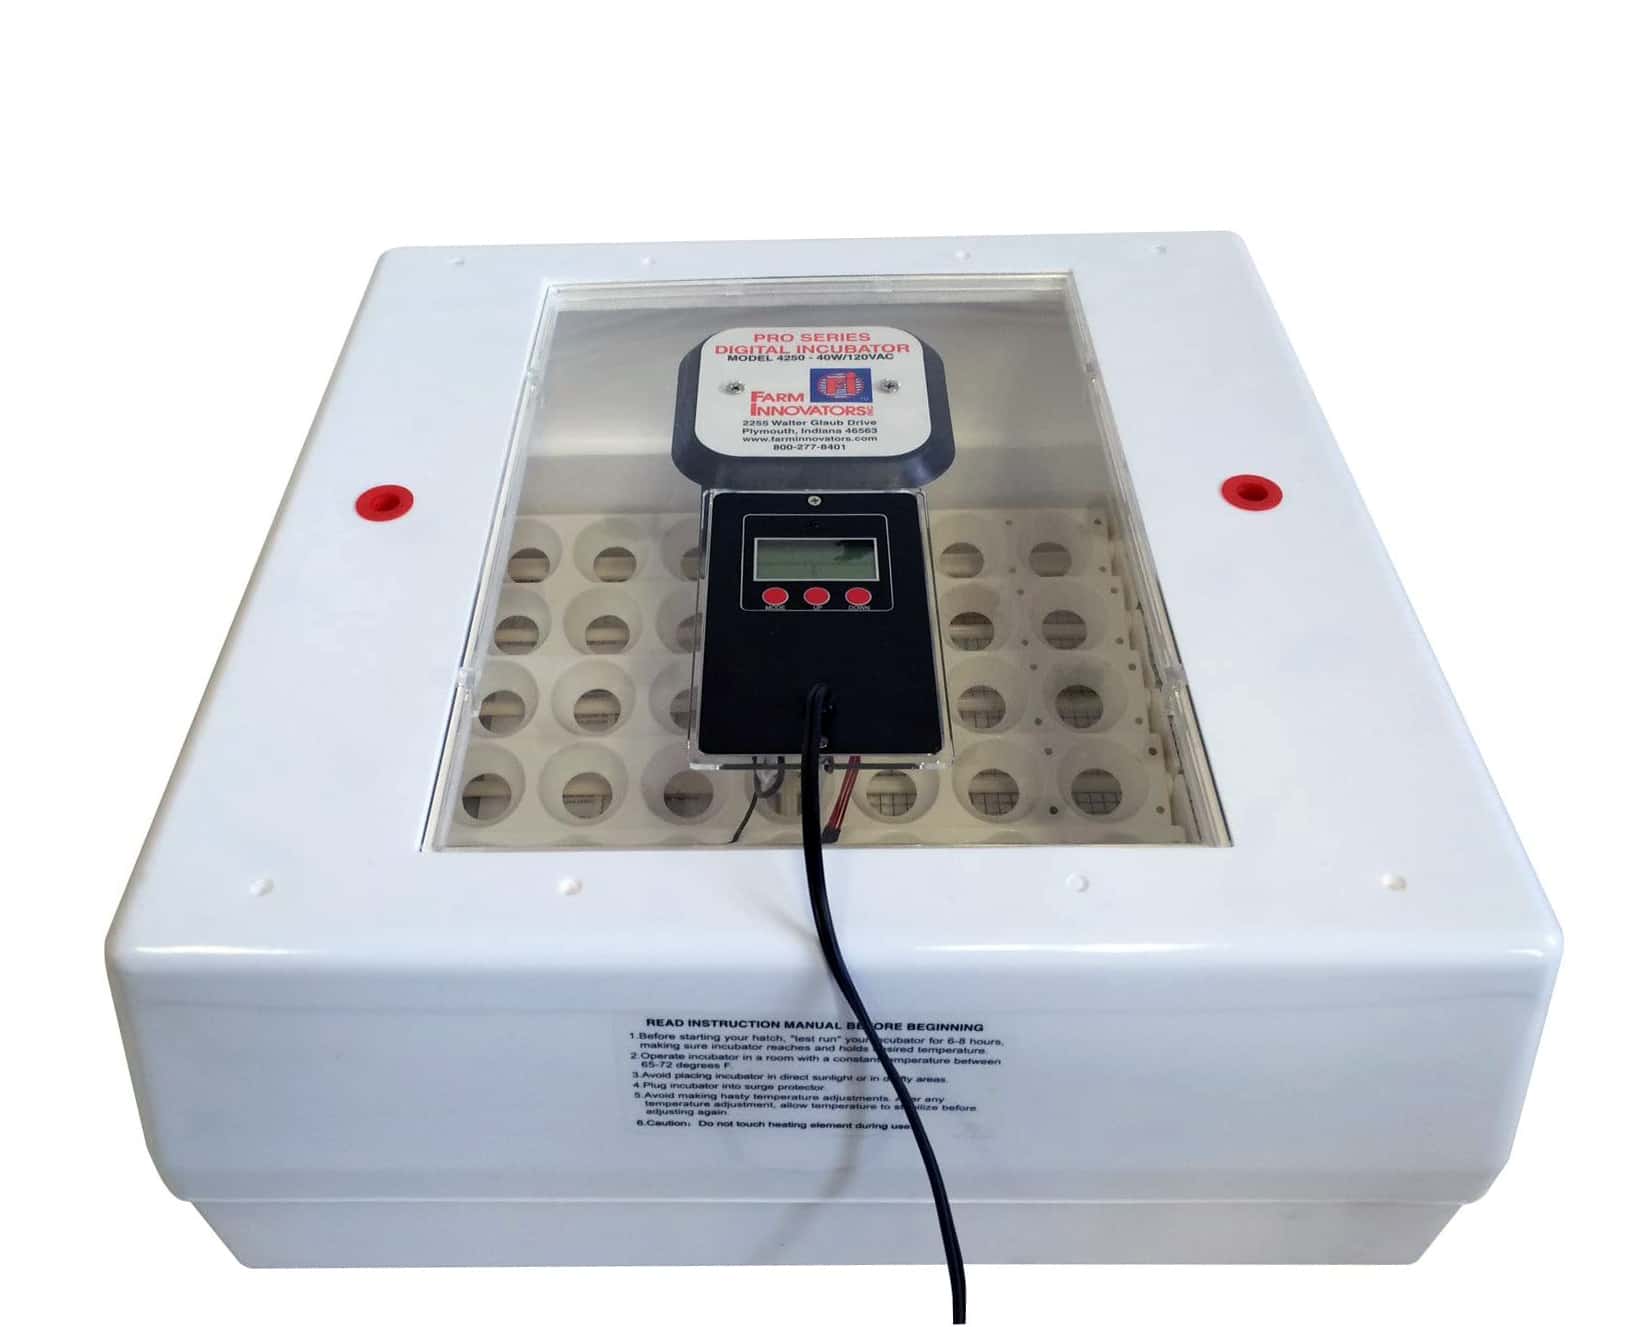
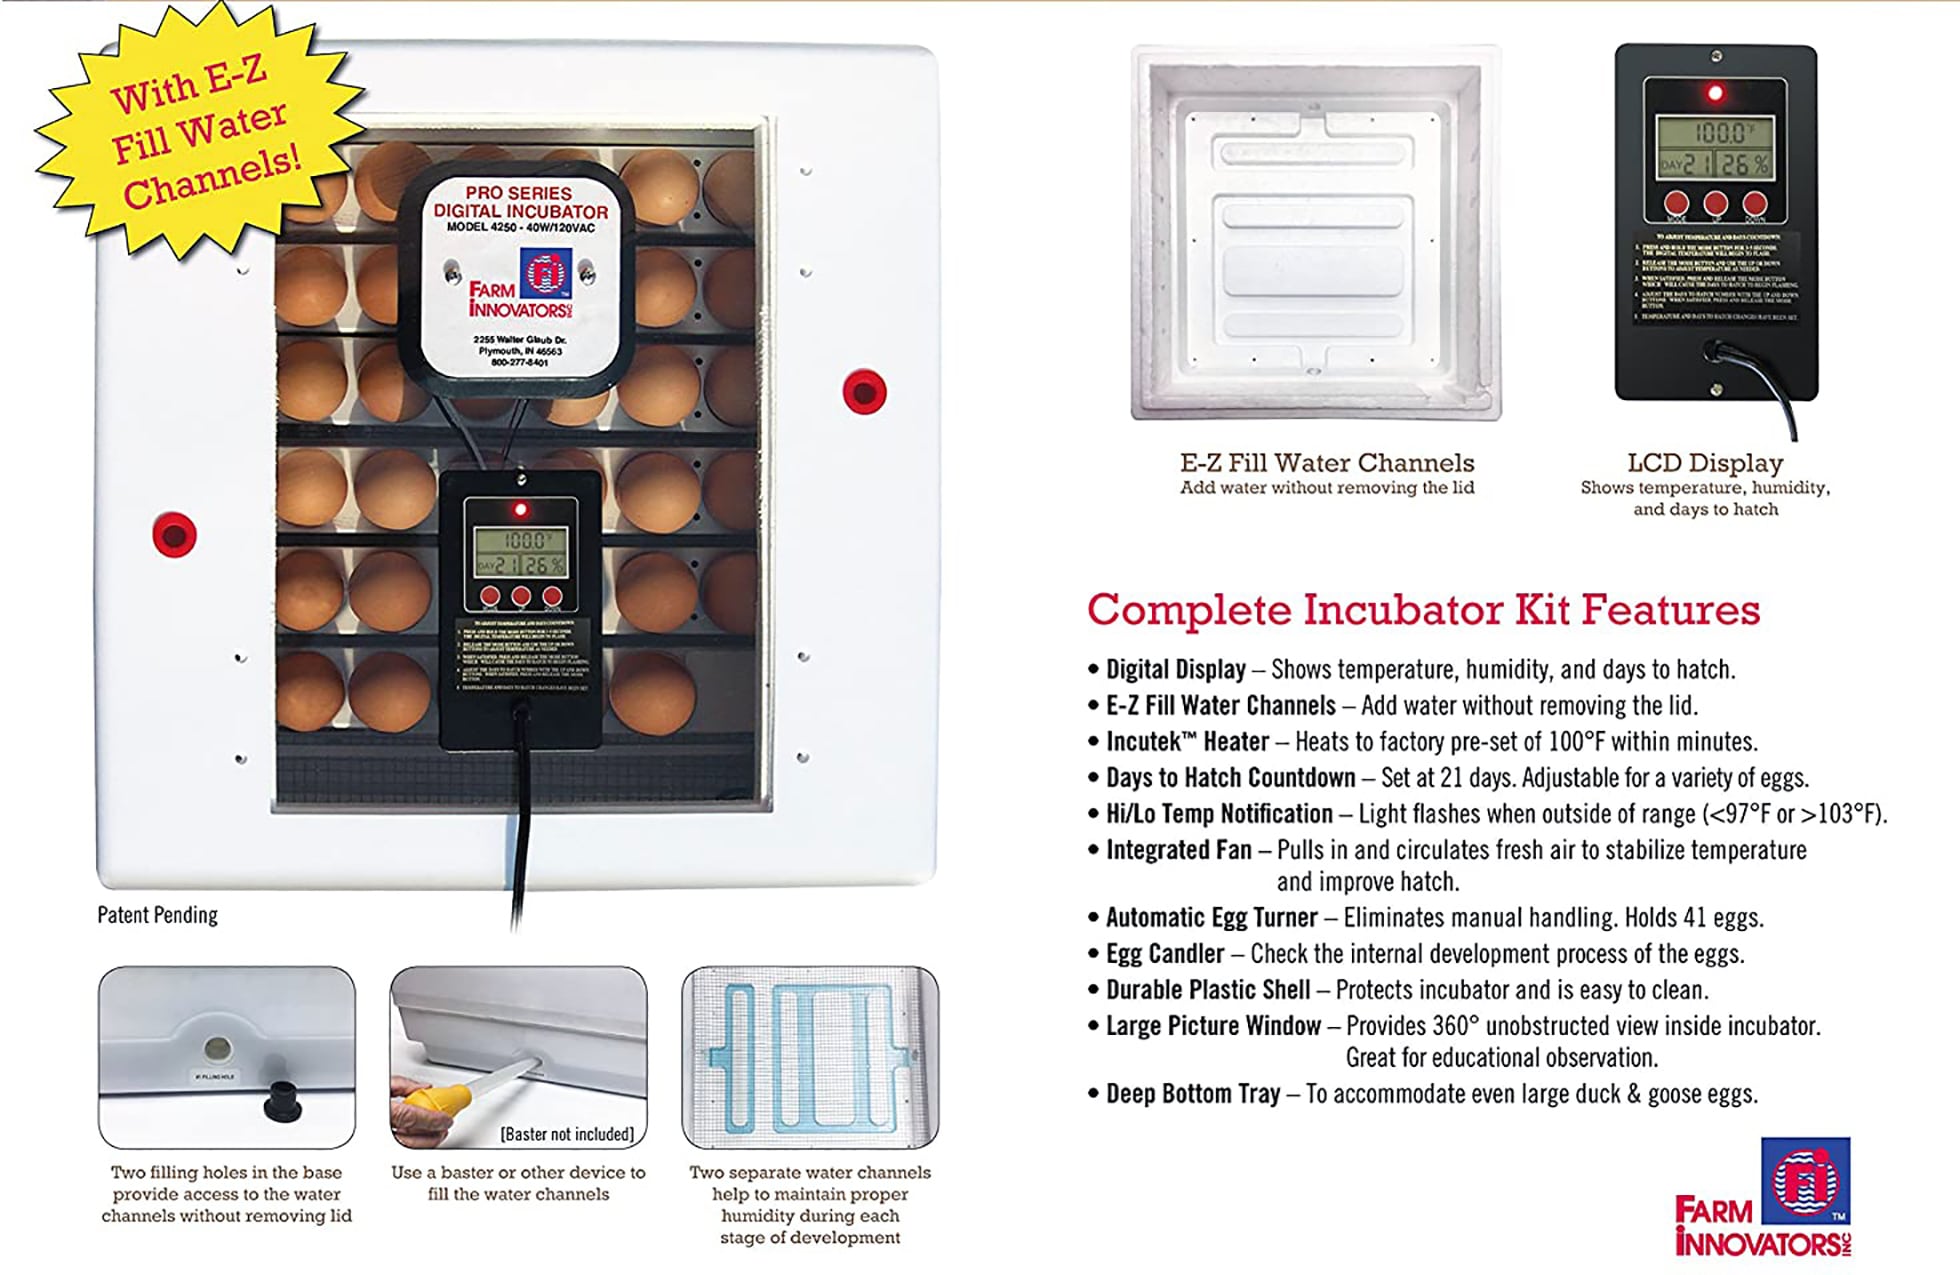
Farm Innovators Model Digital Circulated Air Incubator with Automatic Egg Turner
For those of you focused on being able to clearly see all of the eggs within the incubator, this Farm Innovators Automatic Egg Incubator may be the most beneficial for you. It features a durable and sanitary plastic transparent viewing dome as the top portion of the design, giving you a 360-degree view of the eggs inside.
Additionally, you'll also notice that the packaging is very protective of the incubator overall. And the product comes with various different accessories, including a built-in temperature and humidity gauge as well as an automatic egg turner.
Design & Materials
As for the design of the Farm Innovators incubator, it's capable of fitting up to 41 eggs of different sizes. You can easily view the temperature of the interior design in either Fahrenheit or Celsius, which is beneficial for people located in various different regions around the world.
Unlike the other incubators on the market, this one from Farm Innovators is also presented in a more lightweight design than the others. That being said, you can conveniently transport it to and from different locations easily.
Given the easy-to-view transport dome as well as the user-friendly features, this incubator from Brinsea is highly recommended for those of you that want to view the eggs in a 360-degree view. It's also easy to transport since it's lightweight and features a simple design.
Pros:
- Automatic egg turner turns the eggs completely every 4 hours to eliminate manual handling and improve hatch rate (41 egg capacity)
- Large picture window provides a 360° unobstructed view inside the incubator
- An integrated fan pulls in and circulates fresh air to stabilize temperature and improve hatch
Cons:
- The temperature doesn’t measure temp near eggs
Budget Large 56 Eggs incubator
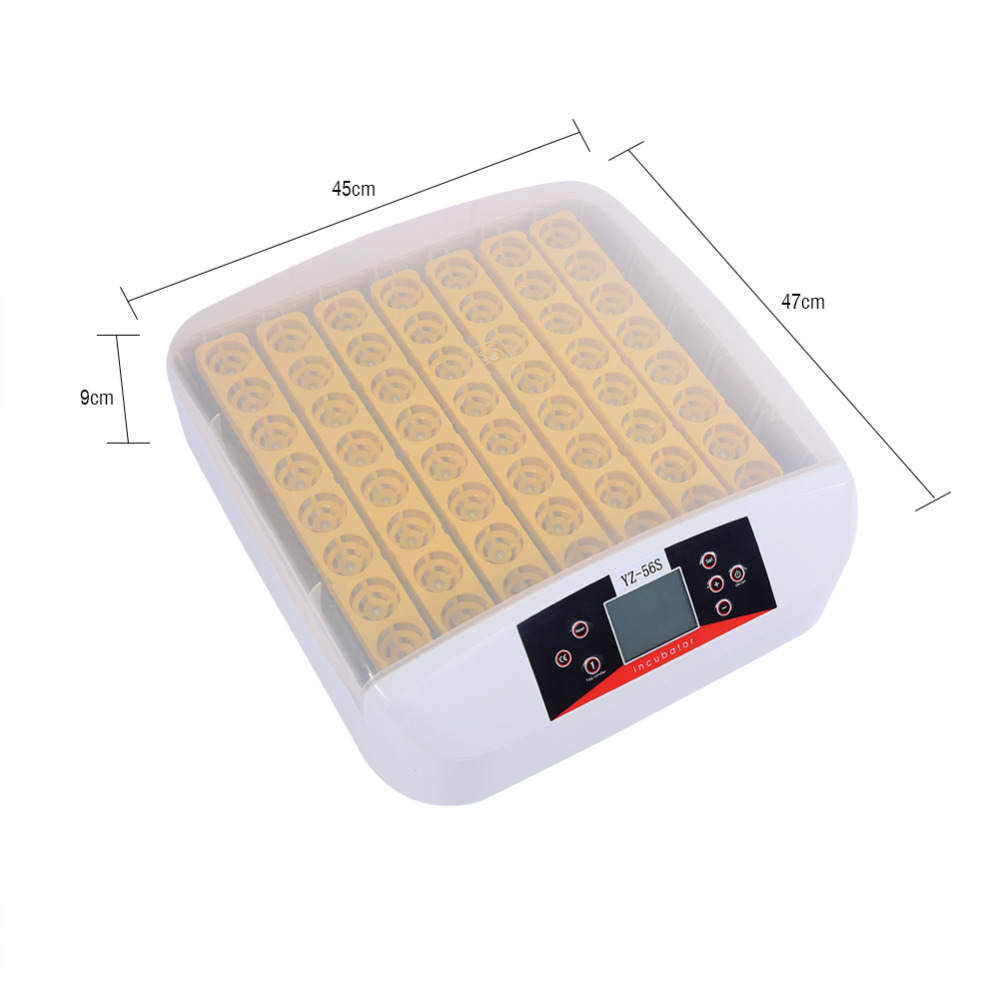
Automatic Large-Scale Poultry Incubation
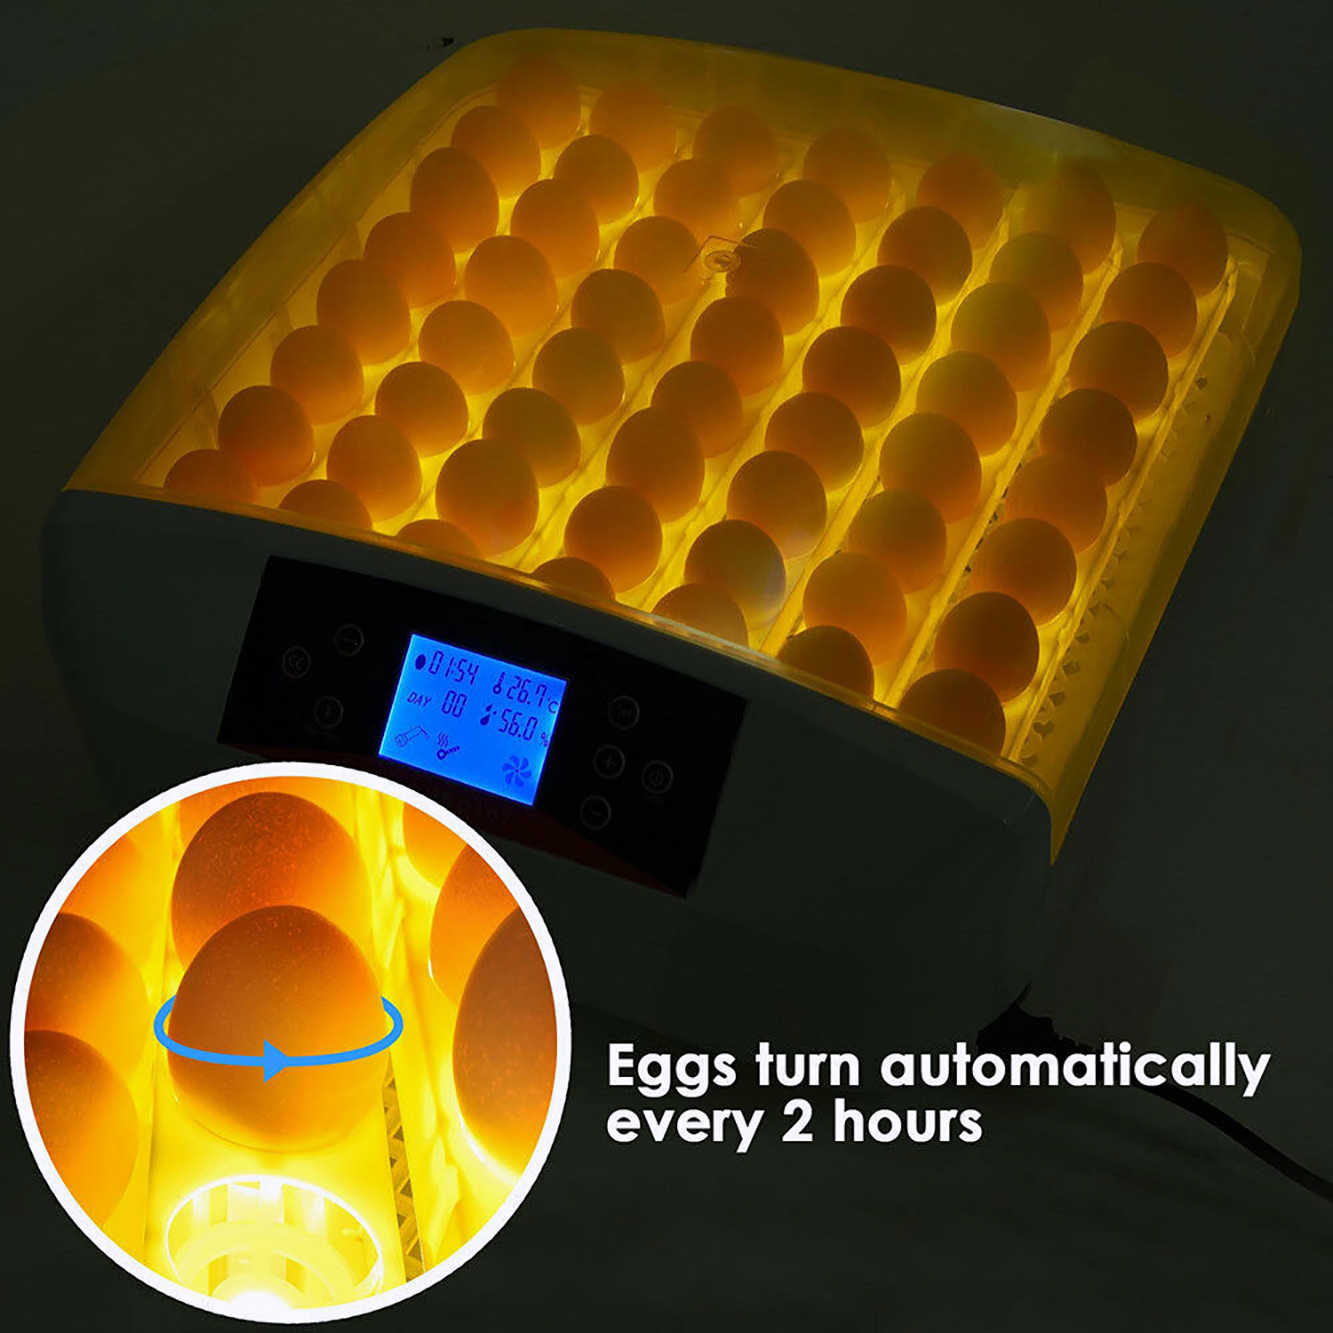
Offering the highest egg capacity, this YZmoffer Egg Incubator is most beneficial for those of you planning on hatching a large number of eggs at once. More specifically, you'll first notice that this incubator can house up to 56 eggs at once, and it features the largest design out of all the incubators on the list.
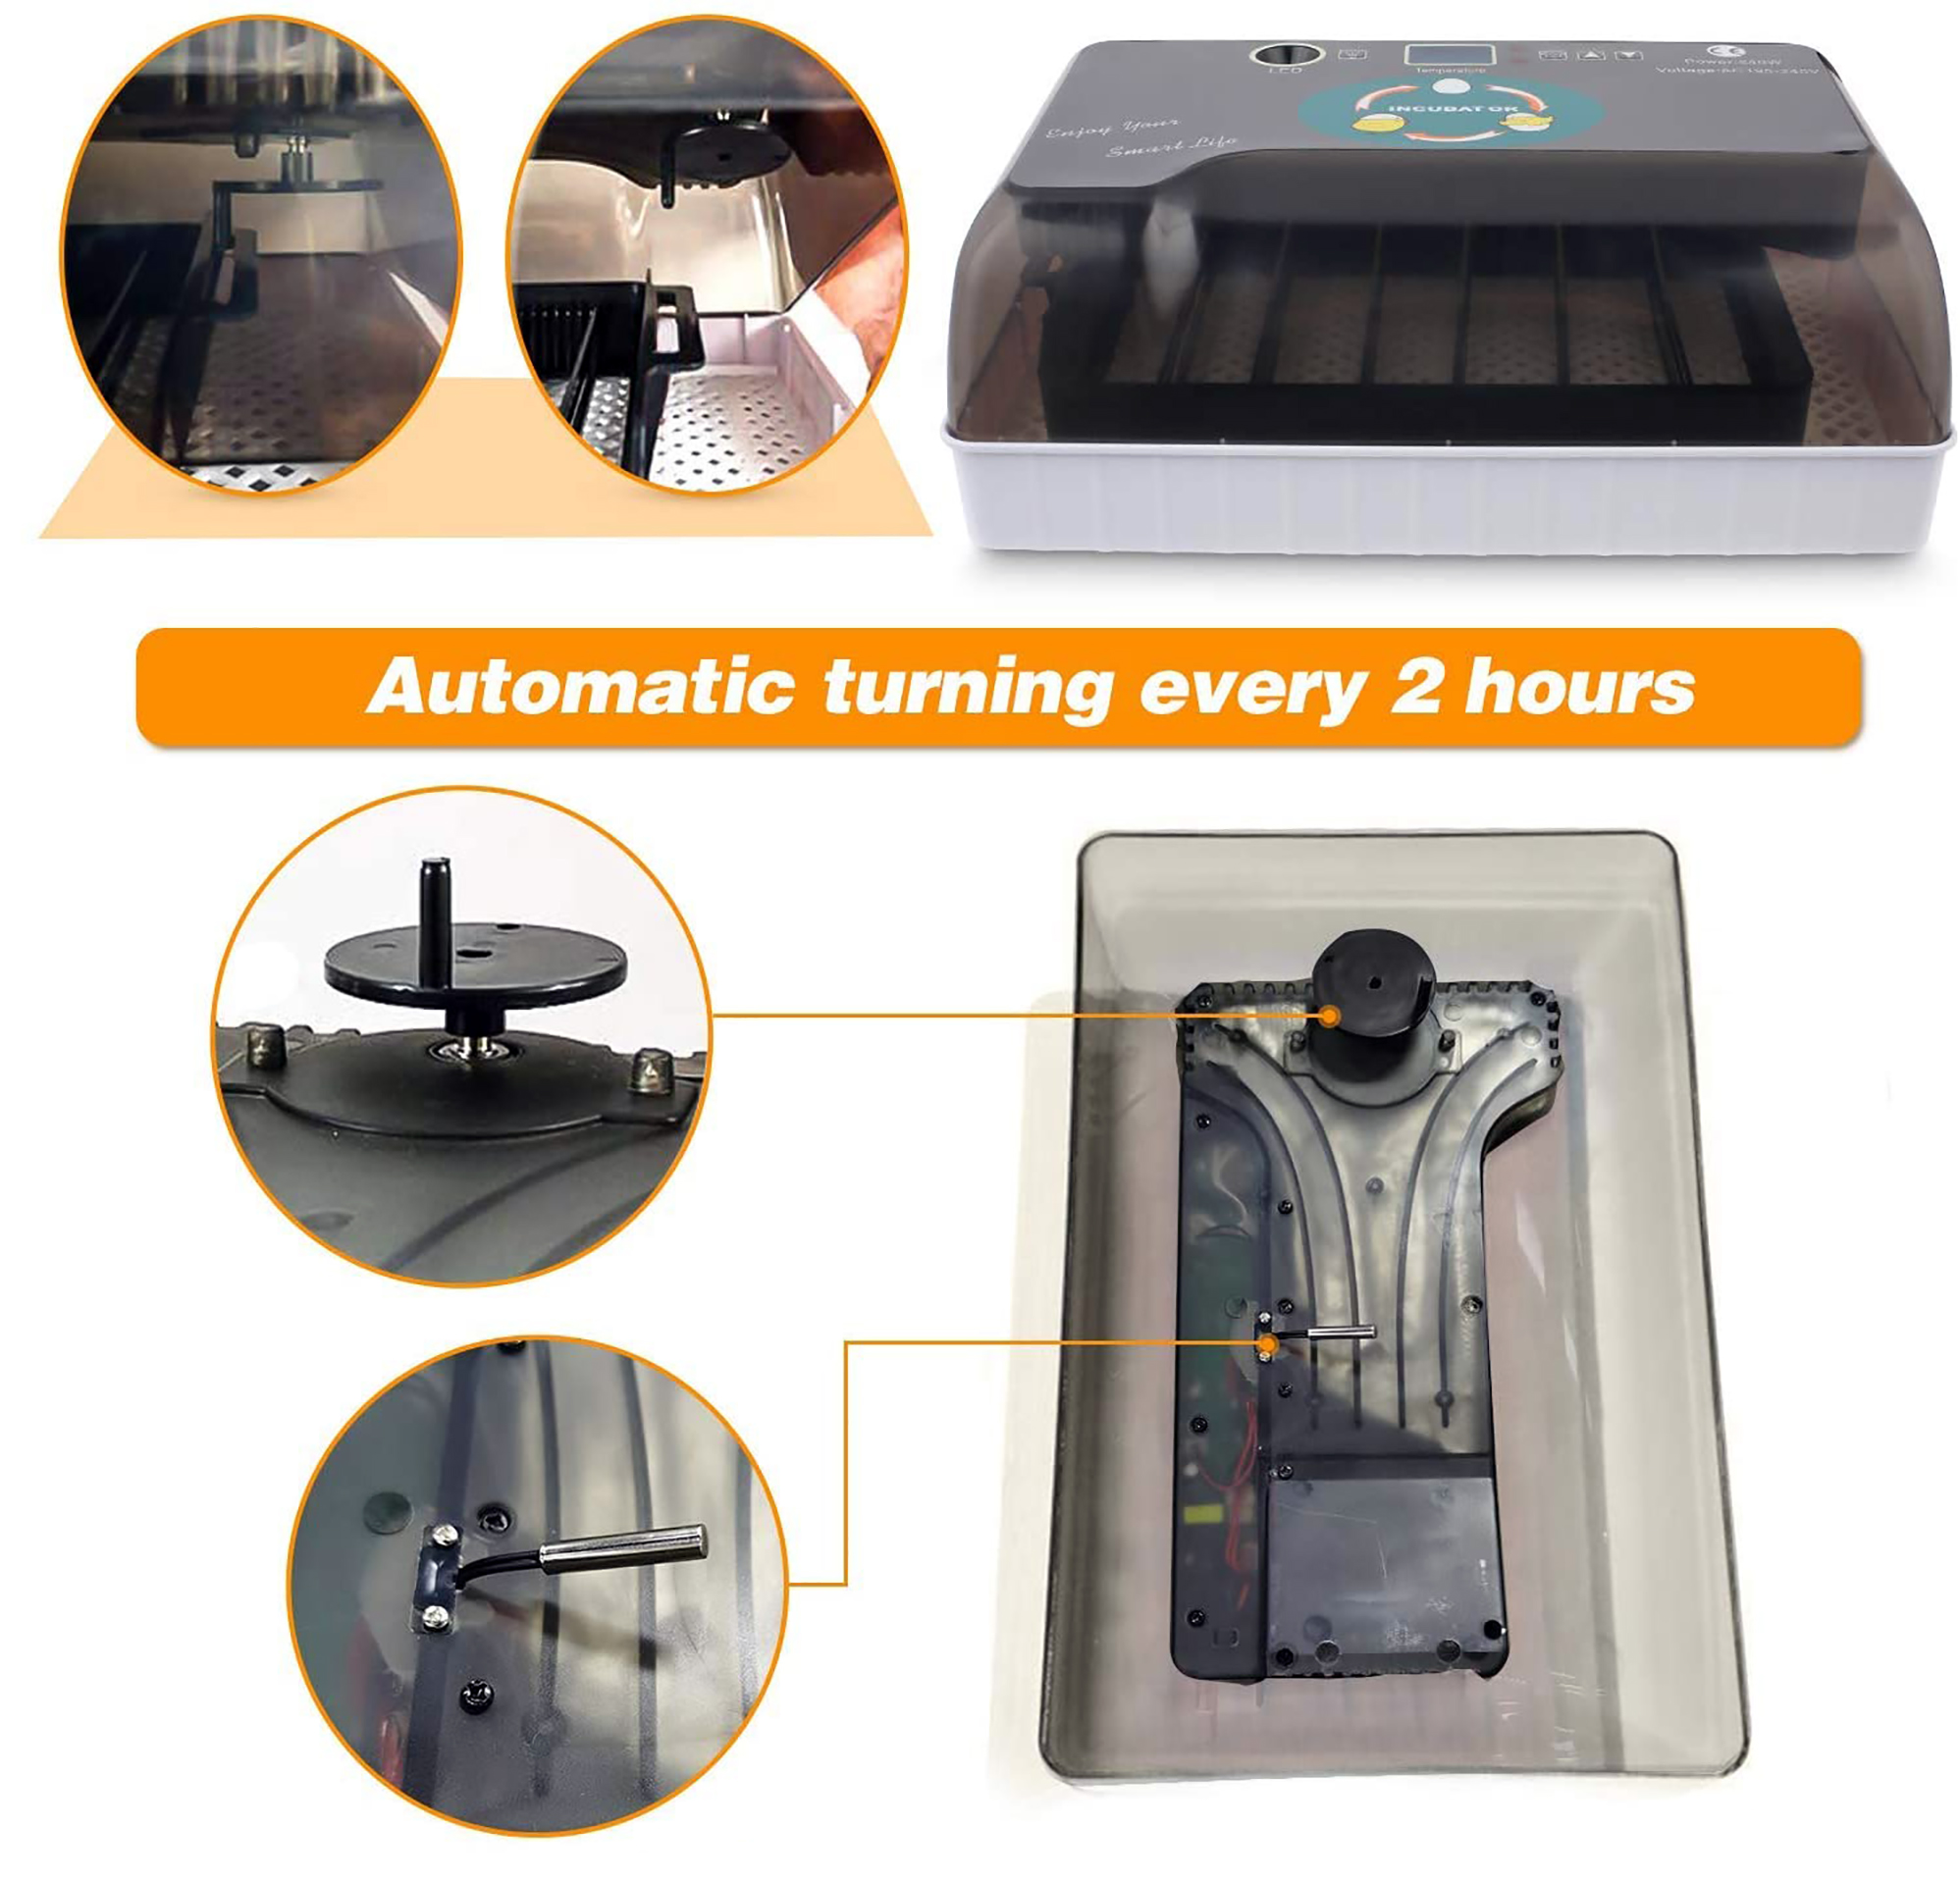
In addition to offering a high capacity space, it also comes with additional accessories that you may find helpful throughout your egg-laying process. For instance, this incubator device comes with an automatic egg turner capable of carefully turning the eggs every two hours. Even more, it features an easy-to-read LED digital display screen that can provide you with the stats needed to ensure all of your eggs are healthy and maintaining a healthy growth process.
Design & Materials
Similar to some of the other designs on the market, this YZmoffer incubator comes with a built-in air fan to help keep the heat evenly distributed throughout the entire encasing. And it also comes with temperature and humidity gauges.
The egg tray is also removable from the rest of the device, giving you the ability to easily take the tray out and clean it to ensure safety. The device itself measures 15.2 inches by 14.6 inches, giving you a simple design to store practically anywhere in your home.
Overall, this incubator from YZmoffer features the largest egg capacity, making it the most recommended for people that have a larger number of eggs to care for. Not only that, but it also has the highest ratings out of most other incubators on the market, making it reliable and trustworthy to provide your eggs with the high-quality maintenance that they need.
Pros:
- Features the highest ratings out of most incubators
- Able to hold up to 56 eggs at once
- Comes with a removable egg tray for optimal sanitation
- 56 Eggs Incubator with LED Candler Inside
Cons:
- Operates from 90 watts, which is more than other incubators require
Best Small Egg Incubator
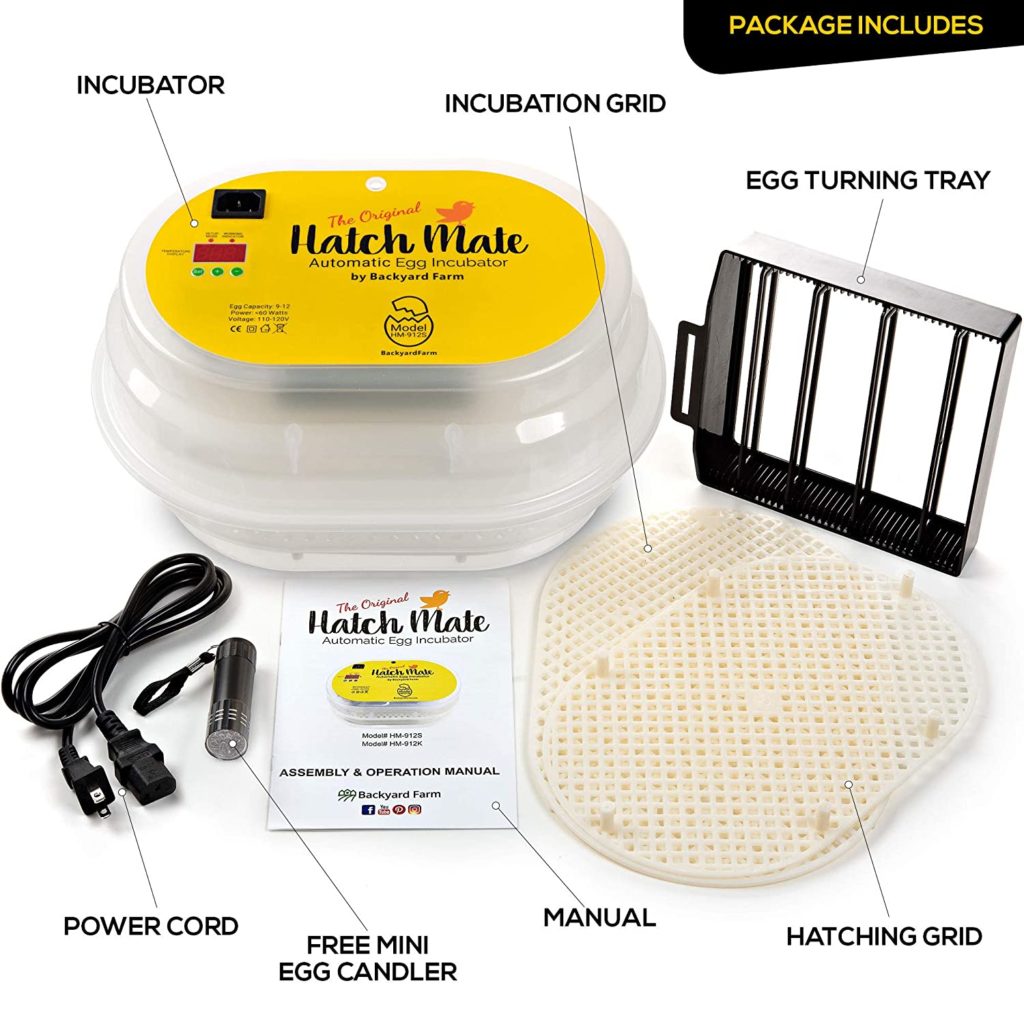
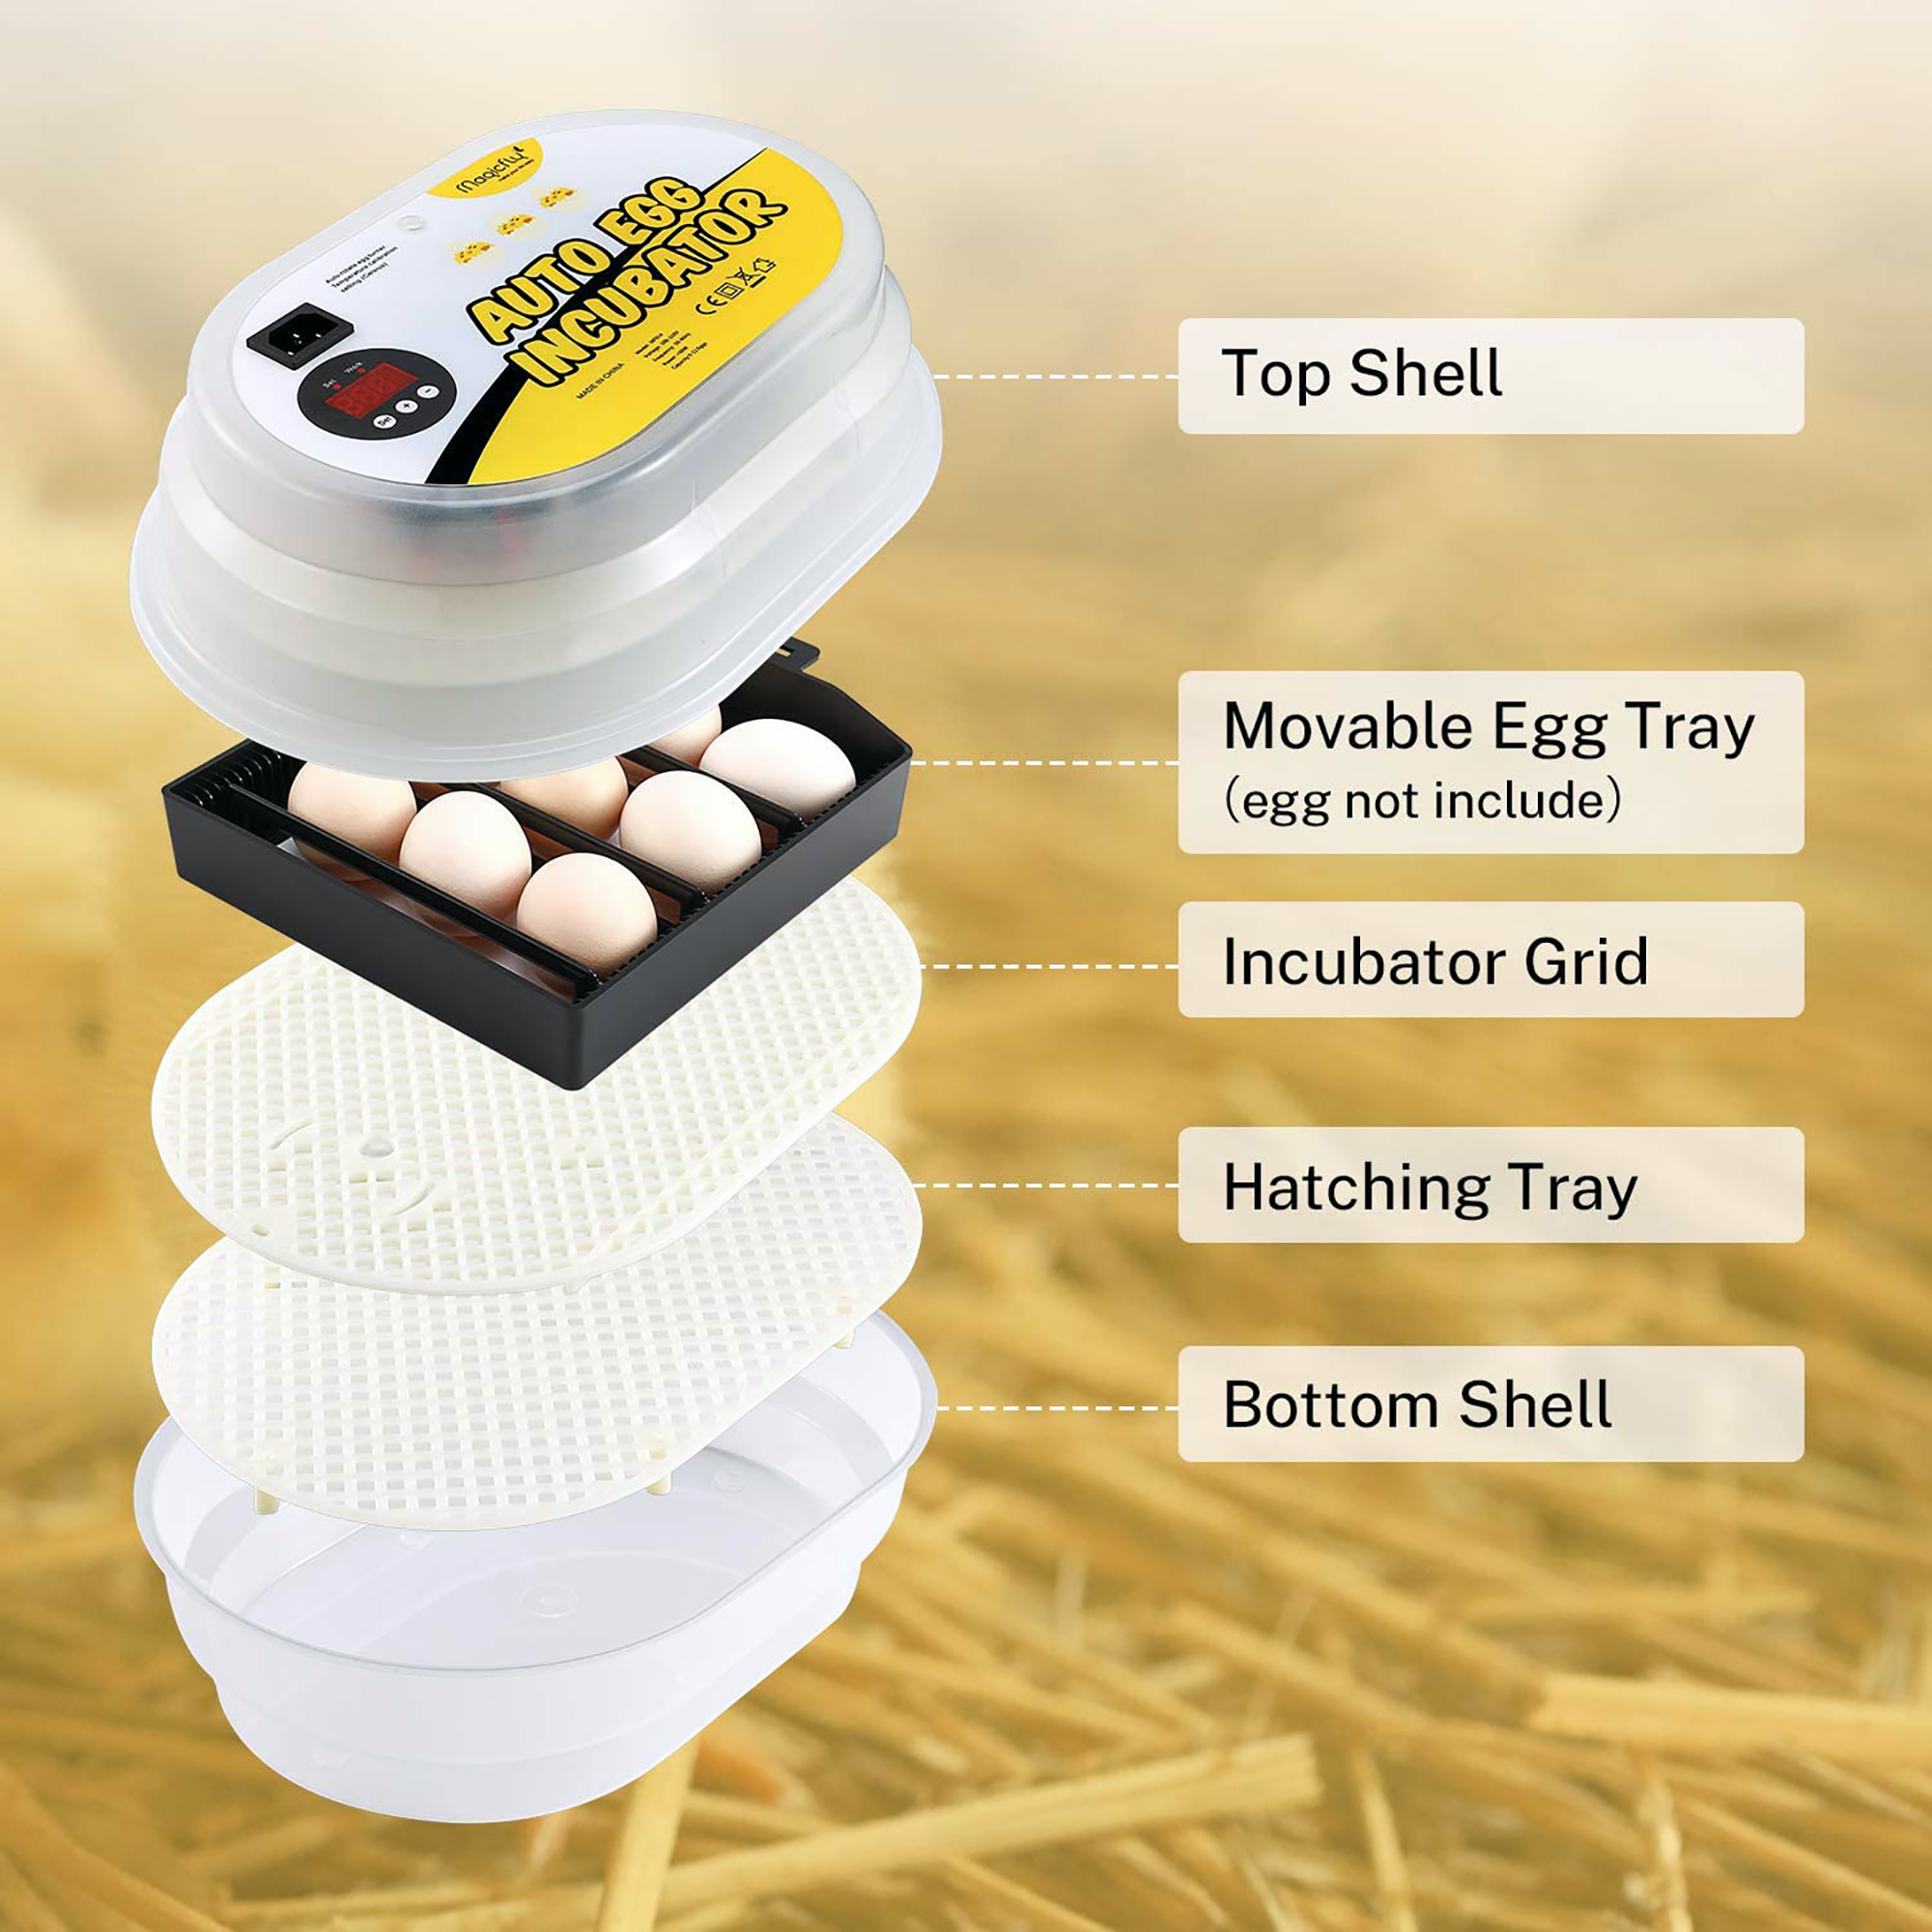
Magicfly Digital Mini Fully Automatic Egg Incubator 9-12 Eggs
When you first receive the Backyard Farm HBlife Incubator in the mail, you'll see that it's a smaller design than other incubators on the market. It's only capable of fitting up to nine eggs within its encasing, and the material isn't the easiest to see through. That makes it difficult to monitor the eggs' progress without opening the device and risking the growth and development of the eggs.
Aside from the small external design of the incubator, it comes with accessories that you may find helpful in maintaining the growth of your eggs, like an automatic egg rotator, a thermometer calibration as well as a forced-air fan. Additionally, it comes with a mini egg candler and an easy-to-read LED digital display.
Design & Materials
Aside from the thick plastic material being difficult to see through, the incubator comes with all of the necessary components needed to effectively maintain your eggs' health. The small, compact design of this incubator makes it extremely easy to carry around with you. Because of that, you can conveniently take it with you if you need to leave anywhere.
It's also great for using in your house since it barely takes up any space. Additionally, it's also more affordable than most other incubators on the market, making it the most recommended for those of you on a budget. So if you're looking for a small, easy-to-transport and affordable incubator, then this product from the backyard farm is the most recommended for you.
Pros:
- Most affordable
- Small and compact design
- Features all of the components needed to use while on-the-go
Cons:
- Not suitable for processing larger numbers of eggs
Cheap Hatching Machine for 12 Eggs

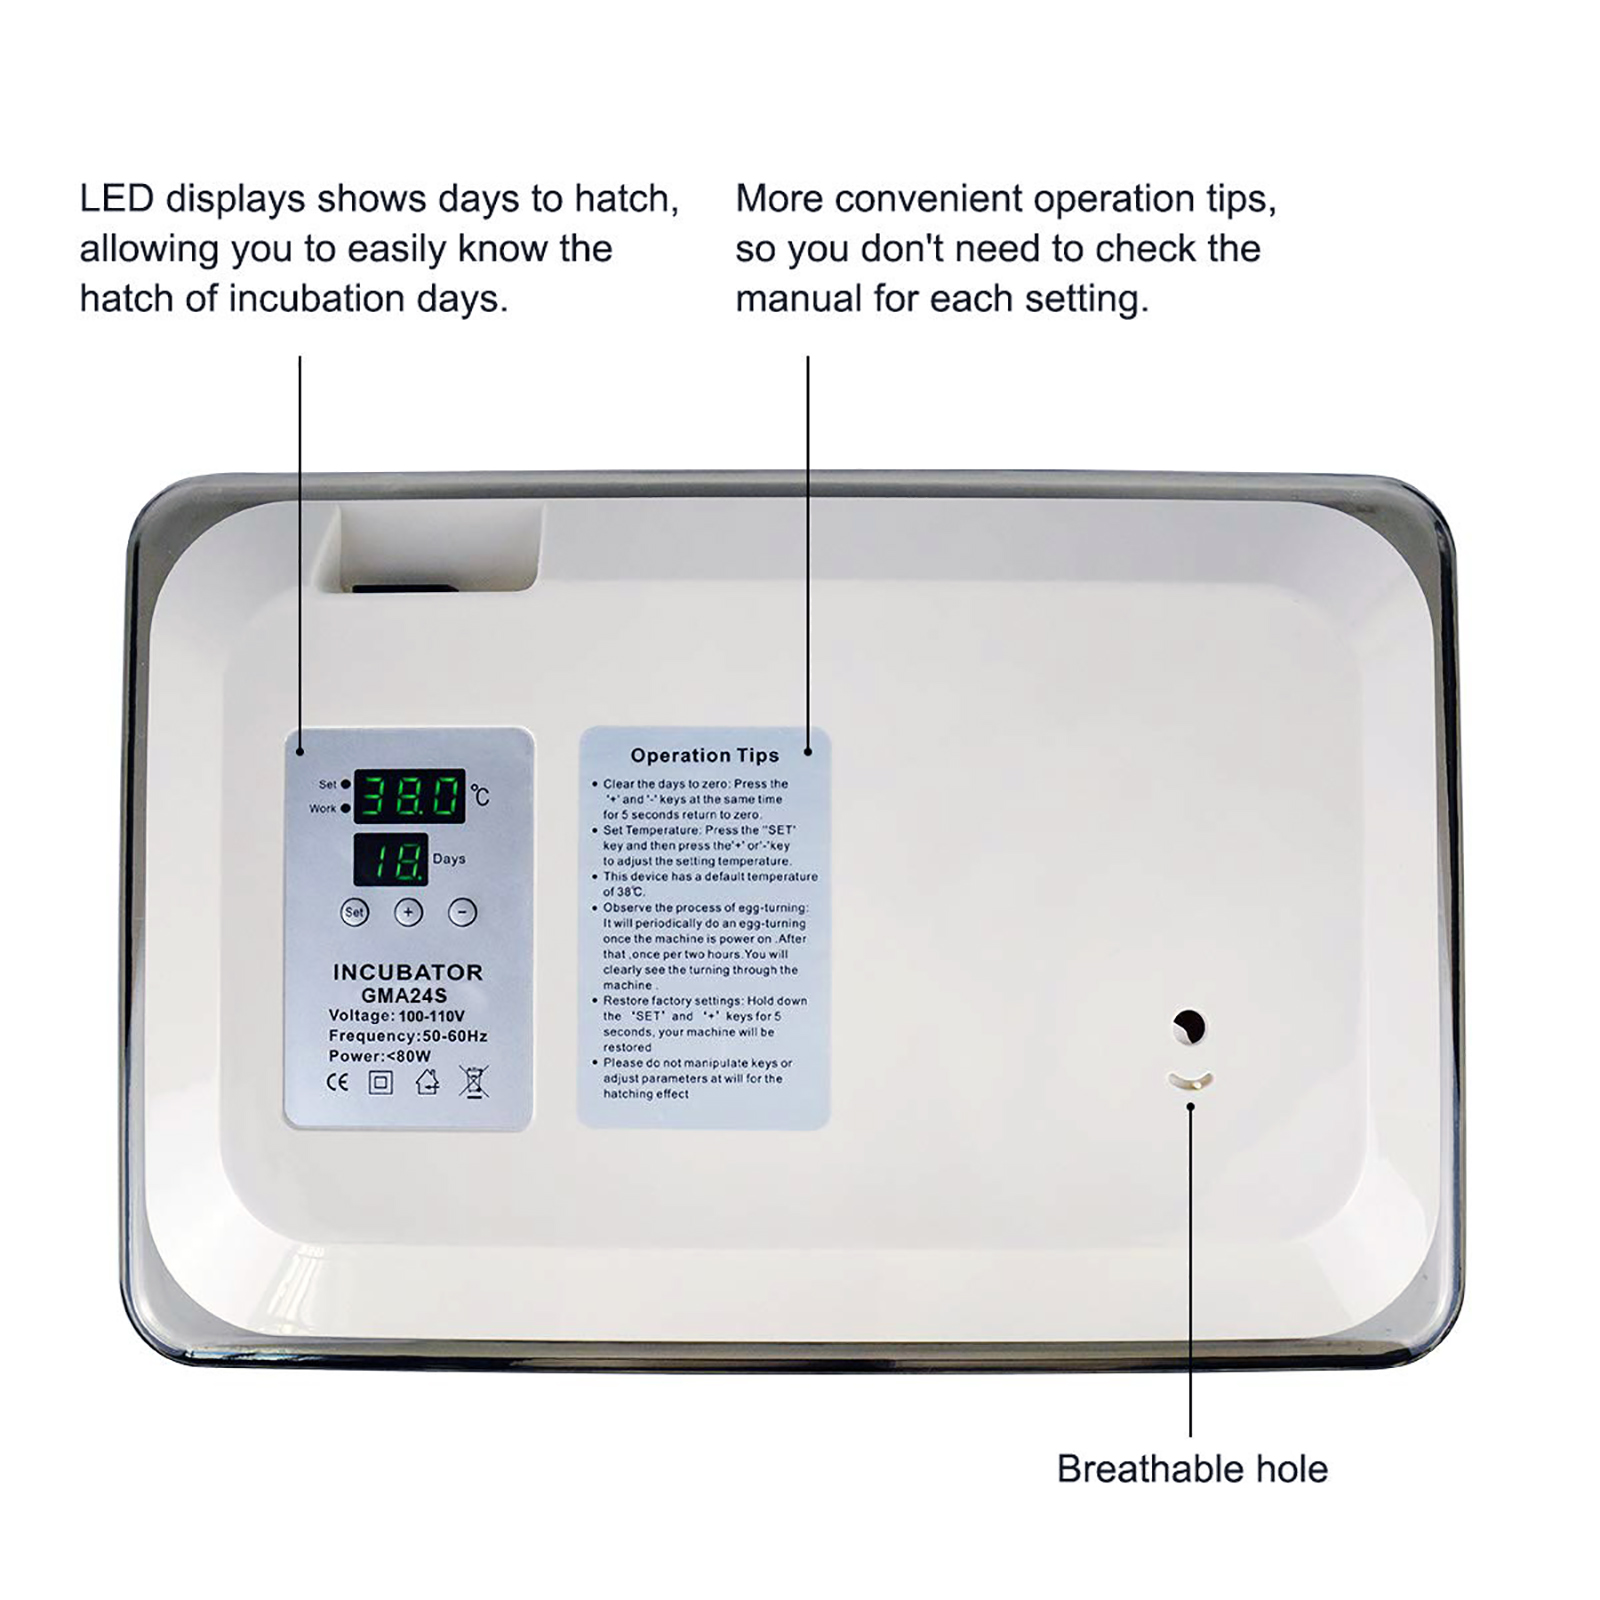
Fully Automatic Egg Incubator with Led Candler
If you're looking for an incubator with Led Candle, the ESTINL Egg Incubator Advanced Combo Kit is the most advised for you. It includes an automatic egg turner, and you'll notice that it's responsible for turning the eggs every 2 hours.
Additionally, it also comes with a thermostat and a hygrometer for measuring the temperature and the humidity. It also includes batteries to operate the device, which is rare in many of the products.
Design & Materials
Regarding the design, it features a styrofoam material that keeps the heat packed into the incubator. And the styrofoam is thick and protective of all the eggs throughout the device.
Styrofoam is great for use in incubators because it increases the amount of insulation that the device has, allowing it to keep the heat packed in tight, decreasing the egg-hatching time. Because of the protective and heat-retaining construction, this incubator is recommended for those of you with more experience in the egg-hatching industry.
Pros:
- Temperature controlling
- The digital incubator automatically rotates the eggs every 2 hours
- The led display enables temperature setting
Cons:
- Features an enclosed design, making it difficult to see the eggs inside
Best Automatic Egg Hatcher Incubator
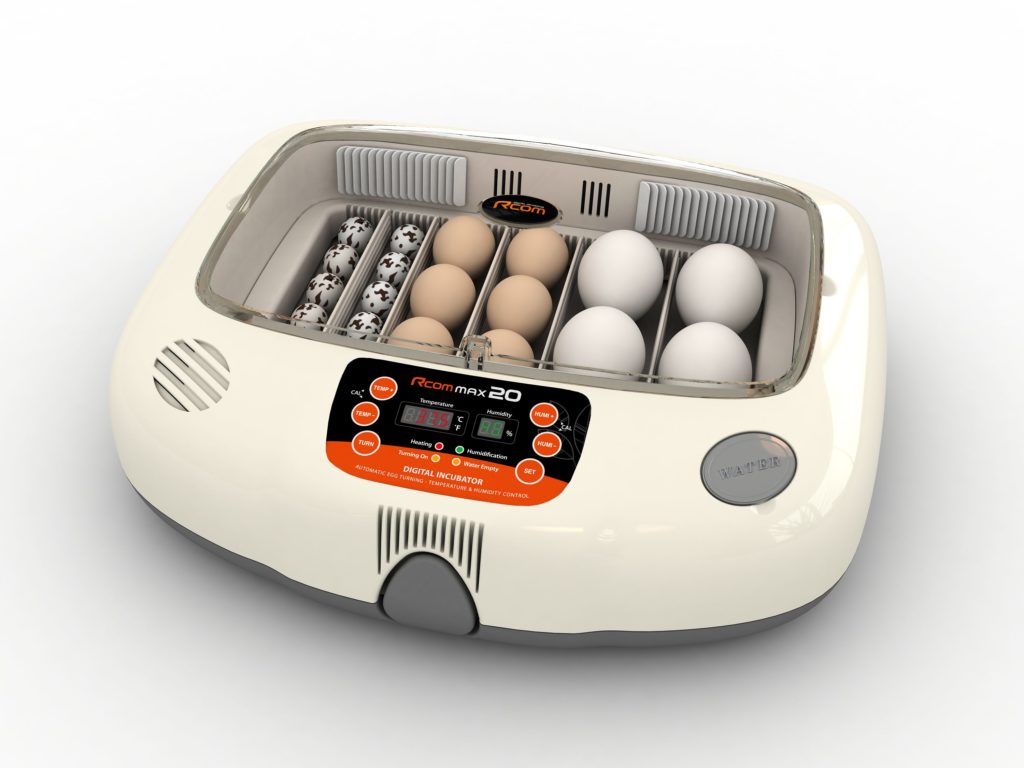
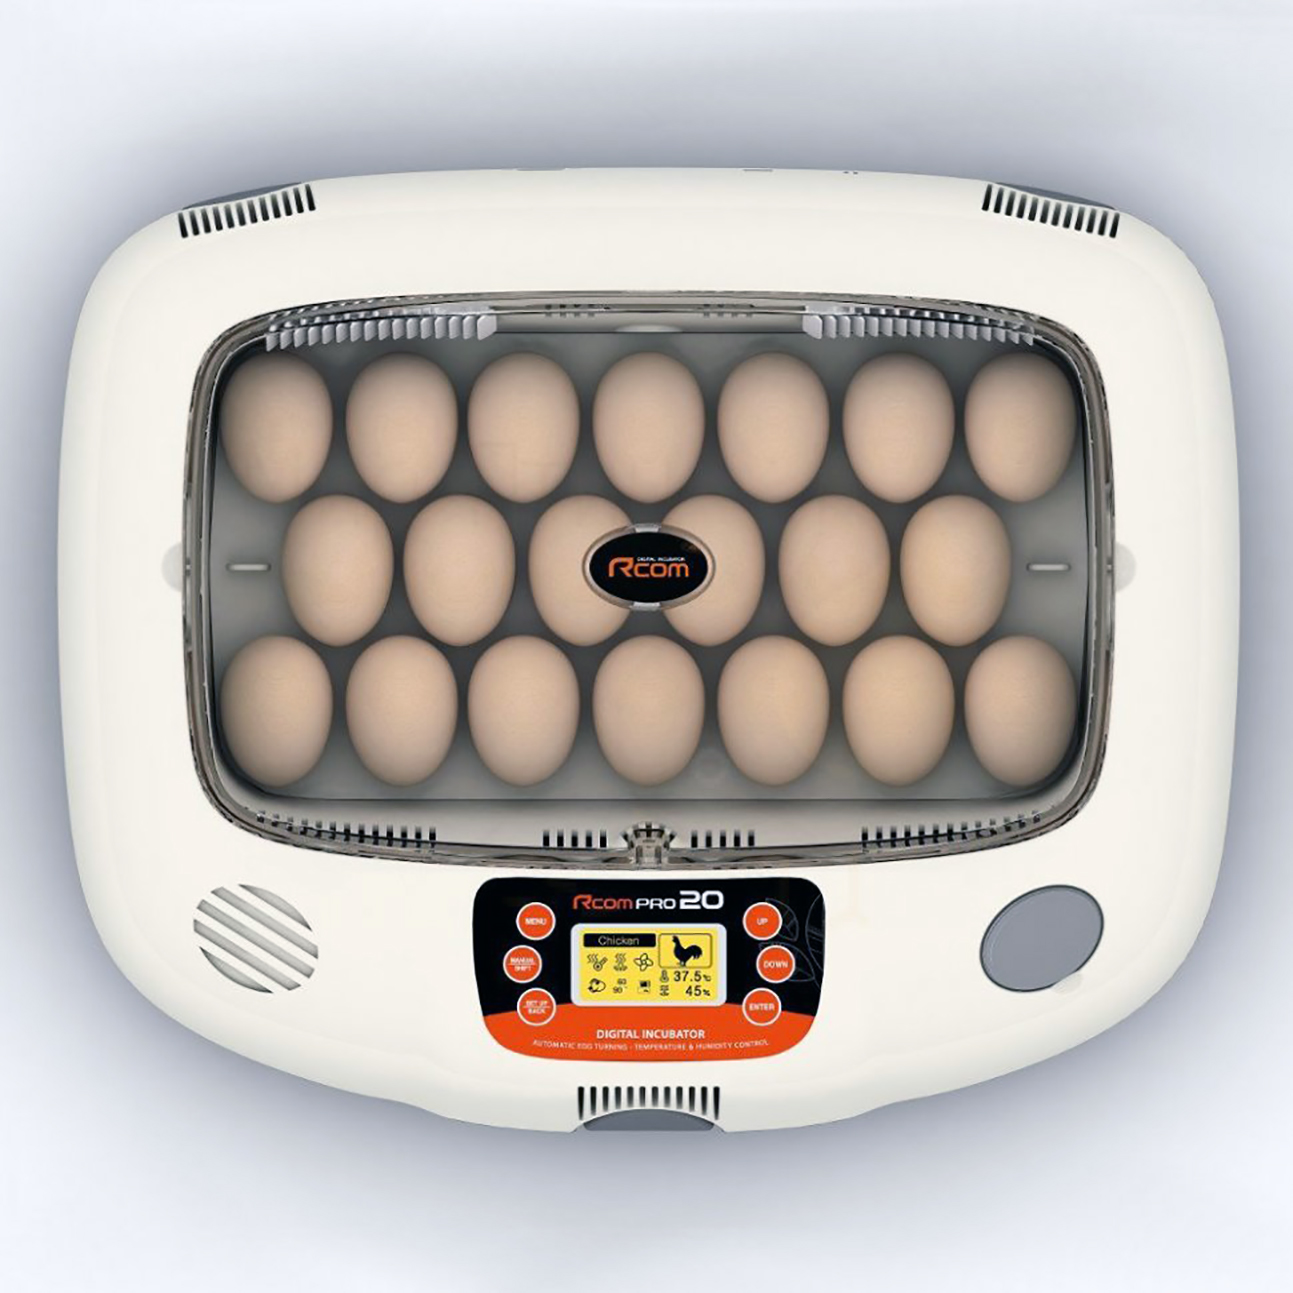
RCOM Max 20 Fully AUTOMATIC Digital Egg INCUBATOR
Comes with a Universal chicken tray adaptable for the smallest up to Emu size eggs, the R-Com RCOM Max 20 MX20 Incubator is suggested for those of you need to maintain a larger number of eggs on a budget. It's capable of carrying 20 eggs, which you'll find the overall construction capable of doing so safely.
The device itself comes with an LED screen to display the temperature ranges for you as well as the humidity, egg turning times and even the hatching date. It's all developed on a computer-controlled system, so you can trust the reliability of the incubator overall.
Design & Materials
It's also one of the most versatile incubators because it features a deep egg tray that can hold eggs in a variety of different sizes. This is rare for most incubators since their egg trays are only so large.
Because of the deep egg tray design as well as the large egg capacity, this RCOM incubator is recommended for anyone needing a reliable and convenient egg-hatching incubator at an affordable rate.
Pros:
- The most reliable
- Universal chicken tray adaptable
- Comes with a computer-controlled system for accurate results
Cons:
- Not the most affordable
Best Digital Circulated Air Incubator
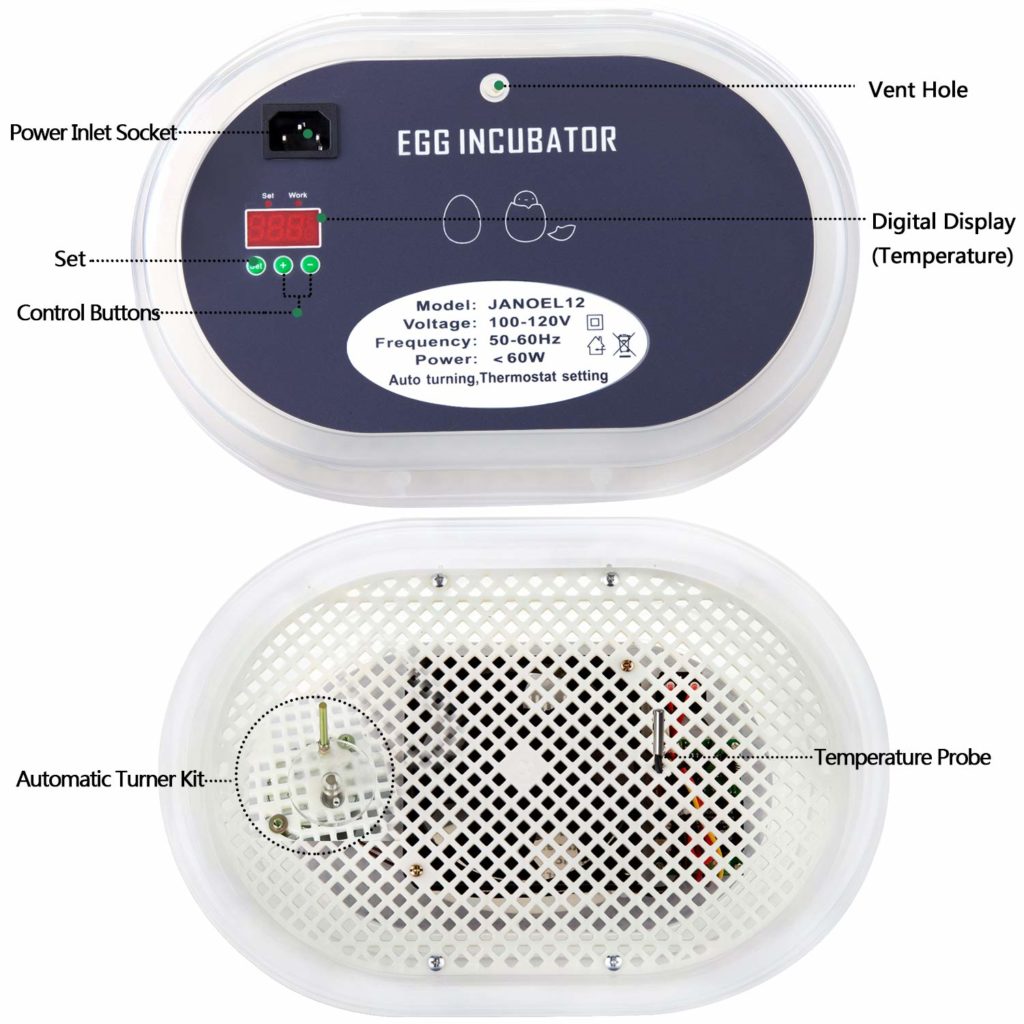
Magicfly Eggs Incubators for Hatching Chickens Eggs
Classified as the best overall incubator, the Farm Innovators Digital Circulated Air Incubator is suitable for both beginners and more advanced individuals. You'll first notice the durable construction that the device offers overall, and it's also capable of holding a larger number of eggs than most standard incubators.
Additionally, it comes with an egg turner that turns the eggs every four hours, ensuring an even heat distribution. And it features a large window, easy-to-read digital display as well as an integrated fan to circulate the heated air throughout the ABS plastic design.
Design & Materials
Offering great versatile features, this incubator comes with an egg tray that has deep divots. With that, you can fit a wider variety of different eggs into the incubator.
Lastly, the durable ABS plastic design is able to be placed practically anywhere, since it can provide full protection for your eggs. There's even a heated mat that it comes with, so it's recommended for people that are planning on caring for the eggs even after they hatch.
Pros:
- Constructed with a strong ABS plastic
- Includes a heated mat
- Features a deep egg tray for various different bird eggs
Cons:
- Only displays the temperature ranges if it's too high or low, so you can't see the exact temperature
Best cheap Egg Incubator
HBlife 9-12 Digital cheap for Chicken Eggs
The HBlife Digital Fully Automatic Egg Incubator is great for it's large, durable and protective construction. It features a transparent outer encasing that gives you the ability to see all of the eggs inside of the device.
It even has automatic temperature control as well as an automatic egg tuner included within the device. You don't even have to remove the egg turner since the device turns that function off three days before the hatch date is expected.
Design & Materials
It's specifically made with a PP and ABS plastic material that can withstand practically any wear and tear. That being said, you don't have to worry about any punctures or impacts breaking through the design.
Given the large and protective design of this incubator over the others, it's most recommended for people that have birds with larger eggs or simply ones that need a more protected environment.
Pros:
- Suitable for a variety of different-sized eggs
- COMPACT DESIGN
- Approved by C-tick, CE and Rohs
Cons:
- Weighs the most out of all the incubators on this list
Top Rater Small 6 Egg Incubator
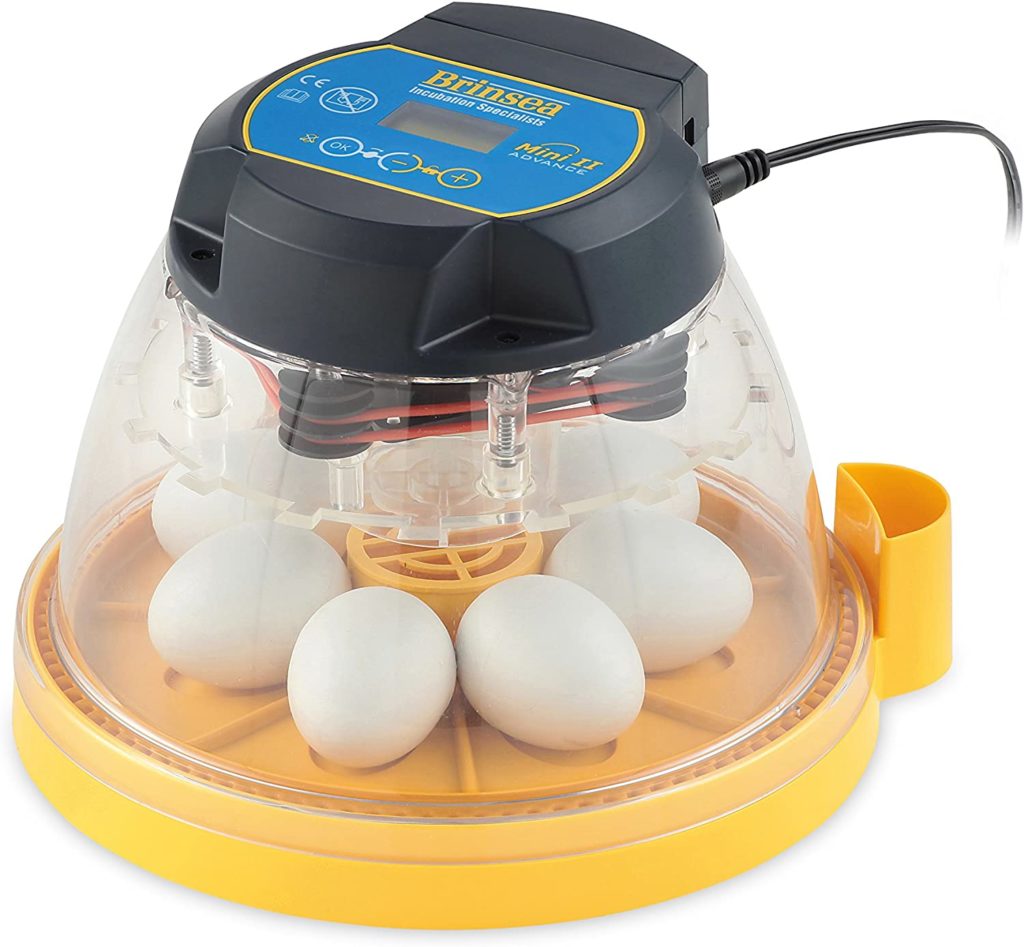

Brinsea Products Mini II Advance Automatic 7 Egg Incubator
After receiving this Brinsea Mini Incubator in the mail, you'll notice the relatively small size of the design compared to the others on this list. It's only capable of housing up to seven eggs, which is the smallest number of eggs on this list. Since you have such a smaller display with this incubator, you have the ability to more easily monitor each of the eggs closely.
Design & Materials
It comes with a hatching mat that you can use for when the eggs hatch since it's heated to keep the birds warm still. And it even comes with a programmable automatic egg turning feature that you can control to turn the eggs to the certain times you request.
Considering it's the smallest and most compact design, it's recommend for those of you that have a smaller number of eggs to watch over. It's the most lightweight and portable design, so you can more closely monitor a smaller number of eggs without having to risk one of the eggs not turning out right.
Pros:
- Lightweight, portable and compact design
- Offers great visibility
- Easy to clean and maintain the sanitary plastic material
Cons:
- Not suitable for larger eggs or high numbers of eggs
Incubating your Poultry Eggs
Caring for Eggs Pre-incubation

It is a common assumption that hatching eggs should be put straight into an incubator as soon as they arrive in the post or as soon as you collect them from the hen, or else they will go off. This is not true and in fact by doing so you will actually be reducing your chances of hatching the eggs successfully.
Especially if the eggs for hatching have been shipped to you it is extremely important to place the large end up in a clean egg carton. This will allow their air bubbles to stabilize and move back to their proper places at the large end of the egg. For best results, you should leave the eggs to stabilize for about twelve hours. Eggs should always be stored with the pointed end pointing downwards as the egg is actually damaged if it is stored with the round end down for any length of time.
However, you should not store the eggs for more than 7 days (in total so be aware of the age of your eggs on delivery) after they have been laid as hatchability reduces significantly thereafter. Eggs should always be stored in a cool area that is slightly humid and definitely away from sunlight. Again they must be stored with the pointed end down.
You should also turn the eggs regularly while they are being stored, as well as during the incubation period. You can do this in the morning and evening, a simple way to do it is to tilt the egg boxes in a different direction each time. Incubation time. You can do it in the morning and evening, the simple way to do it is to tilt the egg boxes in a different direction each time.
Prepare your poultry eggs for incubation
A lot of people imagine that it is essential to get eggs for hatching into the incubator as soon as you get hold of them. However, this is not correct, especially if they have been shipped to you, as even with the best carriers the eggs will have been shaken about a bit during the journey. Therefore it is essential that you allow the eggs for hatching to stabilize. You should therefore place your hatching eggs large end up in a clean egg carton, which will allow their air bubbles to move back in place at the large end of the egg. For best results, leave them to stabilize for about twelve hours. Ideally, they should be kept in a room where the temperature is around 50o F (10 C) and the relative humidity is 70 to 80 percent. If the temperatures are below 40o F (4 C) this is likely to reduce hatchability. Most normal room temperatures will be too hot and it is worth noting that embryos will begin to develop at subnormal rates when the temperature reaches about 80o F (27 C) and will not survive.
Prepare your incubator properly
While the hatching eggs are stabilizing you should set up your incubator and get it running at the correct temperature and humidity before placing the eggs inside. It is essential that the temperature is correct before the eggs go in. If the incubator does not come with an accurate thermometer then you will need to purchase one separately, the same goes for a hygrometer (which measures the humidity).
Your incubator should be set up ideally in a room in which the temperature is between 70o and 75o F (21 and 24 C), and which is free from drafts and excessive variations in temperature, so be careful with radiators or similar heating. Do not place the incubator near windows or where it will be exposed to the direct rays of the sun, as the sun's rays may raise the temperature so much that the eggs will be cooked.
Adding the poultry eggs
The temperature will immediately drop when you add the eggs, not just because you have opened the lid but because the eggs will be a good twenty degrees cooler than the inside of the incubator. However DO NOT adjust the thermostat to compensate, as if you are using a manual incubator you may well finish up cooking the eggs. Wait instead for about four hours and if the temperature is still low make as tiny an adjustment as you can manage and watch for a while to check it has not made it too hot. This is especially important if you are using one of the popular manual styrofoam incubators where the smallest of adjustments can make a large change. Automatic incubators will adjust and monitor the temperature for you.
Eggs must be turned while in the incubator, so before you put in the eggs mark them with a pencil so you can tell when they have been properly turned. If you have an incubator with an automatic turner this will be done for you. An excellent method is to put an X on one side of the egg and an 0 on the opposite side. Then you can always tell when the eggs have been turned because either all '0² 's or all 'Xs will be facing up at the same time.
The Importance of a good thermometer and hygrometer
As noted above it can be difficult to get temperature right with some of the manual incubators, so a good thermometer is essential. Most cheaper incubators come with a small thermometer but we recommend that you use a second one just to be sure, as thermometers can vary greatly in inaccuracy. If you do not have a hygrometer it might be a good idea to get a thermometer/hygrometer combination, since humidity levels are also vital for successful hatching. If humidity is too high, the chicks can drown when they try to pip the shell. If it is too low, they can get stuck to the egg membrane, effectively shrink-wrapped and trapped inside the egg.
A temperature of just one degree out can cause your eggs to fail to hatch, or if they do hatch the chicks will be very frail and may not survive. However, don't worry if the temperature is not correct for a few hours you should get away with this.
N.B If during incubation you notice a bad smell coming from your eggs, find the bad egg, and remove it quickly before it explodes and contaminates the others and your incubator.
Quick Tips for Hatching Poultry Eggs
Here are some quick tips for getting the best results when incubating and hatching poultry eggs.
Incubate or set at least six eggs
Don't set or try to incubate less than six eggs at a time. You are unlikely to have a 100% hatching rate, in fact if they are shipped it may be as low as 50%. You may finish up hatching only one chick and since chickens are flock animals they need others around them or they will be miserable and can even die of loneliness. Remember that half or more of those hatched may be males, which may not be what you want.
Make sure the incubator is at the right temperature and humidity levels are correct
Plug your incubator in before putting your eggs in and ensure that it reaches a steady 99.5 degrees fahrenheit (37.5 centigrade) if it is a forced-air incubator, or 101.5 degrees (39.2 centigrade) if it is a still-air incubator. Still-air incubator temperature needs to be higher because the non-moving air inside the incubator rests in layers, which will be cooler at the bottom of the incubator and warmer at the top. You should use a thermometer and a hygrometer (which measures humidity) if your incubator does not have ones built-in. Always measure the temperature at the top of the egg. Humidity should be 45-50% for days 1-18, then 70-80% for the last few days. However always read the instructions that come with your incubator.
Open the incubator as little as possible
Try not to be tempted to open your incubator as warmth is quickly lost and it should be especially avoided during hatching. Opening the incubator during hatching will also let out humidity and increase the chances that late hatchers will get stuck to the shell and be unable to escape.
Mark and turn your eggs
Eggs should be turned at least three times a day, always an odd number of times, otherwise they will not hatch or you will get deformed chickens. Mark eggs, using a pencil, with an X on one side as it is easy to lose track of which have been turned. Obviously if you have an incubator with an automatic turner so much the better. Hands should always be clean before touching eggs to avoid transferring bacteria.
Eggs should only be turned up to day 18, after that they should be left to allow the chick to position itself properly for hatching.
When eggs for hatching are put in the incubator,they should be laid on their sides and turned at least three times a day. Turning prevents the embryo from sticking to the shell membrane as it will do if it is left in one position for too long. Good results can be obtained by turning the eggs first thing in the morning, then again just after noon and last thing at night. However ideally you would turn your eggs more than three times a day. If you buy an incubator with an automatic turning mechanism this will be done for you and save you a lot of time. If you work full-time away from home you will have to use an automatic egg turner, or if you expect to be away from home for more than a few hours during the first 17 days of incubation.
The important thing is that the eggs should be turned an odd number of times so that the side that is up longest will be staggered from day-to-day. Otherwise the egg will be in the same position every night, which is likely to be the longest stretch of time between turns, assuming you are not going to get up in the middle of the night.
Before you put your eggs in the incubator mark them with a pencil so you can tell when they have been properly turned. An excellent method is to put an X on one side of the egg and an 0 on the opposite side. Then you can always tell when the eggs have been turned, because either all '0² 's or all 'Xs will be facing up at the same time.
When you turn the eggs, move them to a different part of the tray to offset variations in temperature in the different parts of the incubator. Eggs should only be turned up to day 18, after that they should be left to allow the chick to position itself properly for hatching.
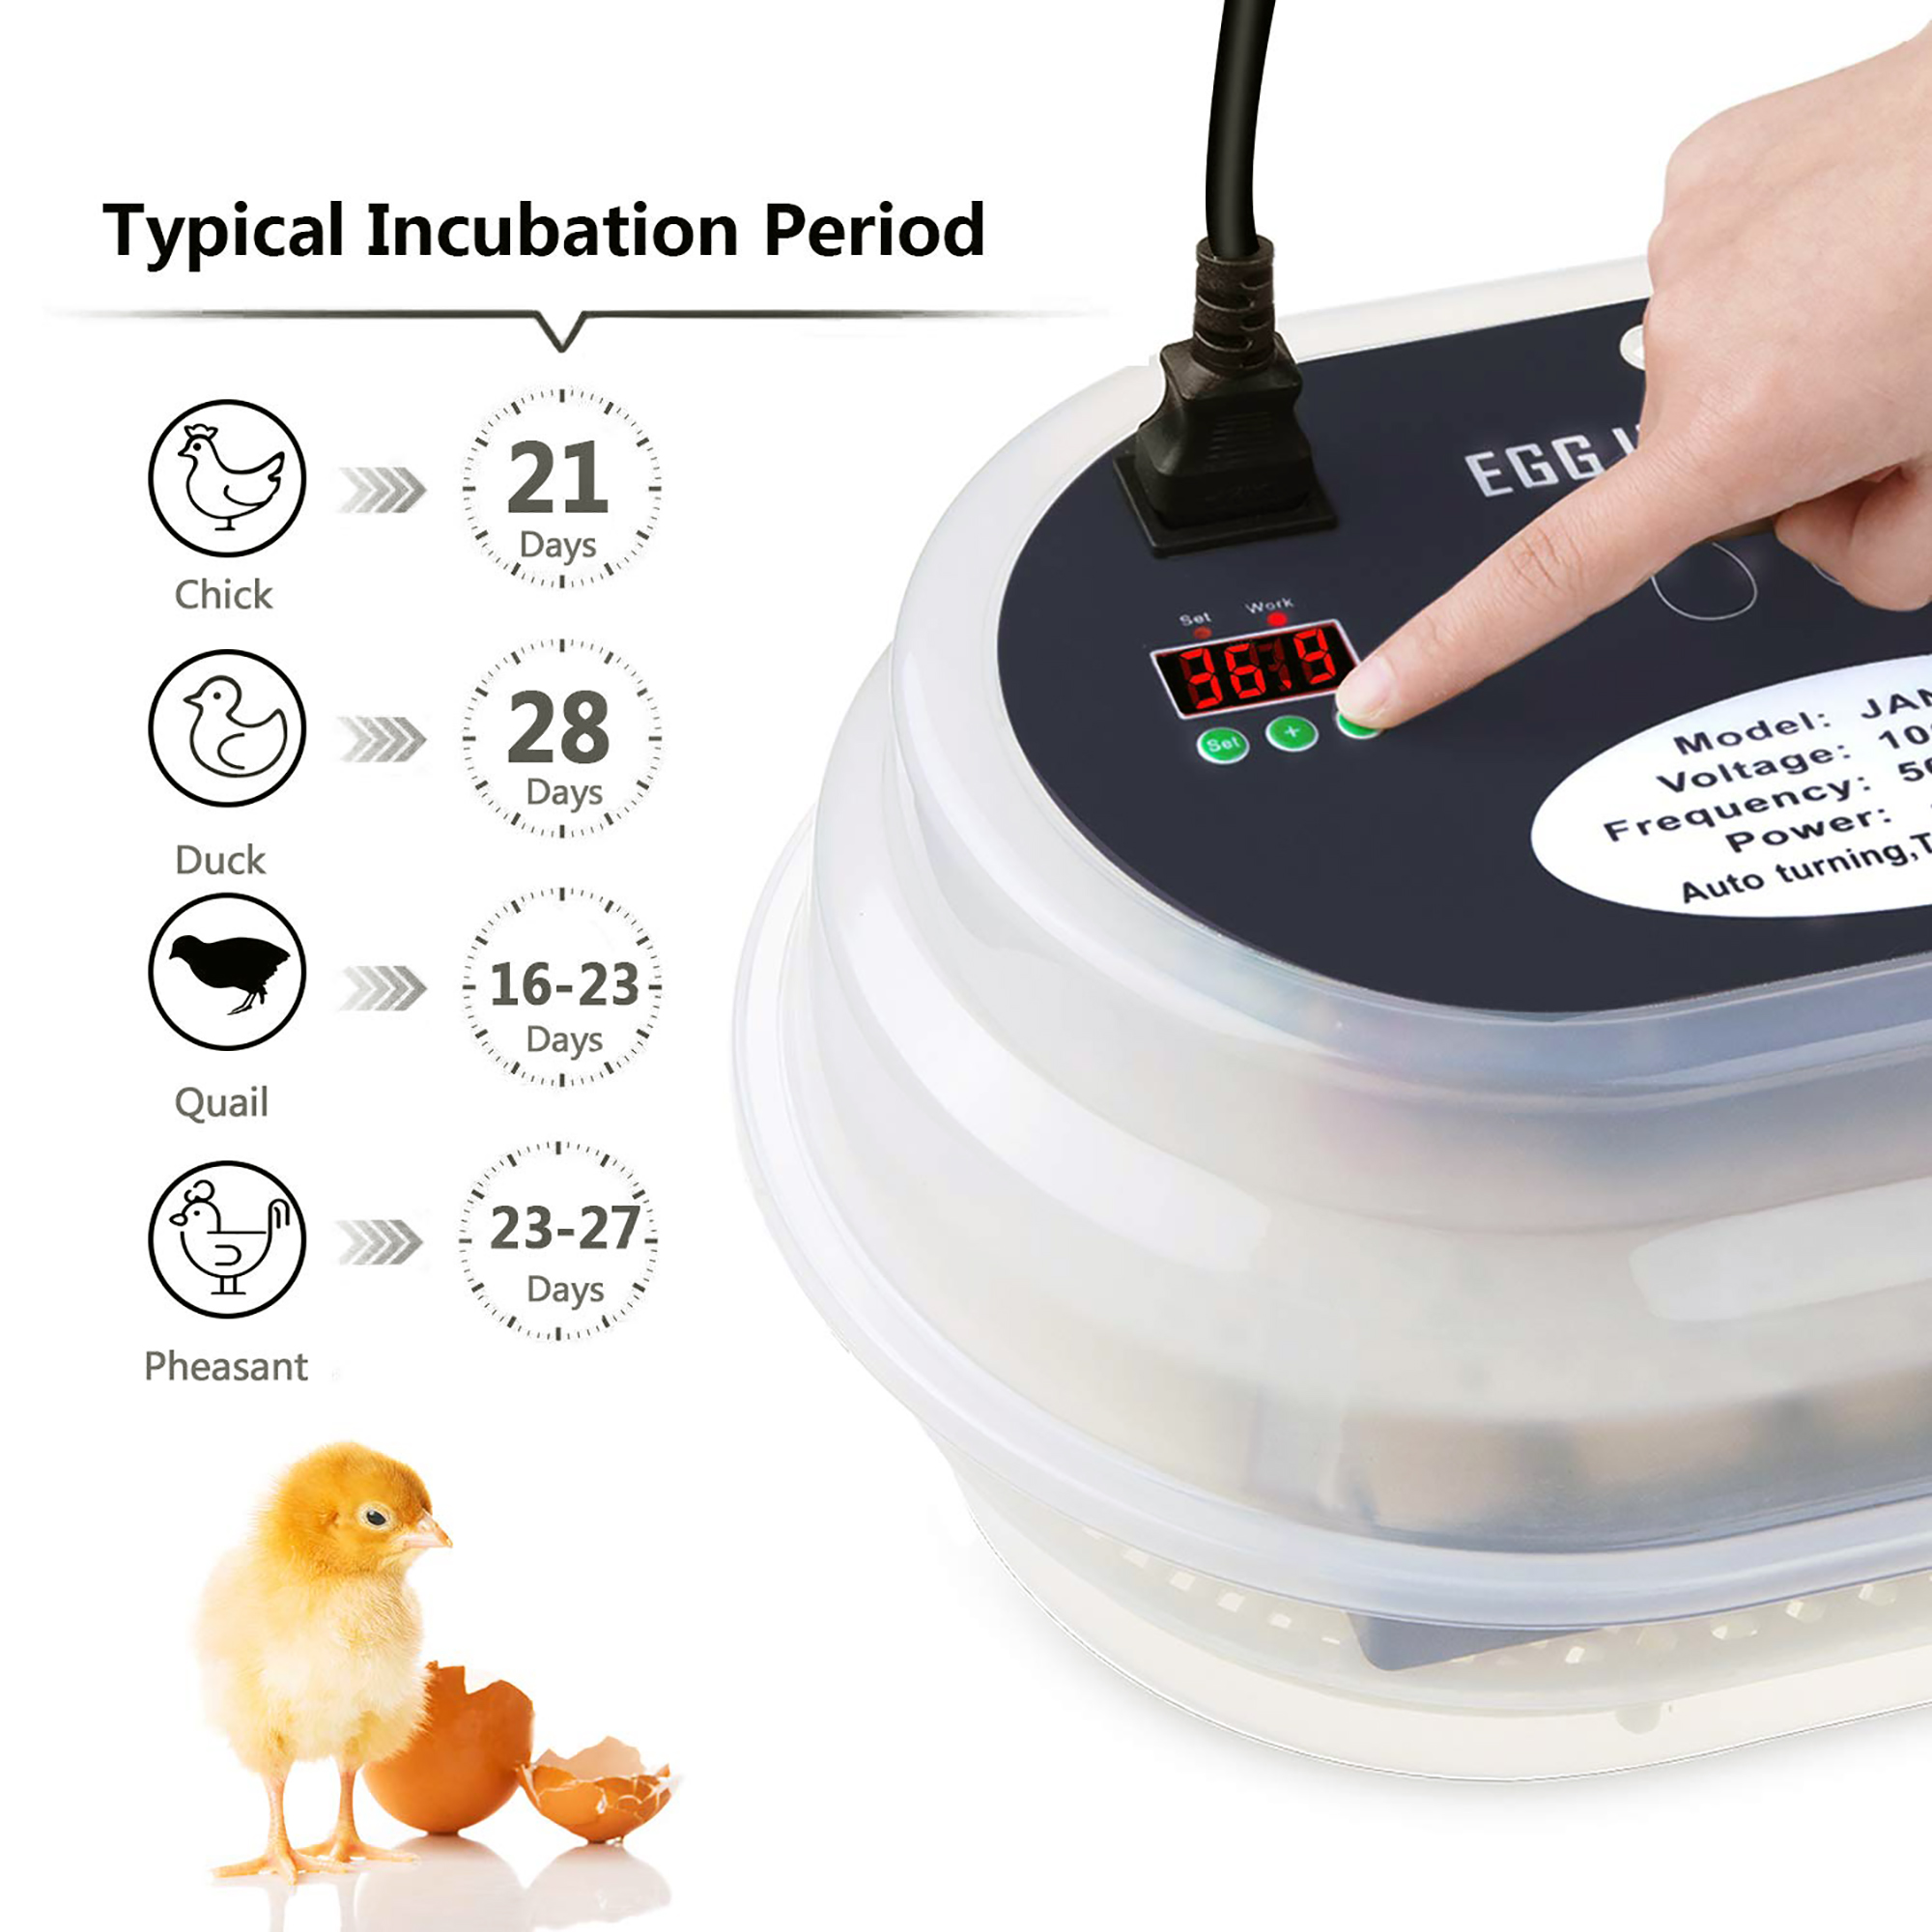
Hatching days
If you are hatching chicken eggs they take twenty-one days to hatch when incubated at optimal temperature. However do allow an extra couple of days before discarding any unhatched eggs as there are always exceptions.
Don't try to help the chick out
Once you see a pip (hole or crack) in the shell, don't worry if it takes the chick a while to get out and it appears to be struggling, this is natural. Never try to help by pulling the shell off on your own as a chick can bleed to death as often there are still blood vessels around parts of the membrane that have not yet been cut off. It is normal for a chick to take on average five or seven hours, to emerge from its shell and even up to twenty-four hours is not uncommon.
Power failure or interruptions during egg incubation
Power failure during incubation can be a worry especially if you live in an area that is prone to power supply problems or sudden severe weather conditions. Correct temperature control and related humidity is of course vital to successful chick hatching, but if you do experience a power failure do not immediately scrap the batch of hatching eggs as most times you can save them. Although it is not advisable chick embryos have been known to survive temperatures of below 90°F for up to 20 hours
The important thing is to keep the eggs as warm as possible until the power returns. You can do this by wrapping blankets around the incubator to keep the heat in, ensuring of course that you allow some air through, otherwise you will suffocate the embryos.
If the power is to be out for a while another method that can be used, if you have a small or medium-sized incubator is to cover the incubator with a box, inside the box you can place candles in jars. The candles should produce enough heat to maintain the correct temperature until the power returns. The box can also be wrapped in a blanket for extra warmth. Again ventilation is important so ensure that you leave plenty of air holes. In addition care should be taken to ensure that the jars, with the lit candles are well away from anything inflammable, or the side of the box. Also be vigilant that the candles do not burn too low or in any way produce too much smoke.
Of course the best solution is to have a backup generator or an electrical socket that can be attached to your car battery which the incubator can be plugged into.
Candle the eggs 4 to 6 days after the power has returned to check that development is proceeding. If you do not see any signs of life or the embryo has not developed or of course if an egg has a bad odor you should dispose of it. In general, you should expect a power failure to delay hatching by a couple of days and also reduce your hatch rate.
Advantages and Disadvantages of Using a Broody Hen to Hatch Eggs

There is nothing better than seeing chicks looking out from underneath a mother hen or diving back beneath her for safety and warmth, just as nature intended. However finding a broody hen and successfully hatching eggs may not be as easy as it sounds. Here is a quick look at the advantages and disadvantages of using a broody hen to hatch eggs.
The advantages of the Broody Hen
- The broody hen is usually more successful in hatching eggs than an incubator.
- You don't have to worry about power-cuts.
- You don't have to worry about keeping the settings of your incubator right or about turning eggs.
The disadvantages of the Broody Hen
- You don't always have a broody hen when you need one, or hatching eggs for a broody hen when do.
- You cannot hatch as many chicks under a broody hen as you can with an incubator.
- You need to provide a house and a run for a broody hen for quite a long time during the incubation and rearing process, even if you only hatch one chick.
Incubation with a broody hen has better hatching results and takes a lot of the effort out of the process. But an incubator will give you more flexibility with regard to when and by how much you increase your flock.
Read More from prestigequeen.com :
- Incubating & Hatching Eggs
- How to make an egg incubator?
- Everything you ever wanted to know about Eggs
- The best chicken BROODER box & heater
- Best Egg laying Chicken Breeds
Where can i buy a chicken incubator?
What is best hatch chicks incubators?
References:
- Egg incubation – en.wikipedia.org
- Incubator (egg) – en.wikipedia.org
- Poultry farming – en.wikipedia.org
Contents
Great job! Thanks Jennifer
i would choose HovaBator Advanced Egg Incubator Combo Kit
he is good
HovaBator is good
what are the best chicken egg incubators?
10 best
where can i buy a chicken incubator?
you can buy in the online store
where can i buy a chicken incubator?
You can buy by clicking on the link on Amazon
Why not Rcom?
it is expensive
i bought Farm Innovators. he is good
Like!! Thank you for publishing this awesome article.
Fully Automatic Egg Incubator – Maintains the temperature precise as well as has an alarm if the temperature level drops. Up until now this little device has a 100% success proportion. would certainly suggest this incubator for anybody wanting to hatch a smaller sized batch of eggs.
I EXTREMELY suggest Harris Farms Nurture Right Incubator. I’ve used 2 different incubator for 2 years before this. My success price was all over the board until this set! With the support ideal incubator I really did not have to adjust the temperature or moisture nearly as long as the previous brands I’ve used. I put 22 eggs in. I candled at day 14 as well as had 2 quitters and 1 non abundant. And I hatched the continuing to be 18! The chicks appeared to hatch out less complicated and also better due to the fact that the moisture is managed better with adding water outside. EASY to clean afterwards contrasted to the styrofoam ones. LOVE THIS. Would extremely advise to anyone!
Cheap Egg Incubator with Led Candler
I got this as a Christmas existing to me so I can movie a How-to video clip on hatching Chicks and after concerning a month of looking into models in this rate range I picked this & so far I am impressed with it. It’s quiet and also seems to function smoothly. Like other Users, I likewise maintained the Styrofoam box it comes in since with it being Wintertime in a breezy residence I want the best problems possible for the eggs and also the box REALLY aids hold heat.
I reproduce Silkies & Titan Cochins as Program Hens and I have a “yard selection” of poultries also so I will certainly be hatching a selection of Chicks with various egg sizes for this job starting following week. I just got it the other day as well as it did terrific on the 24-hour trial run. It works in Celsius so aside from needing to seek advice from Alexa on temp conversions it’s extremely easy to run up until now.
The guideline brochure is extremely practical. Yet I admit I had to ask my spouse to figure it out for me and the two people with each other did get it identified within a couple of minutes. it’s actually VERY simple to establish as soon as you understand it. The booklet itself consists of a wealth of info & images that a Beginner with Incubators will certainly discover extremely helpful. I myself have never utilized one before, I have a couple of Broody Hens however because I require to boost my production of Silkies & Cochins prior to Spring this was the logical selection as well as I am recording it every step of the means, fails & all
I will certainly be back to upgrade on this throughout the procedure and will adjust the rating if need be.
UPDATE:
I get on Day 3 with my eggs. I mixed a few Silkies eggs with my backyard mix of Jersey Giants/ Mille Fleur Belgian Bearded d’Uccle Bantam eggs, my Jacket Titan & her companion the Mille Fluer make gorgeous infants so I’m going to go for range with this initial set. Several of the eggs I am utilizing are HUGE so they used up a lot of room as well as I only got to utilize 9 total amount.
It’s easy so far and the device does every one of the job yet I have to include the water which is sort of a pain while I am figuring it out since it’s a task to really see just how much water it still has in there as well as exactly how fast it’s vaporizing as well as moving the entire point to get a look would certainly be too much. My fault, I ought to have tested every one of that on my examination week & I really did not. Lesson discovered! Did I point out that the candler works GREAT
I love the fact that it maintains the temp best as well as moisture fluctuates extremely little, normally constantly perfect! The egg turner makes this a fussfree piece of equipment. I have 18 days as well as can not wait to with any luck have a number of new chickies! I qas puzzled by the blinking temp light, but that just indicates it precisely the temperature level.